> ## Documentation Index
> Fetch the complete documentation index at: https://docs.overlap.ai/llms.txt
> Use this file to discover all available pages before exploring further.
# Editing
> Open a clip in Studio to refine timing, text, subtitles, and finishing touches before you export or share it.
## Opening Studio
There are two common ways to open Studio, depending on whether you are editing an existing clip or starting a brand-new project.
### Option 1: Edit an existing clip
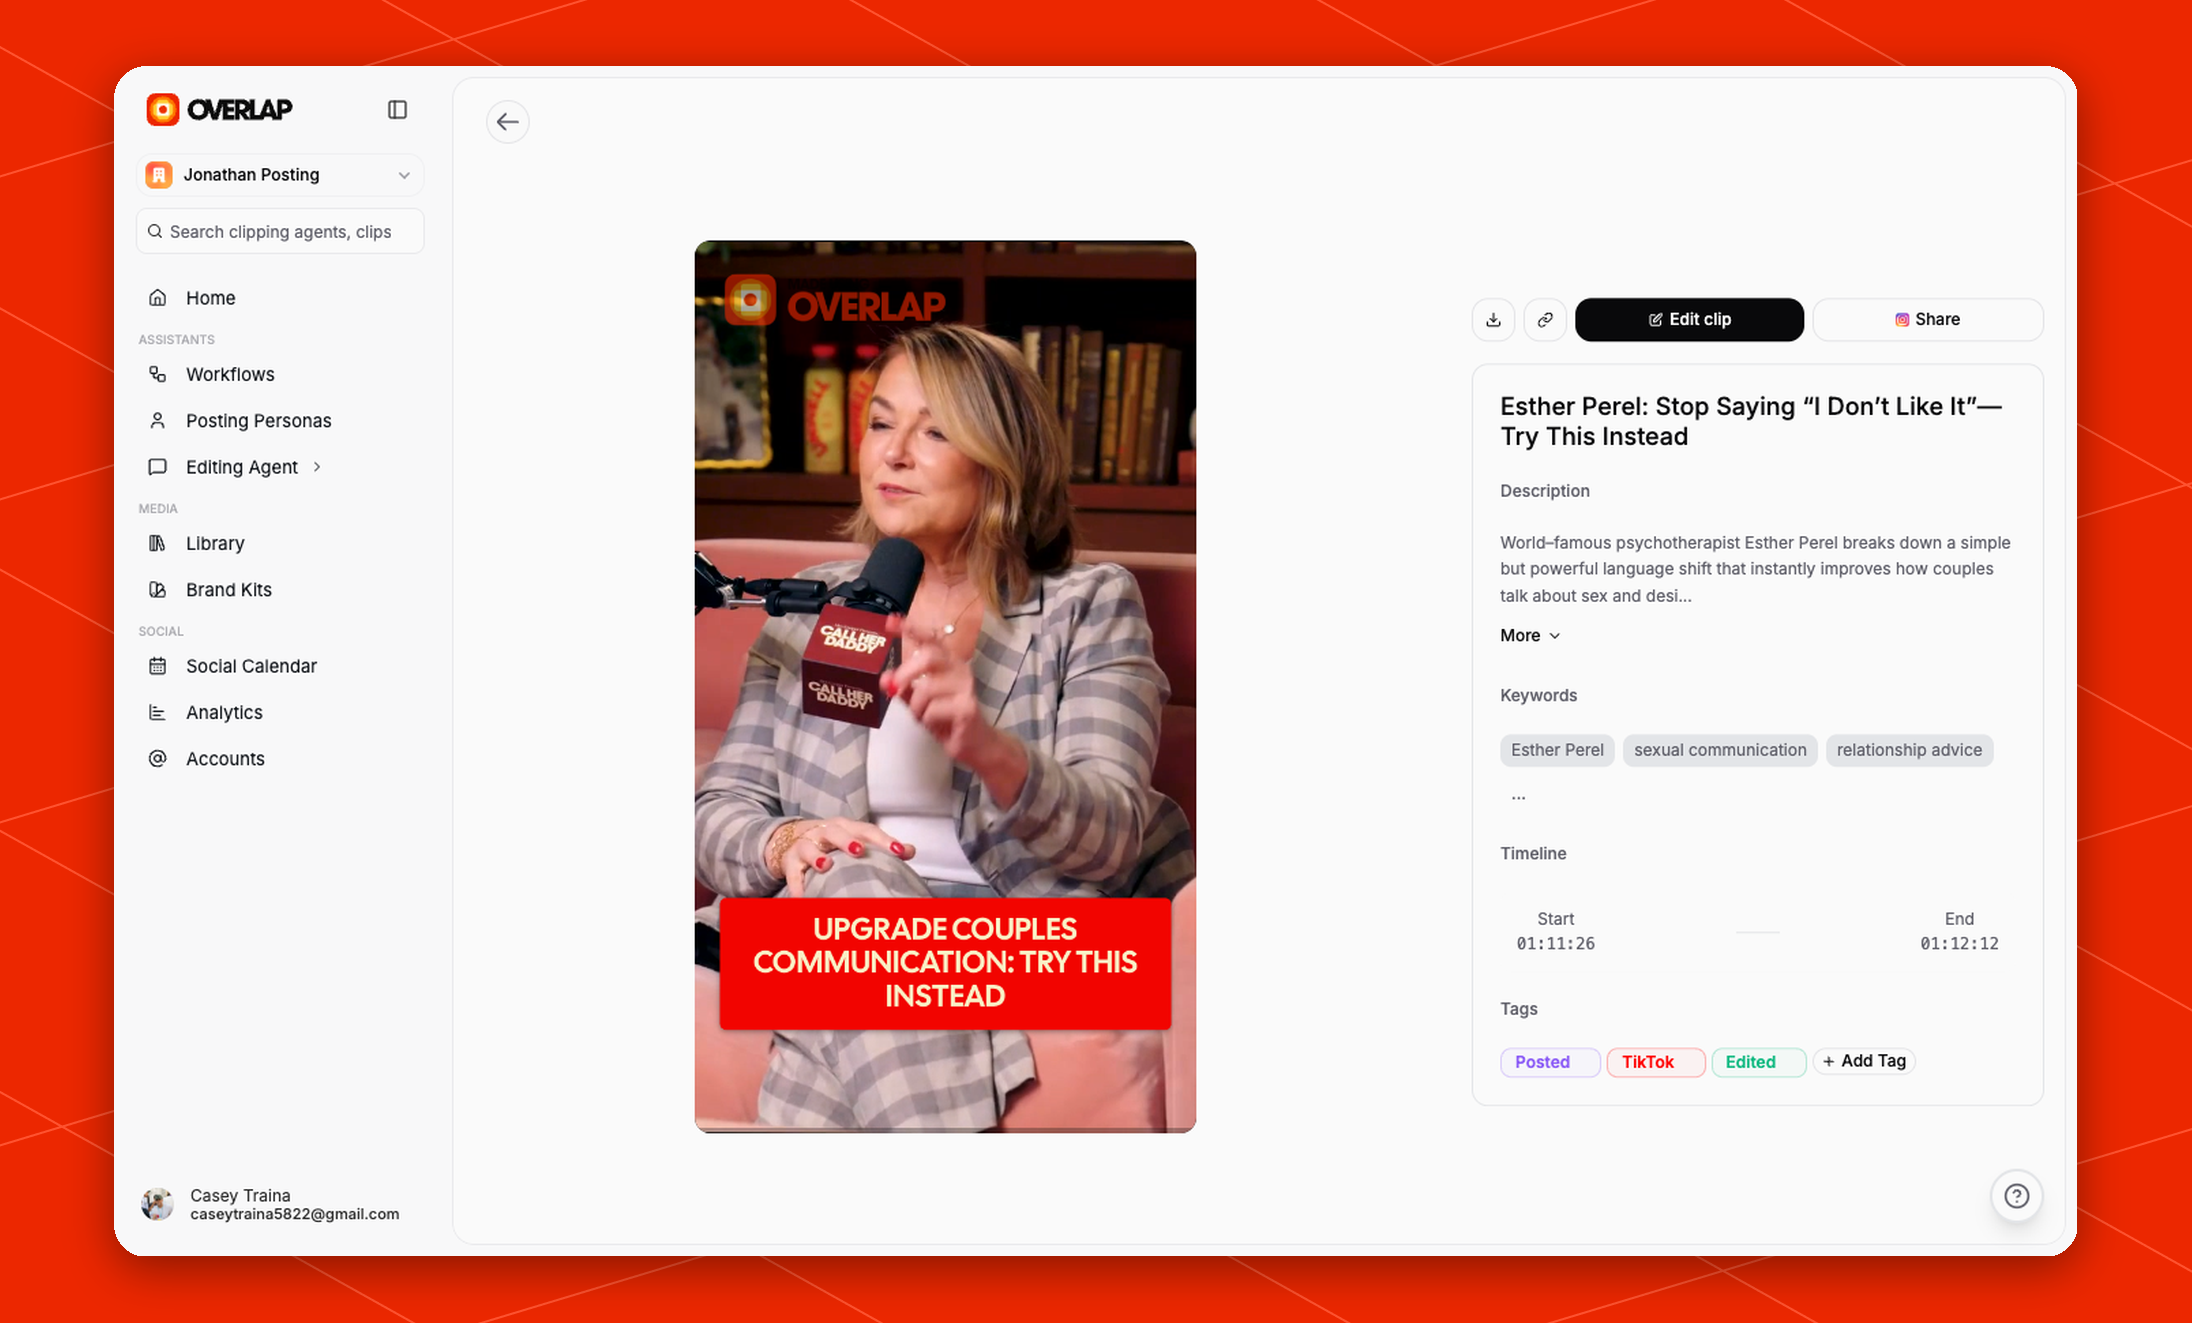
Open a clip and click `Edit Clip`. That takes you directly into `Studio`.
You will typically do this from the clip detail page after Overlap has already generated or surfaced a clip for review. A good mental model is:
* automation and workflows generate or queue the clip
* the clip detail page gives you a focused view of the selected clip
* `Edit Clip` opens the manual editor for that specific output
* `Studio` is where you make the final hands-on changes before exporting or sharing
 ### Option 2: Start a video from scratch
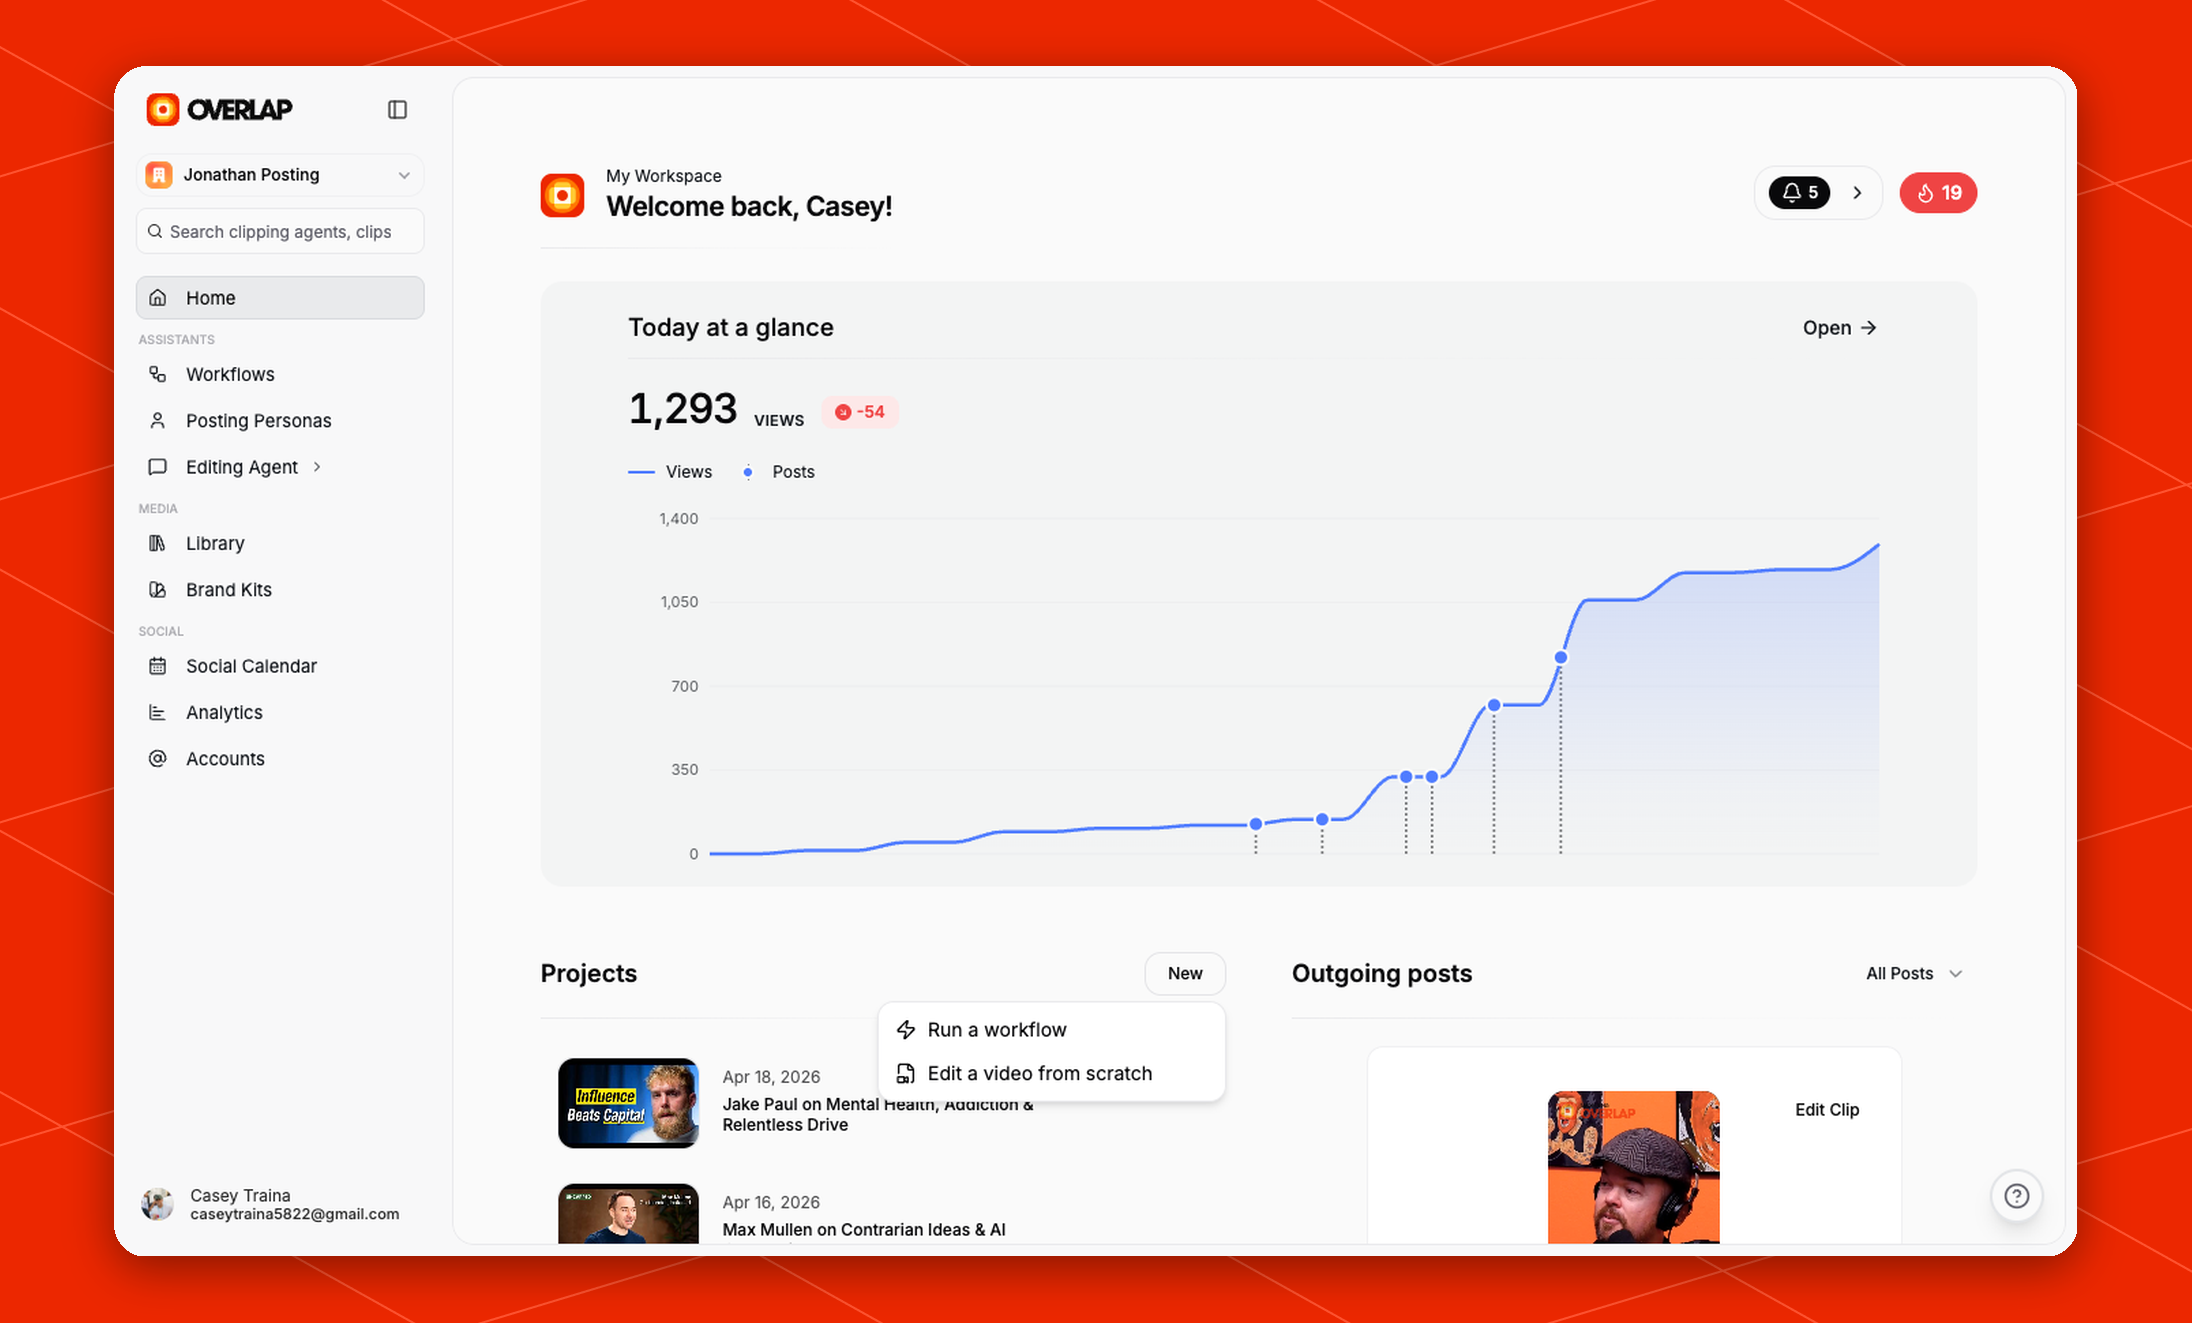
From the `Home` page, use `New` in the `Projects` section, then choose `Edit a video from scratch`.
### Option 2: Start a video from scratch
From the `Home` page, use `New` in the `Projects` section, then choose `Edit a video from scratch`.
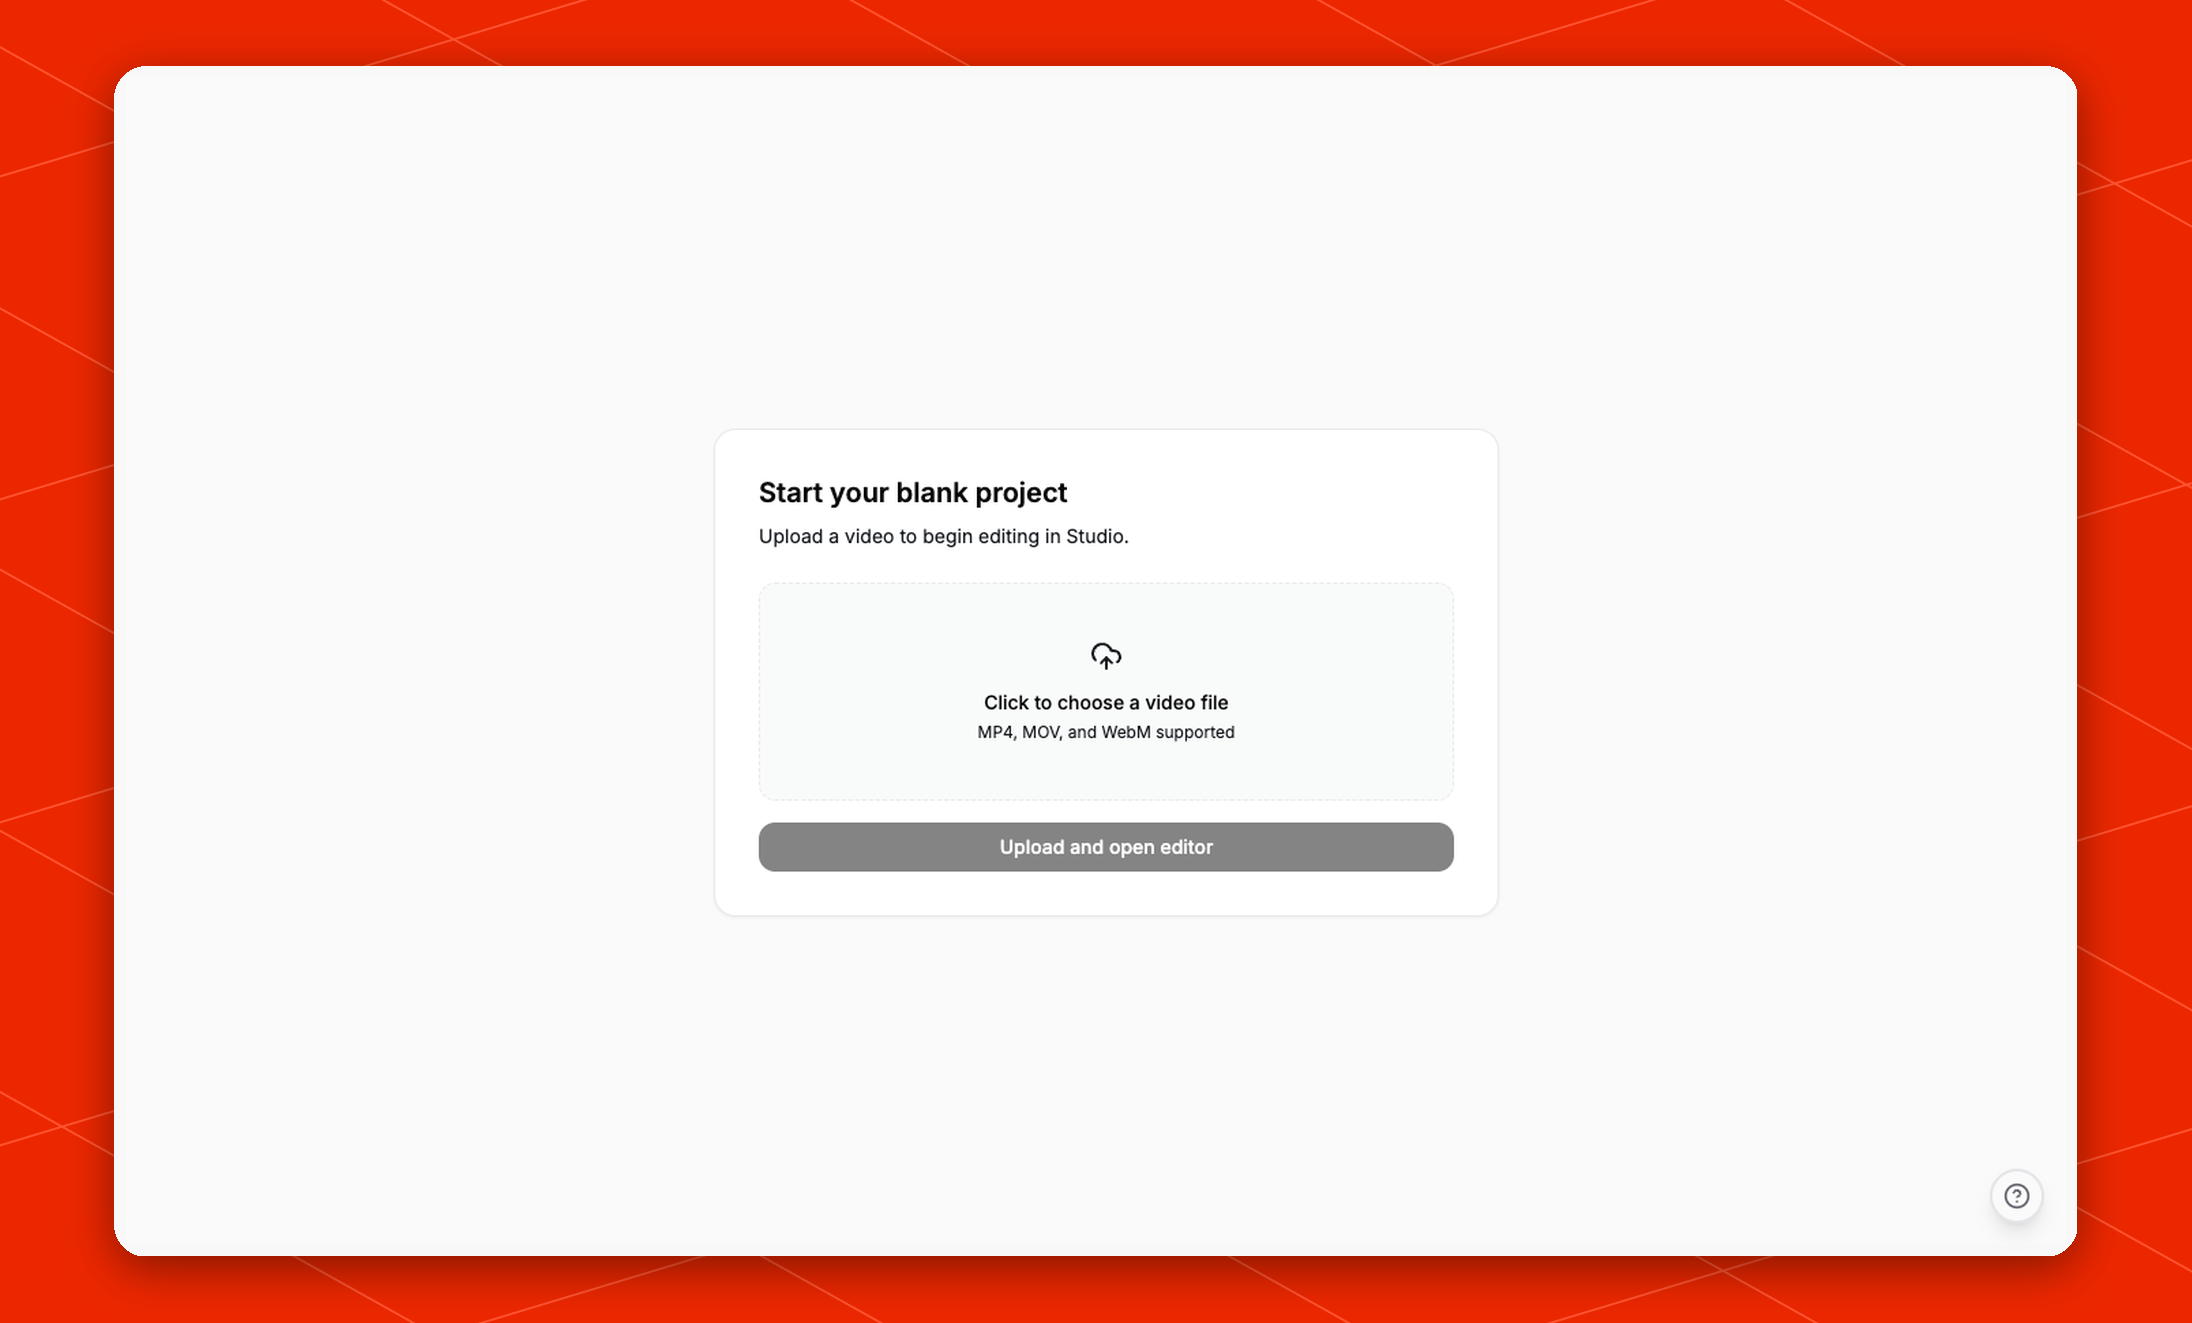
 That opens a blank project where you can upload a source file and jump straight into editing in Studio.
 ## Understanding the Studio layout
Studio brings the clip preview, playback controls, timeline, and editing tools into one screen.
## Understanding the Studio layout
Studio brings the clip preview, playback controls, timeline, and editing tools into one screen.
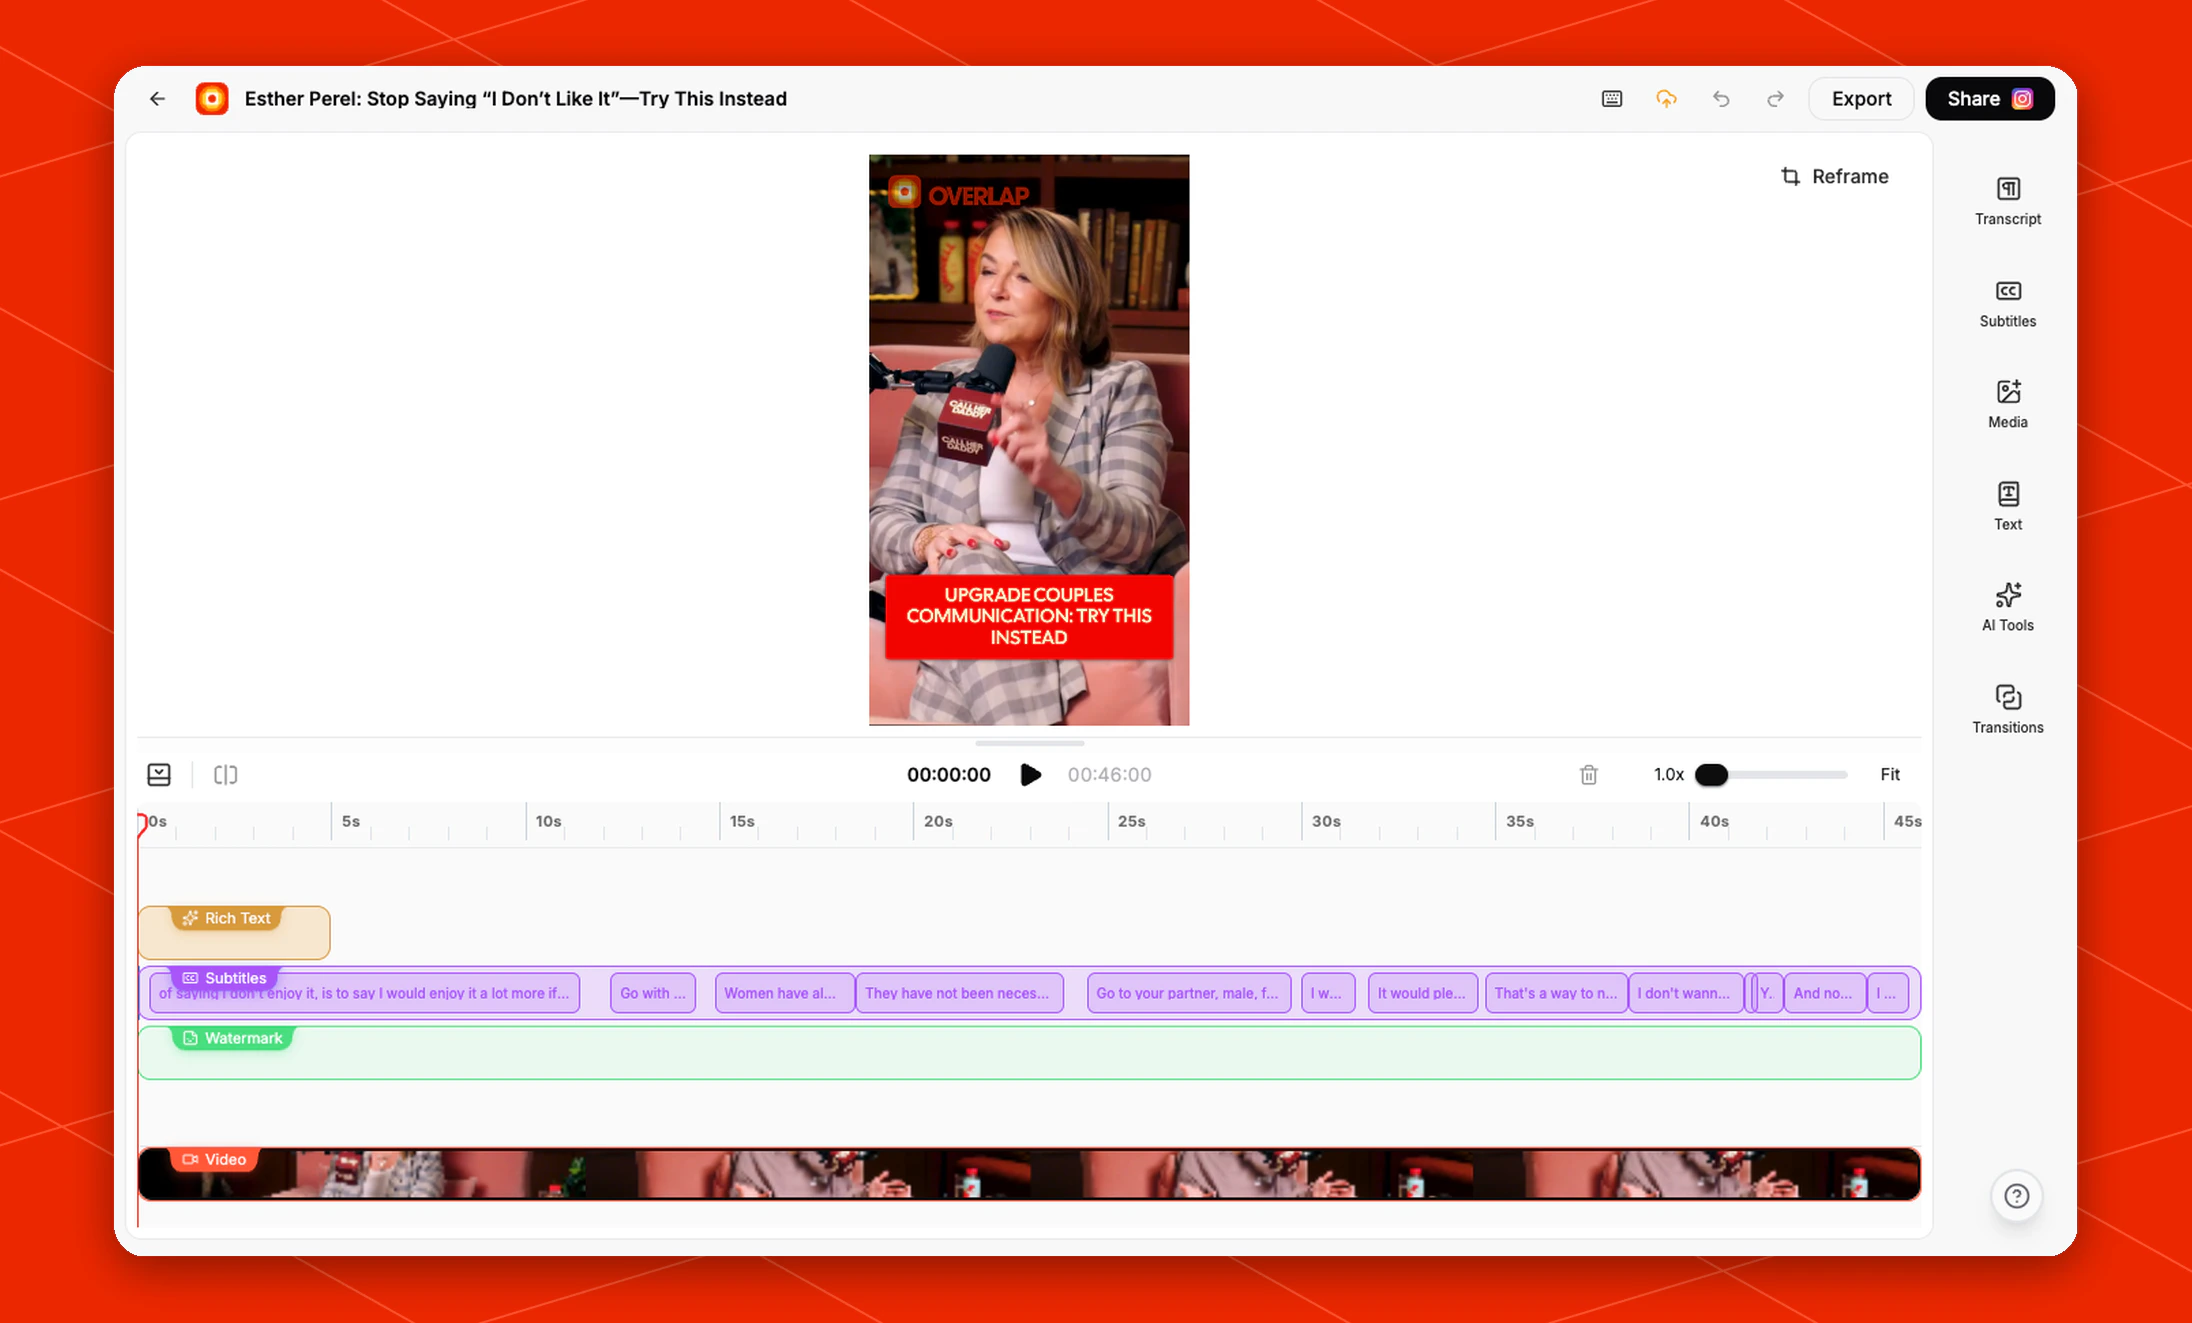 The main areas of the editor are:
* The top bar, where you can go back, see the clip title, and access `Export` and `Share`
* The preview canvas in the center, which shows the current frame of the clip
* The `Reframe` control beside the preview for adjusting composition
* The `Set as Thumbnail` control beside `Reframe`, which saves the current frame as the clip thumbnail
* The playback controls below the preview, including the play button, current time, total duration, speed control, and fit/zoom controls
* The timeline at the bottom, where Overlap shows each visual or text layer over time
* The right-side tool rail, which opens different editing panels
## Editing with the transcript
Open `Transcript` in the right-side tool rail to work on the spoken content directly.
The main areas of the editor are:
* The top bar, where you can go back, see the clip title, and access `Export` and `Share`
* The preview canvas in the center, which shows the current frame of the clip
* The `Reframe` control beside the preview for adjusting composition
* The `Set as Thumbnail` control beside `Reframe`, which saves the current frame as the clip thumbnail
* The playback controls below the preview, including the play button, current time, total duration, speed control, and fit/zoom controls
* The timeline at the bottom, where Overlap shows each visual or text layer over time
* The right-side tool rail, which opens different editing panels
## Editing with the transcript
Open `Transcript` in the right-side tool rail to work on the spoken content directly.
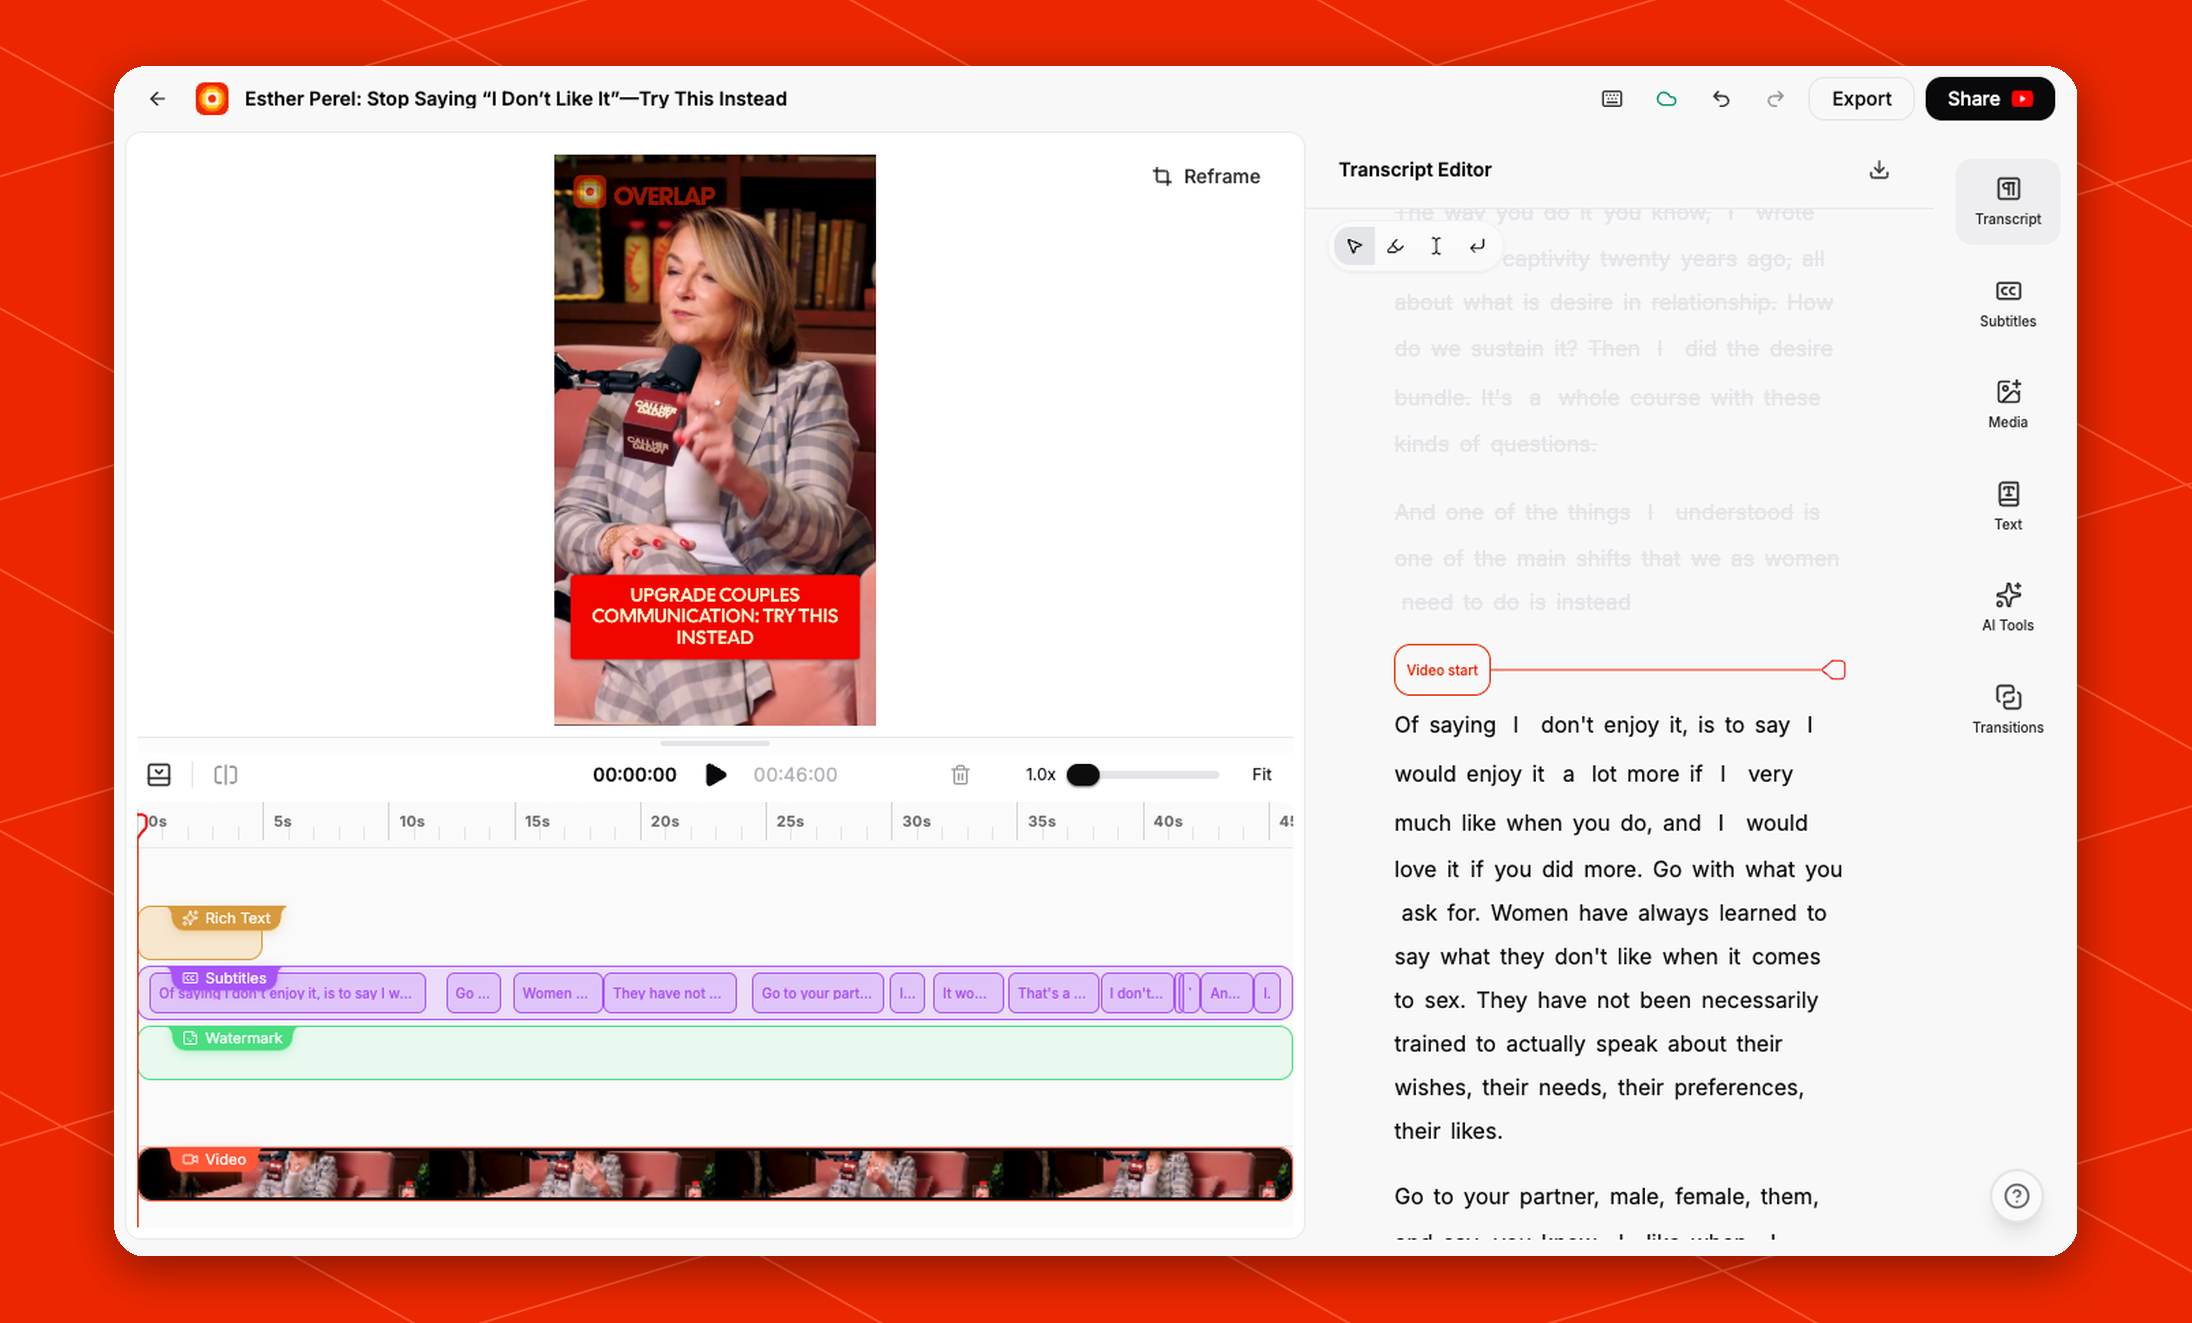 In the current `Transcript Editor`, Overlap shows:
* speaker-grouped transcript blocks such as `Speaker 1` and `Speaker 2`
* markers like `Video start` and `Video end` so you can see what portion of the source is currently inside the clip
* a transcript-focused toolbar above the text for quick edit operations
This is the fastest place to make content-aware edits because you can work from the words instead of hunting visually through the timeline.
## Highlighting transcript sections
To edit a specific moment, highlight the exact word, phrase, sentence, or paragraph you want to change in the transcript.
From there, use transcript actions such as:
* `Cut from Video` to remove the selected spoken portion from the clip itself
* `Mute` to silence the selected section when you want to keep the visuals but remove the audio
* `Edit Captions` to change what appears on screen without treating it as a full video cut
This distinction matters:
* use `Cut from Video` when the pacing or content of the clip should change
* use `Mute` when the shot should stay but the audio should drop out
* use `Edit Captions` when the video timing is fine and only the on-screen text needs adjustment
A practical way to use the transcript editor is:
1. Read through the clip from top to bottom in `Transcript`.
2. Highlight the exact section that feels off.
3. Decide whether the problem is the spoken content, the audio, or only the captions.
4. Apply the corresponding action.
5. Scrub the timeline and preview the result before moving on.
## Working with the timeline
The timeline is the fastest way to understand how the clip is assembled over time. In the current studio view, the clip is split into separate tracks such as:
* `Rich Text`
* `Subtitles`
* `Watermark`
* `Video`
This layered view helps you see what is happening at each moment in the clip.
Use the timeline when you want to:
* Check when subtitle segments begin and end
* See how long a text overlay remains on screen
* Confirm whether the watermark spans the full clip
* Scrub through the video before exporting
* Jump back to the saved thumbnail frame from the thumbnail marker
The ruler across the top of the timeline shows time markers in seconds, which makes it easier to inspect short-form clips precisely. The saved thumbnail frame appears on the ruler as a small black-and-white marker. Hover the marker to see `Thumbnail`, or click it to scrub the preview back to that frame.
## Setting the clip thumbnail
By default, Overlap uses the first frame as the clip thumbnail. If another moment better represents the clip, scrub the preview to that frame and click `Set as Thumbnail` beside `Reframe`.
After you set a thumbnail manually, Overlap saves that frame with the clip. The marker on the timeline ruler shows where the saved thumbnail lives, so you can find it again after reloading Studio.
If the playhead is already on the saved thumbnail frame, the button changes to show that the thumbnail is already set. Manual thumbnails stay in place when you make other edits, including edits that change the first frame.
## Using the right-side tools
The right rail is where you switch between different editing tasks. In the current studio UI, the tool groups are:
* `Transcript`
* `Subtitles`
* `Media`
* `Text`
* `AI Tools`
* `Transitions`
A good way to think about them is:
* Use `Transcript` and `Subtitles` when the spoken words or on-screen captions need refinement
* Use `Media` when you want to work with supporting visual assets
* Use `Text` when you want to manage overlays such as headline or supporting copy. For title-style text fields, click `Generate` to create a short AI title from the clip context
* Use `AI Tools` when you want Overlap to apply a broader cleanup or packaging step for you
* Use `Transitions` when you want to adjust how the clip moves between visual states
## AI-assisted cleanup and finishing
`AI Tools` collects several of the fastest cleanup and packaging actions in one panel.
In the current `Transcript Editor`, Overlap shows:
* speaker-grouped transcript blocks such as `Speaker 1` and `Speaker 2`
* markers like `Video start` and `Video end` so you can see what portion of the source is currently inside the clip
* a transcript-focused toolbar above the text for quick edit operations
This is the fastest place to make content-aware edits because you can work from the words instead of hunting visually through the timeline.
## Highlighting transcript sections
To edit a specific moment, highlight the exact word, phrase, sentence, or paragraph you want to change in the transcript.
From there, use transcript actions such as:
* `Cut from Video` to remove the selected spoken portion from the clip itself
* `Mute` to silence the selected section when you want to keep the visuals but remove the audio
* `Edit Captions` to change what appears on screen without treating it as a full video cut
This distinction matters:
* use `Cut from Video` when the pacing or content of the clip should change
* use `Mute` when the shot should stay but the audio should drop out
* use `Edit Captions` when the video timing is fine and only the on-screen text needs adjustment
A practical way to use the transcript editor is:
1. Read through the clip from top to bottom in `Transcript`.
2. Highlight the exact section that feels off.
3. Decide whether the problem is the spoken content, the audio, or only the captions.
4. Apply the corresponding action.
5. Scrub the timeline and preview the result before moving on.
## Working with the timeline
The timeline is the fastest way to understand how the clip is assembled over time. In the current studio view, the clip is split into separate tracks such as:
* `Rich Text`
* `Subtitles`
* `Watermark`
* `Video`
This layered view helps you see what is happening at each moment in the clip.
Use the timeline when you want to:
* Check when subtitle segments begin and end
* See how long a text overlay remains on screen
* Confirm whether the watermark spans the full clip
* Scrub through the video before exporting
* Jump back to the saved thumbnail frame from the thumbnail marker
The ruler across the top of the timeline shows time markers in seconds, which makes it easier to inspect short-form clips precisely. The saved thumbnail frame appears on the ruler as a small black-and-white marker. Hover the marker to see `Thumbnail`, or click it to scrub the preview back to that frame.
## Setting the clip thumbnail
By default, Overlap uses the first frame as the clip thumbnail. If another moment better represents the clip, scrub the preview to that frame and click `Set as Thumbnail` beside `Reframe`.
After you set a thumbnail manually, Overlap saves that frame with the clip. The marker on the timeline ruler shows where the saved thumbnail lives, so you can find it again after reloading Studio.
If the playhead is already on the saved thumbnail frame, the button changes to show that the thumbnail is already set. Manual thumbnails stay in place when you make other edits, including edits that change the first frame.
## Using the right-side tools
The right rail is where you switch between different editing tasks. In the current studio UI, the tool groups are:
* `Transcript`
* `Subtitles`
* `Media`
* `Text`
* `AI Tools`
* `Transitions`
A good way to think about them is:
* Use `Transcript` and `Subtitles` when the spoken words or on-screen captions need refinement
* Use `Media` when you want to work with supporting visual assets
* Use `Text` when you want to manage overlays such as headline or supporting copy. For title-style text fields, click `Generate` to create a short AI title from the clip context
* Use `AI Tools` when you want Overlap to apply a broader cleanup or packaging step for you
* Use `Transitions` when you want to adjust how the clip moves between visual states
## AI-assisted cleanup and finishing
`AI Tools` collects several of the fastest cleanup and packaging actions in one panel.
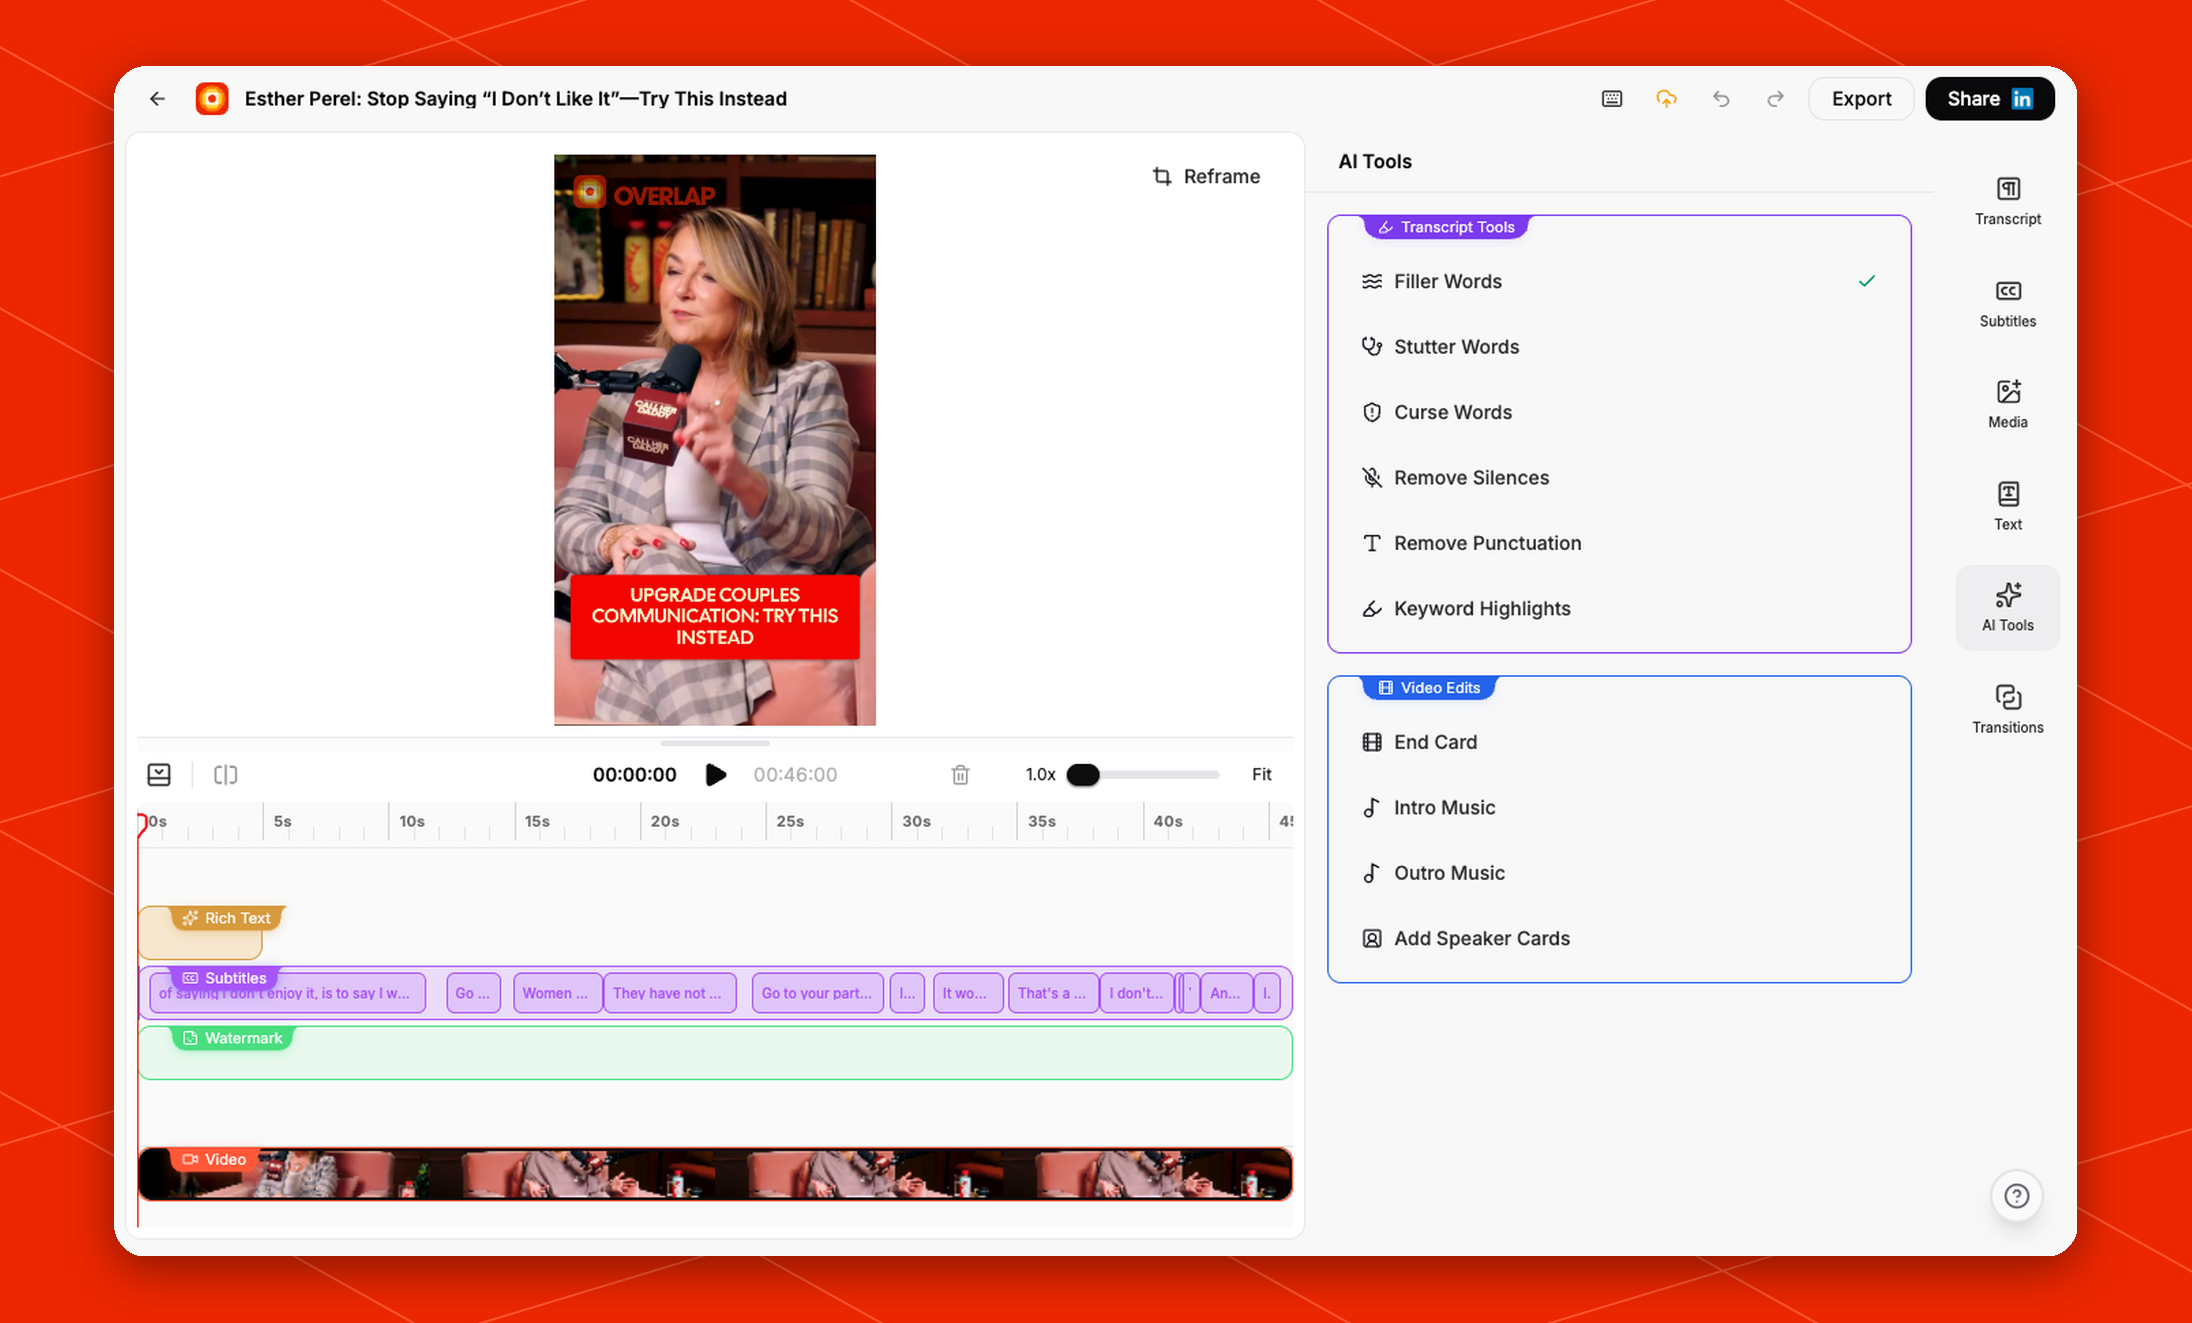 In the current editor, Overlap groups these actions into two sections:
* `Transcript Tools`
* `Video Edits`
Verified options shown in `Transcript Tools` include:
* `Filler Words`
* `Stutter Words`
* `Curse Words`
* `Remove Silences`
* `Remove Punctuation`
* `Keyword Highlights`
Verified options shown in `Video Edits` include:
* `End Card`
* `Intro Music`
* `Outro Music`
* `Add Speaker Cards`
This makes Studio useful for both cleanup and packaging. You can remove distracting speech patterns, tighten pacing, highlight important language, and add finishing elements without leaving the editor.
## A practical editing flow
If you are editing a clip manually, a good default flow is:
1. Click `Edit Clip` to open the clip in Studio.
2. Review the preview and scrub the timeline so you understand the current cut.
3. Start in `Transcript` if the issue is driven by the spoken content.
4. Highlight sections to `Cut from Video`, `Mute`, or `Edit Captions` as needed.
5. Check `Subtitles`, `Text`, and `Rich Text` timing so the on-screen messaging still matches the video.
6. Use `AI Tools` for broader cleanup passes such as silence removal or filler-word cleanup.
7. Use `Reframe` if the subject needs better positioning in the final composition.
8. Scrub to the frame you want people to see first and click `Set as Thumbnail`.
9. Finish with `Export` or `Share` once the clip looks right.
## How this relates to workflows
[`Workflows`](/essentials/workflows) are still where you build repeatable automation for generating clips at scale. `Studio` is where you manually polish a specific output after it has been created.
Use workflows when you want the same editing logic to run automatically across incoming content. Use Studio when you want hands-on control over one clip before publishing.
In the current editor, Overlap groups these actions into two sections:
* `Transcript Tools`
* `Video Edits`
Verified options shown in `Transcript Tools` include:
* `Filler Words`
* `Stutter Words`
* `Curse Words`
* `Remove Silences`
* `Remove Punctuation`
* `Keyword Highlights`
Verified options shown in `Video Edits` include:
* `End Card`
* `Intro Music`
* `Outro Music`
* `Add Speaker Cards`
This makes Studio useful for both cleanup and packaging. You can remove distracting speech patterns, tighten pacing, highlight important language, and add finishing elements without leaving the editor.
## A practical editing flow
If you are editing a clip manually, a good default flow is:
1. Click `Edit Clip` to open the clip in Studio.
2. Review the preview and scrub the timeline so you understand the current cut.
3. Start in `Transcript` if the issue is driven by the spoken content.
4. Highlight sections to `Cut from Video`, `Mute`, or `Edit Captions` as needed.
5. Check `Subtitles`, `Text`, and `Rich Text` timing so the on-screen messaging still matches the video.
6. Use `AI Tools` for broader cleanup passes such as silence removal or filler-word cleanup.
7. Use `Reframe` if the subject needs better positioning in the final composition.
8. Scrub to the frame you want people to see first and click `Set as Thumbnail`.
9. Finish with `Export` or `Share` once the clip looks right.
## How this relates to workflows
[`Workflows`](/essentials/workflows) are still where you build repeatable automation for generating clips at scale. `Studio` is where you manually polish a specific output after it has been created.
Use workflows when you want the same editing logic to run automatically across incoming content. Use Studio when you want hands-on control over one clip before publishing.