> ## Documentation Index
> Fetch the complete documentation index at: https://docs.overlap.ai/llms.txt
> Use this file to discover all available pages before exploring further.
> Record podcasts, interviews, and other long form content in the Overlap recording studio, with remote guests and every session kept together in a project.
# Recording studio
> Use the **recording studio** to record podcasts, interviews, and other long form content directly in Overlap — with remote guests, local per-participant capture, and every recording organized under the project it belongs to.
## What the recording studio is for
The studio opens from **Projects** in the left sidebar, under **Media**, right after **Library**.
A project is a recording room you can return to as many times as you like. Every session you record in a project's studio lands in that project, so a weekly show, an interview series, or a recurring internal update stays in one place instead of scattering across one-off rooms.
## The Projects grid
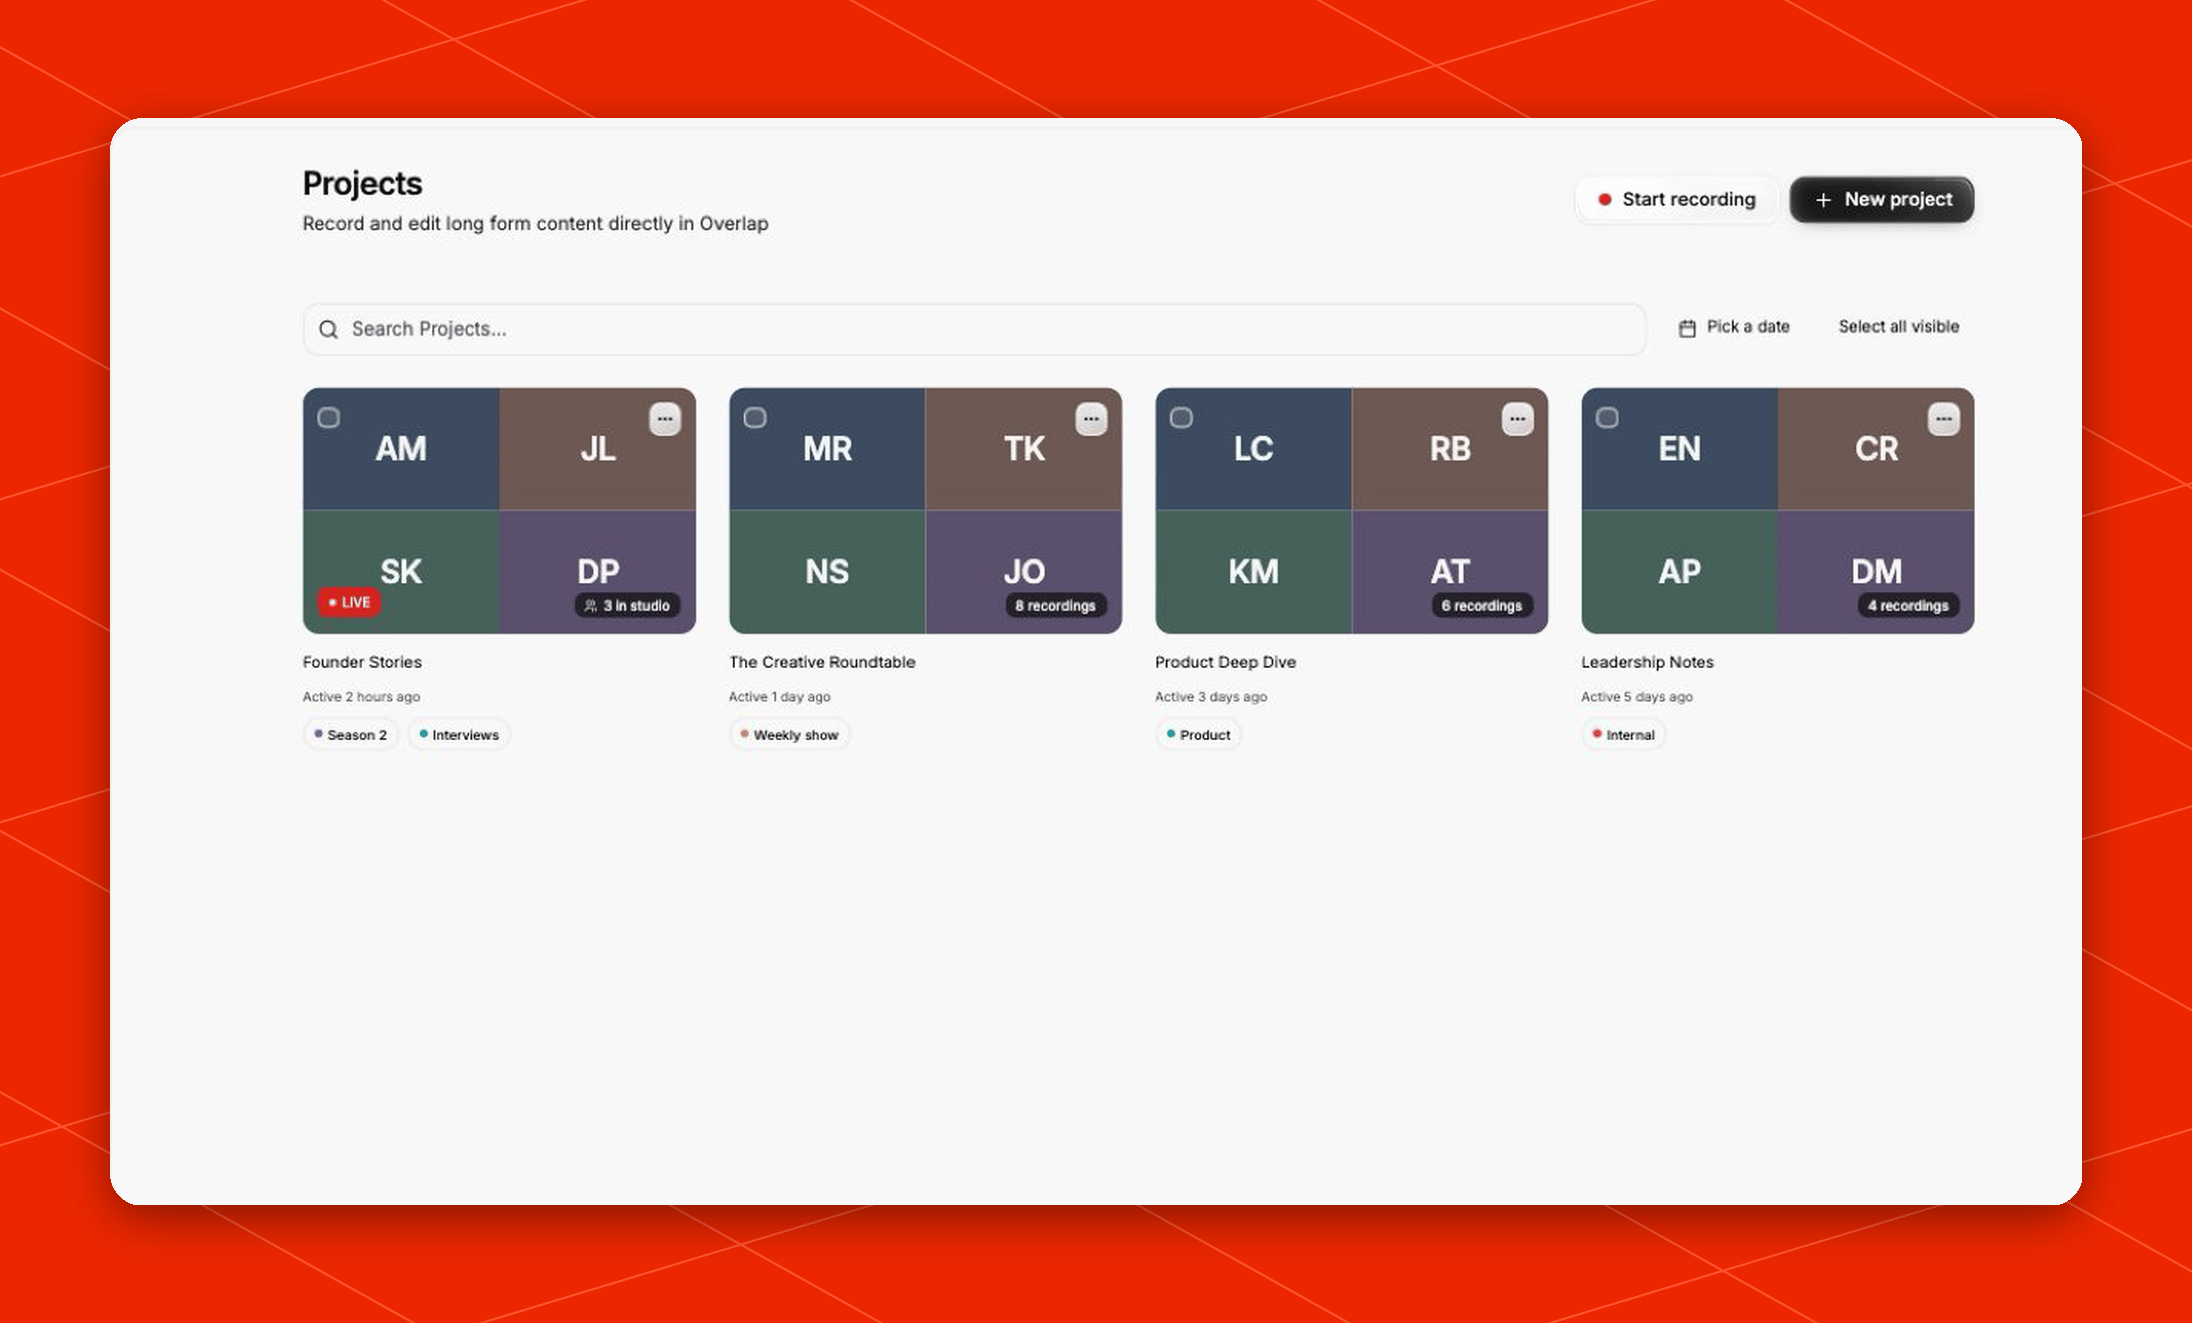 Each card on the grid is one project:
* **Thumbnail** — the first frame of the project's newest recording. Hovering fades in what the card will do: **Join studio**, **Open project**, or **View 12 recordings**
* **Recording count** — the corner pill under the thumbnail, which becomes a live headcount (`4 in studio`) while a session is running
* **Live badge** — projects with someone in the studio right now show a red `LIVE` badge, and always sort to the top of the grid
* **Last activity** — `Active 2 hours ago`, taken from the newest session, which is also how the rest of the grid is ordered
* **Recording / Processing** — a red `Recording` pill while a session is being captured, and a `Processing 60%` pill while a finished session uploads and composes
* **Tags** — any tags you've added, shown beneath the title as coloured pills
Click a live project to jump into its studio; click any other project to open it and see its recordings.
The toolbar above the grid runs left to right: search, **Pick a date**, and **Select all visible** (which becomes **Deselect all** once the page is selected). Search matches project names and tags. **Pick a date** narrows the grid to projects created or recorded on a given day — only days with activity are selectable, and **Clear date** in the picker drops the filter again. Projects are shown sixteen at a time; use **Previous** and **Next** below the grid to page through the rest.
The `⋯` menu on each card offers **Start recording**, **Open project**, **Rename**, and **Delete**. Starting a recording from here goes straight into that project's studio — see [Record into an existing project](#record-into-an-existing-project).
If your workspace holds more projects than the grid loads at once, a line above the grid says so: search and the date filter only look at what's loaded, and an older project is still reachable by opening its link directly.
### Selecting, tagging, and deleting projects
Each card has a checkbox in its top-left corner, and **Select all visible** takes the whole page at once. A bar above the grid then shows how many projects are selected, with **Clear selection**, **Add tag**, and **Delete** — selections carry across pages, so you can gather projects from more than one page first.
**Add tag** turns into a name field and a colour swatch; press Enter or **Apply** and the tag lands on every selected project. Tags are how you group projects across pages — a season, a show, a client — and searching for a tag name brings up everything carrying it. A label can run to 40 characters, a project can hold up to twenty tags, and a project that already carries the label keeps the one it has whatever colour you apply.
Deleting a project permanently removes it, all of its recordings, and their stored video and audio files from Overlap; it can't be undone, so Overlap asks you to confirm first and tells you how many recordings go with it. A project is kept rather than deleted while someone is in its studio, or while a session is still being captured or processed — Overlap reports which ones it kept and why. Wait for processing to finish, then delete. Long-form edits you already created from a recording keep their own copy of the footage and are not affected.
## Create a project
There are two ways in, depending on whether you want to set things up first or just start recording:
* **New project** — name the project up front. It's created immediately and opens on its (empty) project page, ready for its first session whenever you are. Use this to prepare a home for a show before recording day.
* **Start recording** — go straight into the studio preview. You name the project right in the preview, check your camera and mic, and the project is created the moment you join. Backing out of the preview creates nothing.
**Start recording** is also in the **New** menu on the home page, under **Projects and episodes** — it opens the same studio preview. Your recording projects appear in that home list too, alongside your episodes, with a running session marked **Live now** and pinned to the top.
## Record into an existing project
A project's studio is permanent, so you can record into any project as many times as you like. Two ways in:
* **Start recording** in the project's header, next to its title
* **Start recording** in the `⋯` menu on the project's card in the grid
Either one takes you to that project's studio preview to check your camera and mic before joining. Because the project already exists, there's no name to fill in. Everything you capture lands in that same project alongside its earlier sessions.
When a session is already running, the project shows **Join session** as well — it takes you into the same studio.
## Set up your camera and mic before joining
Every way into the studio — yours or a guest's — passes through the same preview screen, **Set up your recording**. Nothing is live and nothing is recorded here.
Each card on the grid is one project:
* **Thumbnail** — the first frame of the project's newest recording. Hovering fades in what the card will do: **Join studio**, **Open project**, or **View 12 recordings**
* **Recording count** — the corner pill under the thumbnail, which becomes a live headcount (`4 in studio`) while a session is running
* **Live badge** — projects with someone in the studio right now show a red `LIVE` badge, and always sort to the top of the grid
* **Last activity** — `Active 2 hours ago`, taken from the newest session, which is also how the rest of the grid is ordered
* **Recording / Processing** — a red `Recording` pill while a session is being captured, and a `Processing 60%` pill while a finished session uploads and composes
* **Tags** — any tags you've added, shown beneath the title as coloured pills
Click a live project to jump into its studio; click any other project to open it and see its recordings.
The toolbar above the grid runs left to right: search, **Pick a date**, and **Select all visible** (which becomes **Deselect all** once the page is selected). Search matches project names and tags. **Pick a date** narrows the grid to projects created or recorded on a given day — only days with activity are selectable, and **Clear date** in the picker drops the filter again. Projects are shown sixteen at a time; use **Previous** and **Next** below the grid to page through the rest.
The `⋯` menu on each card offers **Start recording**, **Open project**, **Rename**, and **Delete**. Starting a recording from here goes straight into that project's studio — see [Record into an existing project](#record-into-an-existing-project).
If your workspace holds more projects than the grid loads at once, a line above the grid says so: search and the date filter only look at what's loaded, and an older project is still reachable by opening its link directly.
### Selecting, tagging, and deleting projects
Each card has a checkbox in its top-left corner, and **Select all visible** takes the whole page at once. A bar above the grid then shows how many projects are selected, with **Clear selection**, **Add tag**, and **Delete** — selections carry across pages, so you can gather projects from more than one page first.
**Add tag** turns into a name field and a colour swatch; press Enter or **Apply** and the tag lands on every selected project. Tags are how you group projects across pages — a season, a show, a client — and searching for a tag name brings up everything carrying it. A label can run to 40 characters, a project can hold up to twenty tags, and a project that already carries the label keeps the one it has whatever colour you apply.
Deleting a project permanently removes it, all of its recordings, and their stored video and audio files from Overlap; it can't be undone, so Overlap asks you to confirm first and tells you how many recordings go with it. A project is kept rather than deleted while someone is in its studio, or while a session is still being captured or processed — Overlap reports which ones it kept and why. Wait for processing to finish, then delete. Long-form edits you already created from a recording keep their own copy of the footage and are not affected.
## Create a project
There are two ways in, depending on whether you want to set things up first or just start recording:
* **New project** — name the project up front. It's created immediately and opens on its (empty) project page, ready for its first session whenever you are. Use this to prepare a home for a show before recording day.
* **Start recording** — go straight into the studio preview. You name the project right in the preview, check your camera and mic, and the project is created the moment you join. Backing out of the preview creates nothing.
**Start recording** is also in the **New** menu on the home page, under **Projects and episodes** — it opens the same studio preview. Your recording projects appear in that home list too, alongside your episodes, with a running session marked **Live now** and pinned to the top.
## Record into an existing project
A project's studio is permanent, so you can record into any project as many times as you like. Two ways in:
* **Start recording** in the project's header, next to its title
* **Start recording** in the `⋯` menu on the project's card in the grid
Either one takes you to that project's studio preview to check your camera and mic before joining. Because the project already exists, there's no name to fill in. Everything you capture lands in that same project alongside its earlier sessions.
When a session is already running, the project shows **Join session** as well — it takes you into the same studio.
## Set up your camera and mic before joining
Every way into the studio — yours or a guest's — passes through the same preview screen, **Set up your recording**. Nothing is live and nothing is recorded here.
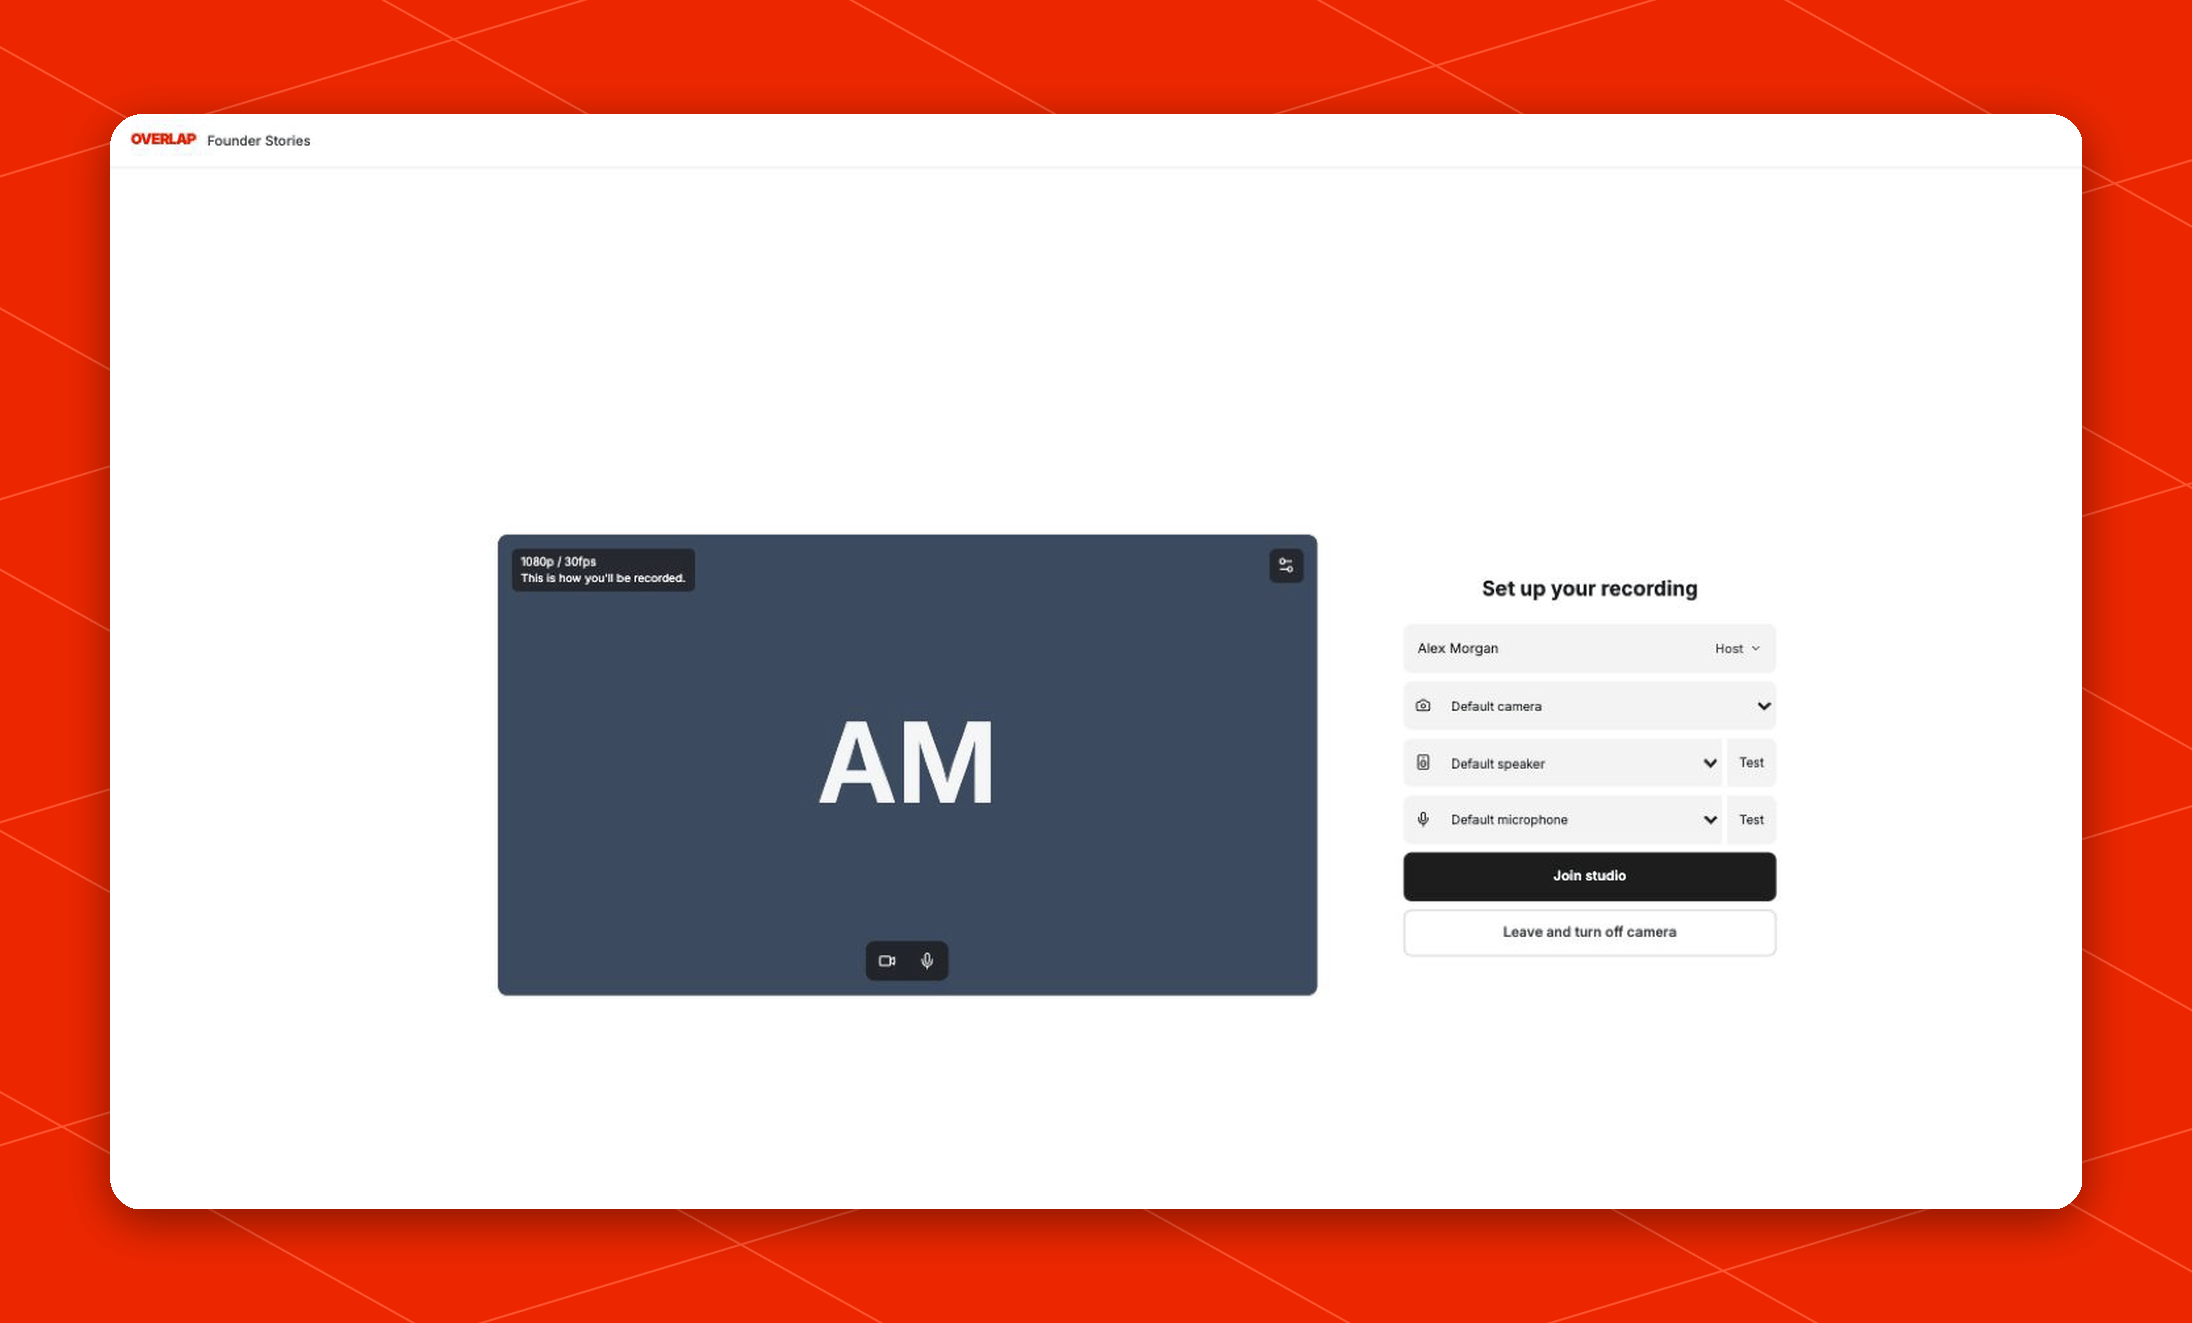 * **Name your project** appears only when you're creating a project on the way in; **Your name** is how you'll appear to everyone else and on your recorded track.
* **Camera**, **Speaker**, and **Microphone** each pick a device. **Test** on the speaker plays a tone through it; **Test** on the microphone listens for a few seconds and shows a live level meter so you can see yourself register.
* A badge on the preview shows what the camera will actually be captured at, such as `1080p / 30fps`, with the reminder *This is how you'll be recorded* — the preview itself is deliberately lighter than the recording.
* The camera and microphone buttons under the preview let you join with either already off.
* The gear in the preview's corner opens **Camera effects** — **None**, **Blur**, or one of four **Background** images — and the **Framing guide**.
The framing guide draws a private overlay on your own preview: a vertical band marking the **Vertical clip zone** that a 9:16 clip would be cut from, and an **Eye line** to sit your eyes on. It's labelled **Only visible to you**, it's never recorded, and the choice is remembered for next time.
**Join studio** takes you in, and reads **Rejoin studio** if you've already been in this session. When there's no other way out of the preview — you're creating a project, or you've just left a session — **Leave and turn off camera** backs out and releases the camera immediately.
## Inside the studio
The studio's header carries the project name, a `REC 12:04` timer once a session is being captured, and a `Reconnecting…` note if your connection drops for a moment.
Everyone's tiles sit on the stage in the middle. **Layout** in the toolbar switches between **Grid**, which gives everyone an equal tile, and **Focus**, which promotes one tile and puts the rest in a strip beside it. Each tile has its own menu with **Pin tile** and **Maximize tile**; both are your own view only, and neither changes what anyone else sees or what gets recorded.
* **Name your project** appears only when you're creating a project on the way in; **Your name** is how you'll appear to everyone else and on your recorded track.
* **Camera**, **Speaker**, and **Microphone** each pick a device. **Test** on the speaker plays a tone through it; **Test** on the microphone listens for a few seconds and shows a live level meter so you can see yourself register.
* A badge on the preview shows what the camera will actually be captured at, such as `1080p / 30fps`, with the reminder *This is how you'll be recorded* — the preview itself is deliberately lighter than the recording.
* The camera and microphone buttons under the preview let you join with either already off.
* The gear in the preview's corner opens **Camera effects** — **None**, **Blur**, or one of four **Background** images — and the **Framing guide**.
The framing guide draws a private overlay on your own preview: a vertical band marking the **Vertical clip zone** that a 9:16 clip would be cut from, and an **Eye line** to sit your eyes on. It's labelled **Only visible to you**, it's never recorded, and the choice is remembered for next time.
**Join studio** takes you in, and reads **Rejoin studio** if you've already been in this session. When there's no other way out of the preview — you're creating a project, or you've just left a session — **Leave and turn off camera** backs out and releases the camera immediately.
## Inside the studio
The studio's header carries the project name, a `REC 12:04` timer once a session is being captured, and a `Reconnecting…` note if your connection drops for a moment.
Everyone's tiles sit on the stage in the middle. **Layout** in the toolbar switches between **Grid**, which gives everyone an equal tile, and **Focus**, which promotes one tile and puts the rest in a strip beside it. Each tile has its own menu with **Pin tile** and **Maximize tile**; both are your own view only, and neither changes what anyone else sees or what gets recorded.
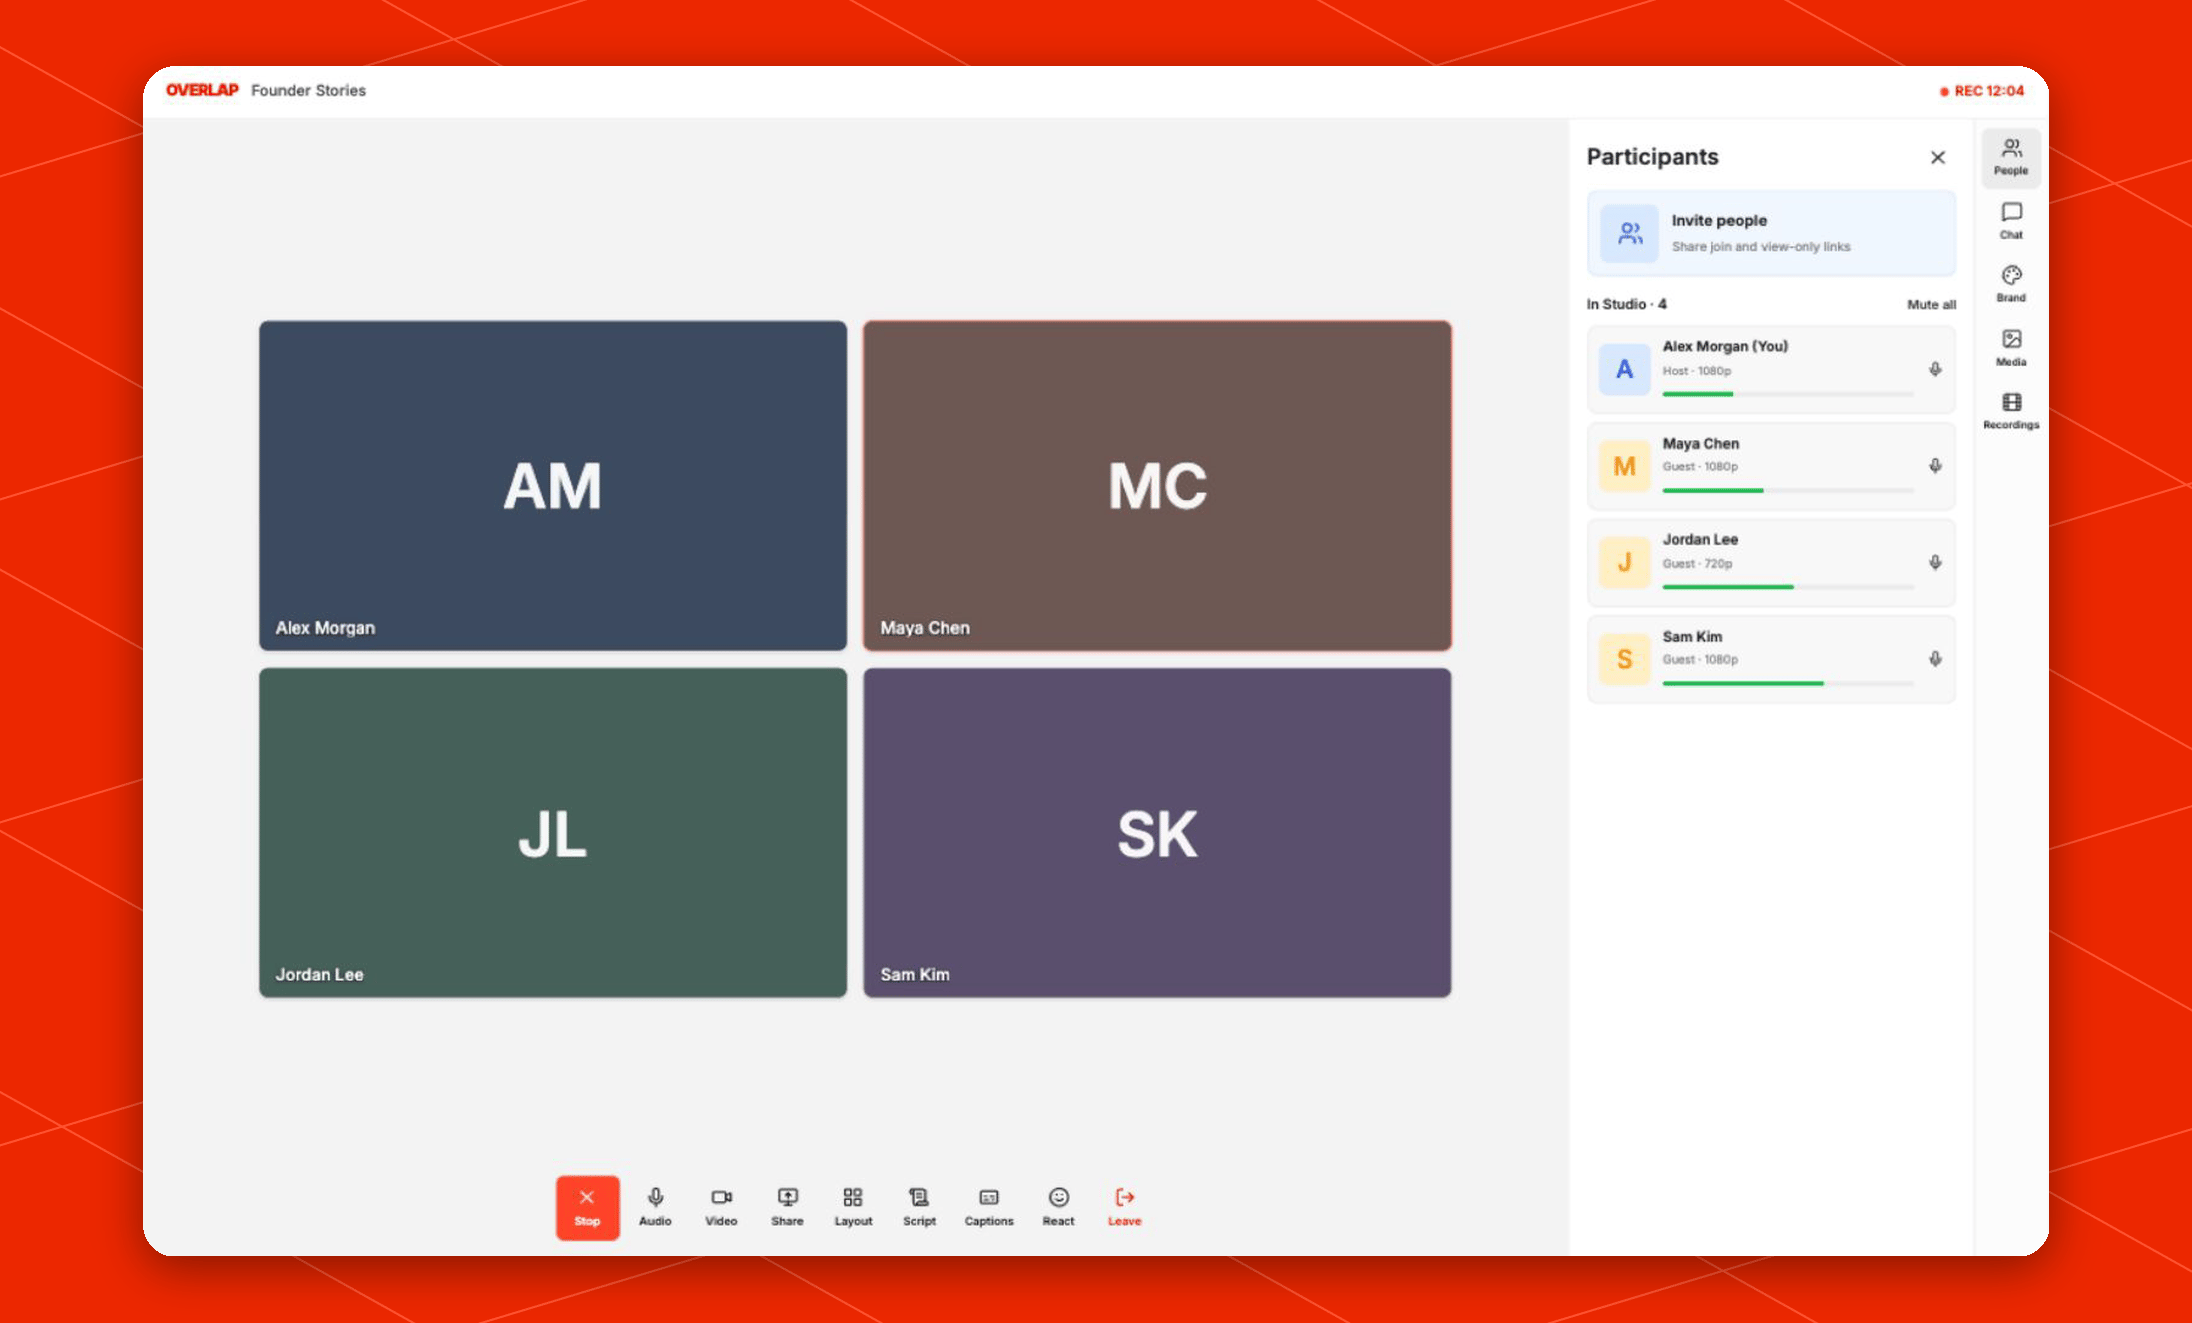 ### The studio toolbar
* **Record** / **Stop** — hosts only. Starting a recording runs a three-second **Recording starts…** countdown so everyone begins together, and a *This session is now being recorded* banner appears for everyone in the room.
* **Audio** — click to mute and unmute yourself. The small chevron opens your **Microphone** device picker plus **Noise cancellation** (a 0–100% amount) and **Echo cancellation** (on by default; turn it off only on headphones). Both shape what the room hears and what gets recorded.
* **Video** — click to turn your camera off and on. The chevron opens your **Camera** device picker, **Camera effects**, **Mirror my video**, and the **Framing guide**.
* **Share** — shares your screen into the session as its own source, and becomes **Stop share** while it's running.
* **Layout** — **Grid** or **Focus**, for your own view.
* **Script** — a notepad you can paste a script into, with **Bold**, **Italic**, and **Underline**. Press play to launch the teleprompter in its own window, which scrolls your script with **Play/Pause**, **Replay**, a scroll-speed slider, and text-size controls. Only you see it.
* **Captions** — turns on live captions for you, in their own window, with each line labelled by speaker. Everyone else sees a *Live captions are on in this studio* note, because turning them on asks each browser to transcribe its own microphone. Captions are display-only and are never burned into the recording.
* **React** — sends an emoji that floats on your tile for everyone to see.
* **Leave** — asks you to confirm, then drops you out. The room stays open for everyone else and you can come back the same way you came in.
### The side panels
The rail on the right opens one panel at a time:
**Participants** lists everyone **In Studio** and everyone **Backstage**. Each row shows a person's role and camera quality, a connection indicator, and a live audio level meter. While a recording is running, each row also carries a capture chip — **Recording** when their camera and mic are both being captured, or a warning such as **Mic not recording**, **Camera not recording**, or **Browser can't record** — so you find out during the session rather than afterwards. Anyone can open their own row menu to **Change name**, and to **Pin tile** / **Unpin tile** for their own view. Hosts additionally get **Mute participant**, **Move to backstage**, and **Remove from studio** on other people's rows, **Mute all** / **Unmute all** at the top of the section, and a level slider to lift or trim a quiet guest's microphone. People are told when a host mutes them or adjusts their gain.
**Chat** has one **Everyone** conversation plus any **Direct message** you start with one person or several. Enter sends and Shift+Enter starts a new line; you can react to a message with an emoji; unread counts show on the conversation and on the rail. Chat is not part of the recording.
**Brand** styles your own tile, and everyone sees the result — including the recording. Set a **Logo** and the corner it sits in, a **Brand color**, a tile **Background** (a colour or an image), an **Overlay** frame (**Frame**, **Corners**, **Lower third**, **Broadcast**, or a transparent PNG of your own), a **Brand font** (choose one of ours or upload a `.ttf`, `.otf`, `.woff`, or `.woff2`), and a **Name style** for your name tag — **Clean**, **Pill**, **Bar**, or **Gradient**. Your branding follows your tile through every layout, and it carries into a long-form edit made from the recording — see [Room branding](/essentials/long-form-editor#room-branding).
**Media** brings extra material into the session live. **Videos & images** uploads files and gives each one a show/hide control, so an image or a clip plays out to the whole room — and into the recording — the moment you turn it on; videos get their own volume slider. **Music** (hosts) searches a soundtrack library or takes your own upload, with volume, **Fade**, and **Loop**. **Sound effects** has ready-made stings — **Clapping**, **Cheering**, **Drum roll**, **Air horn** — and accepts your own uploads too.
**Recordings** (hosts) lists this project's recent sessions with their status, with **Open** on each finished one and **View all project recordings** at the bottom.
Guests get everything above except **Record** and the **Recordings** panel. People watching on a view-only link see only **Participants** and **Chat** (read-only), plus **Layout** and **Leave**.
## Recording sessions
The studio records each participant locally at full quality and uploads in the background, so a shaky connection during the call doesn't degrade the recording. When the session ends, Overlap composes the individual tracks into a synchronized, ready-to-edit recording — grid view, isolated tracks, and a transcript included.
One project can hold as many sessions as you need — start a new one any time with **Start recording**. Within a session you can start and stop recording as many times as you like; each capture becomes its own recording on the project page.
Up to 20 people can be in a session at once, hosts and invited guests together. The limit applies to every session in a project, including ones you come back to days later.
Anyone can join, talk, and watch from any modern browser, but Overlap can only capture a participant into the recording from **Chrome** or **Edge**. Someone on another browser is told so as soon as recording starts, and their row in **Participants** shows **Browser can't record**. See [System Requirements](/guides/get-started/system-requirements).
### Waiting room
Turn on the **On join** switch next to Backstage in the People panel to screen guests before they appear in the studio. While it's on, every guest who joins lands backstage: they can watch and listen, but nobody can see or hear them, and they see a note that the host will let them in shortly. Admit them from the row menu in the People panel's Backstage section (**Move to studio**), or bring everyone in at once with **Admit all**. Turning the switch on or off only affects guests who join afterwards — nobody already in the studio is moved.
Backstage doubles as a holding area during a session: a host can send anyone backstage from their row menu at any time, and bring them back the same way.
## Invite guests and share a view-only link
In the studio's **People** panel (the **Participants** sidebar), hosts see one **Invite people** card. Pressing it mints two links at once and reveals a row for each:
* **Join link** — anyone who opens it lands in the studio preview, sets up their camera and mic, and joins as a guest: they're seen, heard, recorded, and listed alongside everyone else.
* **View-only link** — anyone who opens it can watch and listen to the session live, but never joins it: they aren't seen or heard, they aren't recorded, and the people in the room don't see them on their participant list. Viewers never make a project show as `LIVE` on their own, and they aren't included in its participant count, but each viewer does occupy one of the session's 20 seats while they're watching.
Each row shows the full link and has its own copy button. Both links are tied to their project and expire after seven days; a join link can't be used to watch and a view-only link can't be used to join, so handing out a view-only link never lets someone into the recording.
Opening a view-only link shows a single **Start watching** button instead of the camera and mic preview. Viewers get the same stage as everyone else, the grid and focus layouts, tile pinning, and a read-only view of the chat, with a `Viewing` badge in the header and a reminder that nobody can see or hear them. If a host has ended the session, the link reports that the room has ended. Hosts can preview what viewers see by opening their own view-only link.
## After a session: the project page
A project's page shows its recordings on the same cards the Library uses for clips: thumbnail, duration, title, and the date it was recorded. A session still being captured carries a red `Rec` badge; one still being assembled shows `Processing · 40%` and becomes playable automatically when it's ready; one that couldn't be assembled shows `Failed` with the reason underneath.
### The studio toolbar
* **Record** / **Stop** — hosts only. Starting a recording runs a three-second **Recording starts…** countdown so everyone begins together, and a *This session is now being recorded* banner appears for everyone in the room.
* **Audio** — click to mute and unmute yourself. The small chevron opens your **Microphone** device picker plus **Noise cancellation** (a 0–100% amount) and **Echo cancellation** (on by default; turn it off only on headphones). Both shape what the room hears and what gets recorded.
* **Video** — click to turn your camera off and on. The chevron opens your **Camera** device picker, **Camera effects**, **Mirror my video**, and the **Framing guide**.
* **Share** — shares your screen into the session as its own source, and becomes **Stop share** while it's running.
* **Layout** — **Grid** or **Focus**, for your own view.
* **Script** — a notepad you can paste a script into, with **Bold**, **Italic**, and **Underline**. Press play to launch the teleprompter in its own window, which scrolls your script with **Play/Pause**, **Replay**, a scroll-speed slider, and text-size controls. Only you see it.
* **Captions** — turns on live captions for you, in their own window, with each line labelled by speaker. Everyone else sees a *Live captions are on in this studio* note, because turning them on asks each browser to transcribe its own microphone. Captions are display-only and are never burned into the recording.
* **React** — sends an emoji that floats on your tile for everyone to see.
* **Leave** — asks you to confirm, then drops you out. The room stays open for everyone else and you can come back the same way you came in.
### The side panels
The rail on the right opens one panel at a time:
**Participants** lists everyone **In Studio** and everyone **Backstage**. Each row shows a person's role and camera quality, a connection indicator, and a live audio level meter. While a recording is running, each row also carries a capture chip — **Recording** when their camera and mic are both being captured, or a warning such as **Mic not recording**, **Camera not recording**, or **Browser can't record** — so you find out during the session rather than afterwards. Anyone can open their own row menu to **Change name**, and to **Pin tile** / **Unpin tile** for their own view. Hosts additionally get **Mute participant**, **Move to backstage**, and **Remove from studio** on other people's rows, **Mute all** / **Unmute all** at the top of the section, and a level slider to lift or trim a quiet guest's microphone. People are told when a host mutes them or adjusts their gain.
**Chat** has one **Everyone** conversation plus any **Direct message** you start with one person or several. Enter sends and Shift+Enter starts a new line; you can react to a message with an emoji; unread counts show on the conversation and on the rail. Chat is not part of the recording.
**Brand** styles your own tile, and everyone sees the result — including the recording. Set a **Logo** and the corner it sits in, a **Brand color**, a tile **Background** (a colour or an image), an **Overlay** frame (**Frame**, **Corners**, **Lower third**, **Broadcast**, or a transparent PNG of your own), a **Brand font** (choose one of ours or upload a `.ttf`, `.otf`, `.woff`, or `.woff2`), and a **Name style** for your name tag — **Clean**, **Pill**, **Bar**, or **Gradient**. Your branding follows your tile through every layout, and it carries into a long-form edit made from the recording — see [Room branding](/essentials/long-form-editor#room-branding).
**Media** brings extra material into the session live. **Videos & images** uploads files and gives each one a show/hide control, so an image or a clip plays out to the whole room — and into the recording — the moment you turn it on; videos get their own volume slider. **Music** (hosts) searches a soundtrack library or takes your own upload, with volume, **Fade**, and **Loop**. **Sound effects** has ready-made stings — **Clapping**, **Cheering**, **Drum roll**, **Air horn** — and accepts your own uploads too.
**Recordings** (hosts) lists this project's recent sessions with their status, with **Open** on each finished one and **View all project recordings** at the bottom.
Guests get everything above except **Record** and the **Recordings** panel. People watching on a view-only link see only **Participants** and **Chat** (read-only), plus **Layout** and **Leave**.
## Recording sessions
The studio records each participant locally at full quality and uploads in the background, so a shaky connection during the call doesn't degrade the recording. When the session ends, Overlap composes the individual tracks into a synchronized, ready-to-edit recording — grid view, isolated tracks, and a transcript included.
One project can hold as many sessions as you need — start a new one any time with **Start recording**. Within a session you can start and stop recording as many times as you like; each capture becomes its own recording on the project page.
Up to 20 people can be in a session at once, hosts and invited guests together. The limit applies to every session in a project, including ones you come back to days later.
Anyone can join, talk, and watch from any modern browser, but Overlap can only capture a participant into the recording from **Chrome** or **Edge**. Someone on another browser is told so as soon as recording starts, and their row in **Participants** shows **Browser can't record**. See [System Requirements](/guides/get-started/system-requirements).
### Waiting room
Turn on the **On join** switch next to Backstage in the People panel to screen guests before they appear in the studio. While it's on, every guest who joins lands backstage: they can watch and listen, but nobody can see or hear them, and they see a note that the host will let them in shortly. Admit them from the row menu in the People panel's Backstage section (**Move to studio**), or bring everyone in at once with **Admit all**. Turning the switch on or off only affects guests who join afterwards — nobody already in the studio is moved.
Backstage doubles as a holding area during a session: a host can send anyone backstage from their row menu at any time, and bring them back the same way.
## Invite guests and share a view-only link
In the studio's **People** panel (the **Participants** sidebar), hosts see one **Invite people** card. Pressing it mints two links at once and reveals a row for each:
* **Join link** — anyone who opens it lands in the studio preview, sets up their camera and mic, and joins as a guest: they're seen, heard, recorded, and listed alongside everyone else.
* **View-only link** — anyone who opens it can watch and listen to the session live, but never joins it: they aren't seen or heard, they aren't recorded, and the people in the room don't see them on their participant list. Viewers never make a project show as `LIVE` on their own, and they aren't included in its participant count, but each viewer does occupy one of the session's 20 seats while they're watching.
Each row shows the full link and has its own copy button. Both links are tied to their project and expire after seven days; a join link can't be used to watch and a view-only link can't be used to join, so handing out a view-only link never lets someone into the recording.
Opening a view-only link shows a single **Start watching** button instead of the camera and mic preview. Viewers get the same stage as everyone else, the grid and focus layouts, tile pinning, and a read-only view of the chat, with a `Viewing` badge in the header and a reminder that nobody can see or hear them. If a host has ended the session, the link reports that the room has ended. Hosts can preview what viewers see by opening their own view-only link.
## After a session: the project page
A project's page shows its recordings on the same cards the Library uses for clips: thumbnail, duration, title, and the date it was recorded. A session still being captured carries a red `Rec` badge; one still being assembled shows `Processing · 40%` and becomes playable automatically when it's ready; one that couldn't be assembled shows `Failed` with the reason underneath.
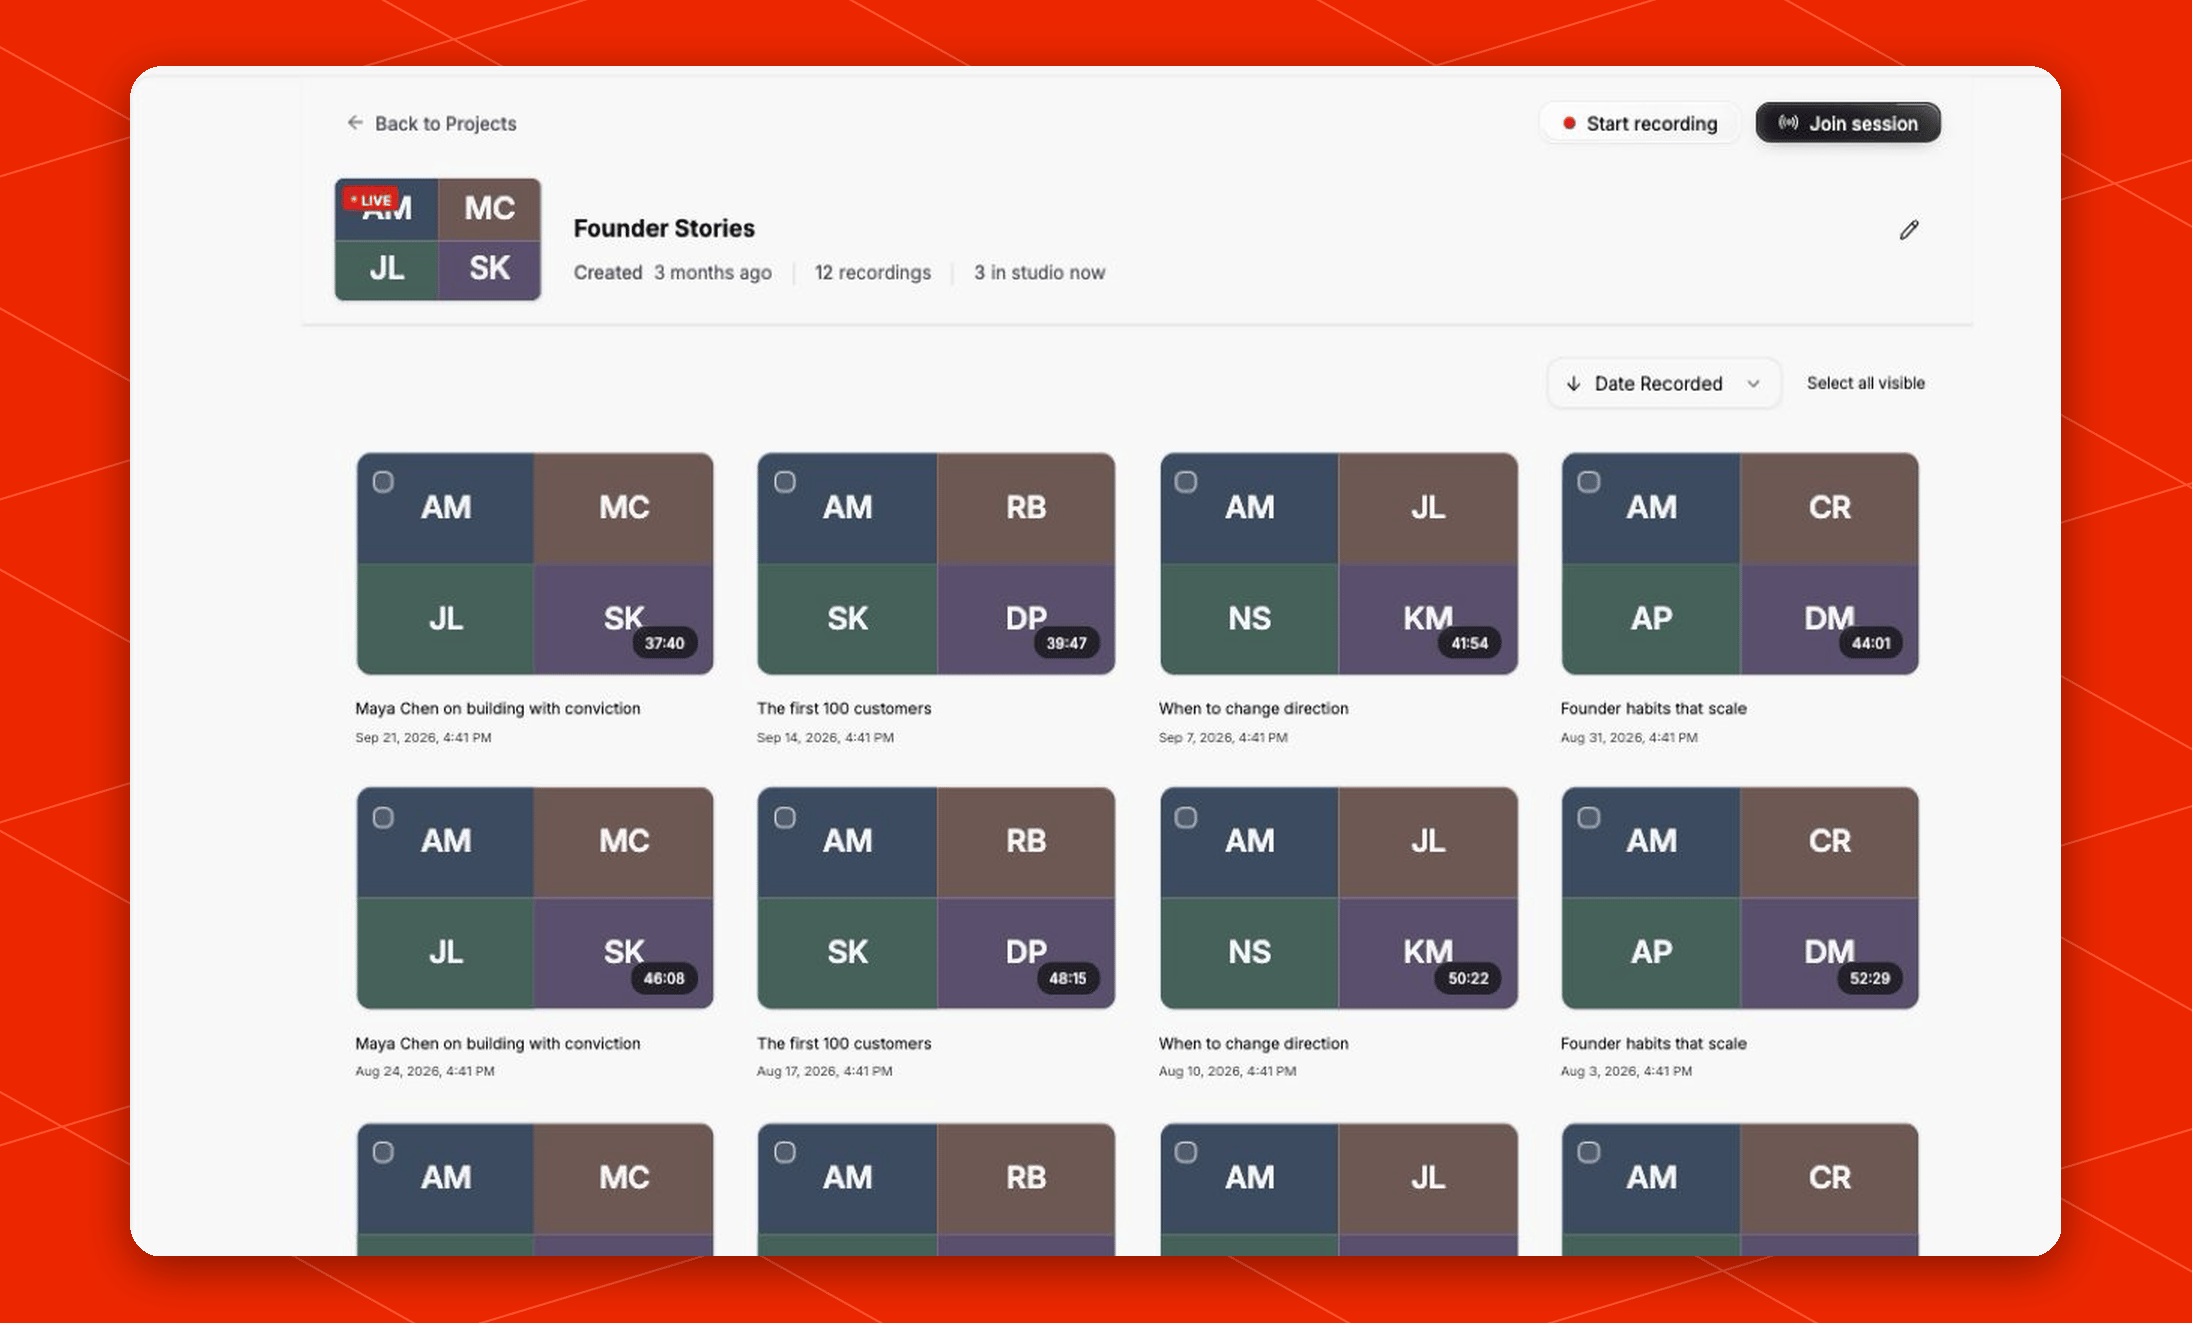 Above the grid, sort the recordings by **Date Recorded**, **Duration**, or **Title**; picking the active option again flips between ascending and descending. **Select all visible**, next to the sort menu, takes the whole set at once, and every recording has its own checkbox — selecting any of them reveals **Delete** for the selection.
Hovering a recording card reveals a `⋯` menu in its corner: **Edit** opens the session in the Studio editor, **Open** plays it, **Details** shows the session's project, status, recorded date, duration, captured track count, id, and any error, and **Delete** removes it (Edit and Open appear once the recording is ready). Deletes always ask you to confirm, are permanent — the recording's stored video and audio files are removed along with it — and a session that's still being captured or processed can't be deleted until it finishes. Long-form edits already created from the recording keep their own copy of the footage.
From the project header you can:
* **Rename** the project with the pencil next to its title
* **Start recording** — open the studio preview and capture another session into this project
* **Join session** — enter the studio while a session is live
The header also states when the project was created, how many recordings it holds, and how many people are in the studio right now.
### Playing a recording
Open a recording to play it. The player sits front and center, and everything else lives in a sidebar on the right: the recording's name, when it was recorded, and the transcript. Hover over the name and click the pencil to rename the recording — the new name shows on the project page too.
Above the grid, sort the recordings by **Date Recorded**, **Duration**, or **Title**; picking the active option again flips between ascending and descending. **Select all visible**, next to the sort menu, takes the whole set at once, and every recording has its own checkbox — selecting any of them reveals **Delete** for the selection.
Hovering a recording card reveals a `⋯` menu in its corner: **Edit** opens the session in the Studio editor, **Open** plays it, **Details** shows the session's project, status, recorded date, duration, captured track count, id, and any error, and **Delete** removes it (Edit and Open appear once the recording is ready). Deletes always ask you to confirm, are permanent — the recording's stored video and audio files are removed along with it — and a session that's still being captured or processed can't be deleted until it finishes. Long-form edits already created from the recording keep their own copy of the footage.
From the project header you can:
* **Rename** the project with the pencil next to its title
* **Start recording** — open the studio preview and capture another session into this project
* **Join session** — enter the studio while a session is live
The header also states when the project was created, how many recordings it holds, and how many people are in the studio right now.
### Playing a recording
Open a recording to play it. The player sits front and center, and everything else lives in a sidebar on the right: the recording's name, when it was recorded, and the transcript. Hover over the name and click the pencil to rename the recording — the new name shows on the project page too.
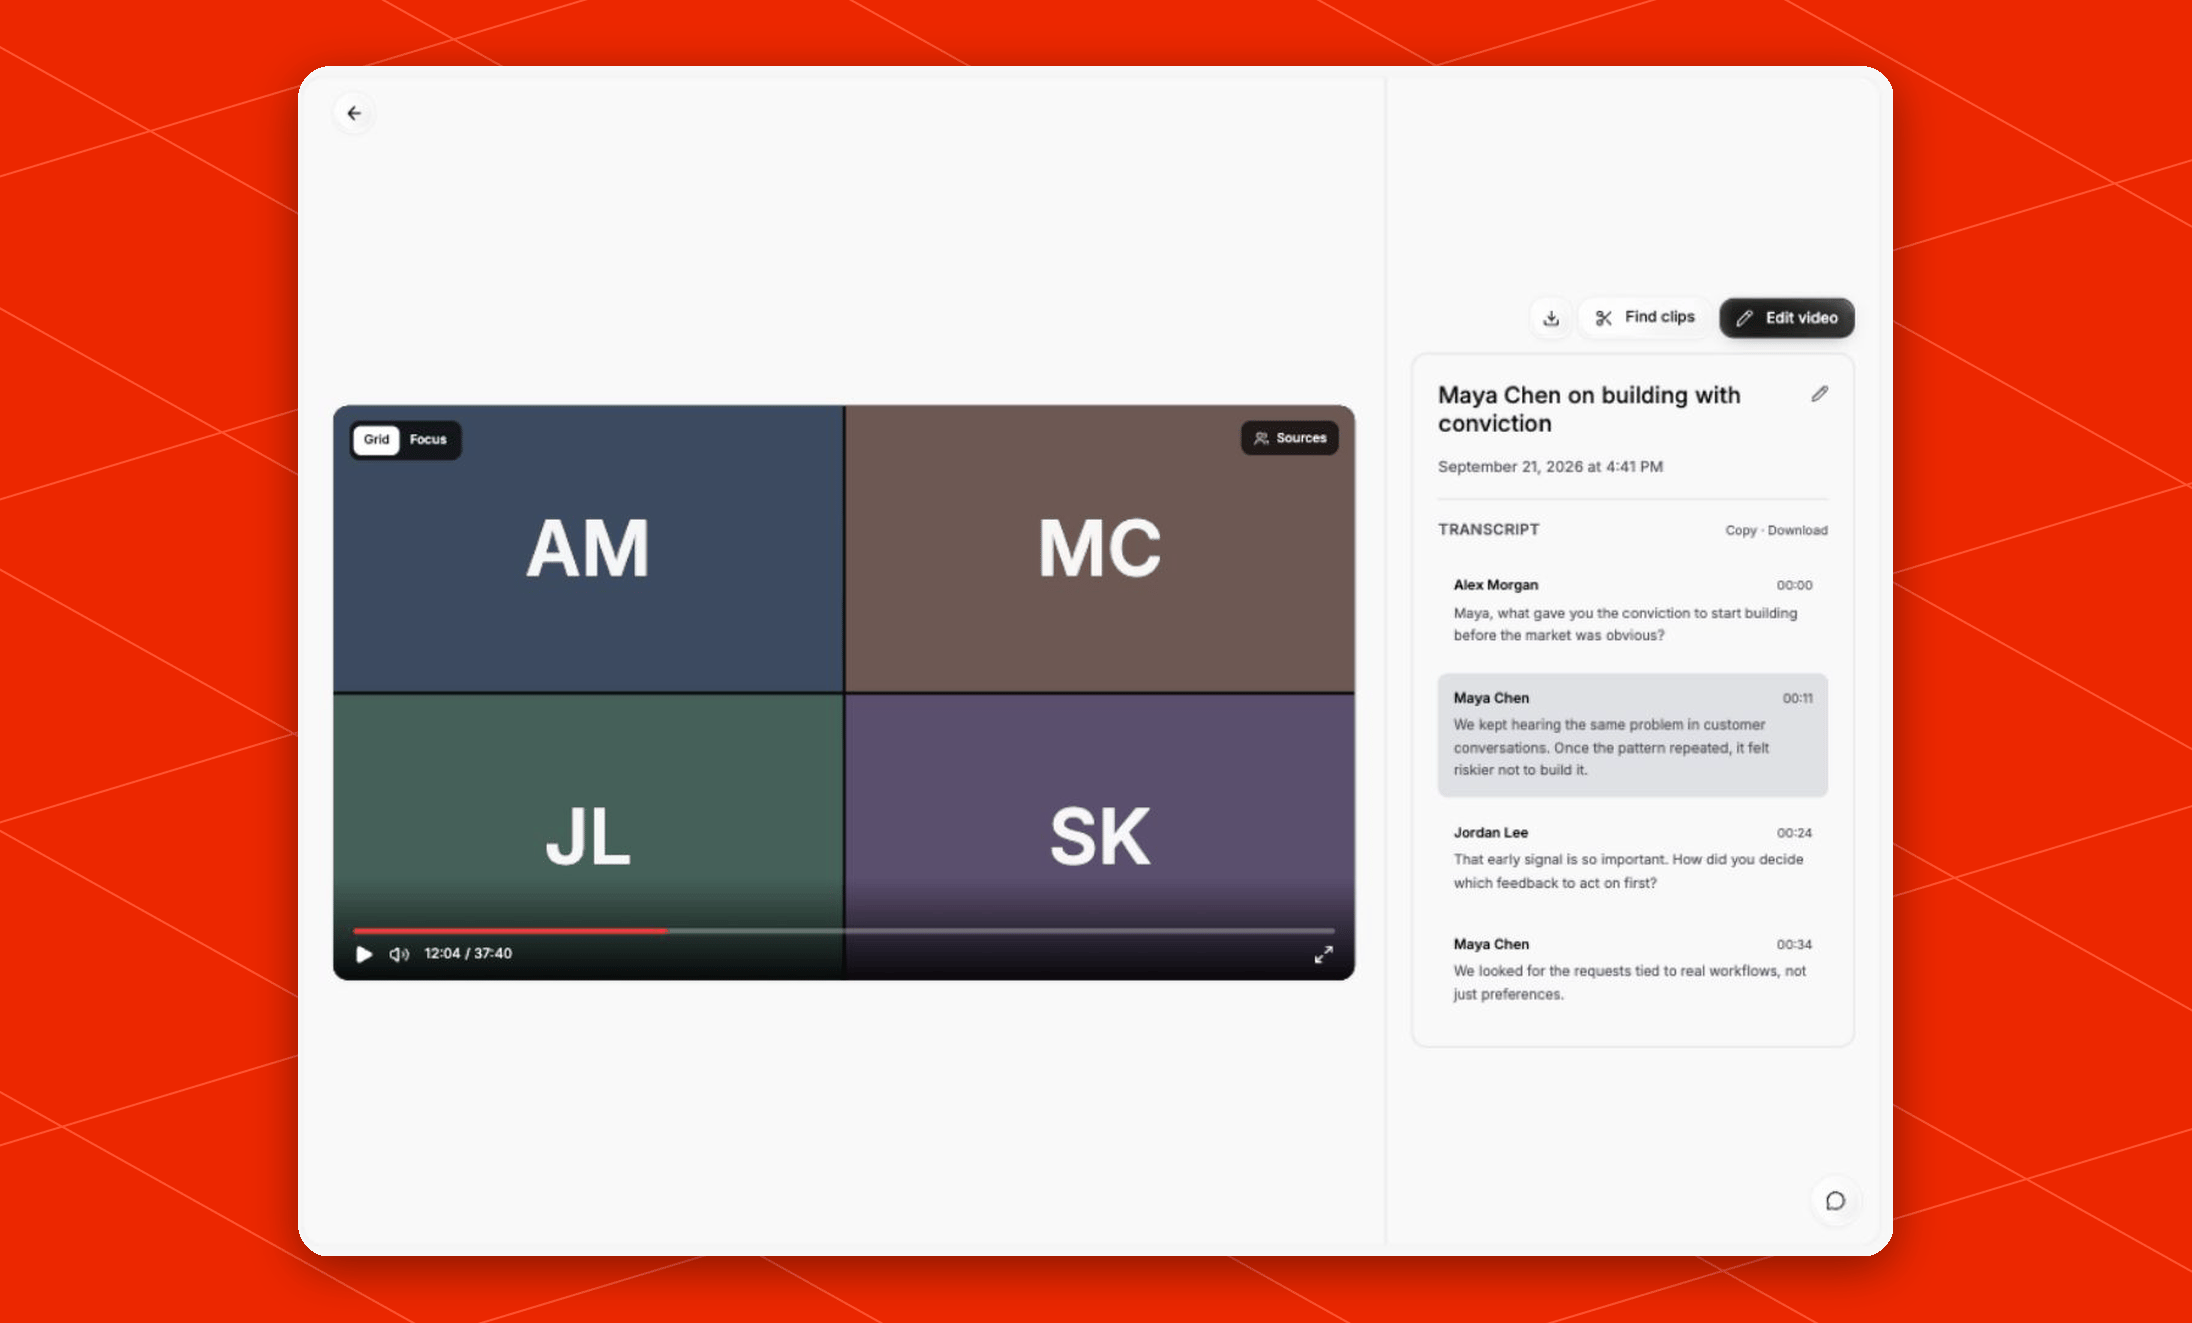 **Sources**, in the corner of the player, lists everything the session captured — the composed session, each participant's isolated camera, screen share, and audio tracks, any media played into the room, and any branding stills; click one to play it, or download it straight from the list. When the composed session is playing, a **Grid** | **Focus** switch beside it flips between the everyone-in-a-grid cut and the speaker-focused cut.
The transcript reads as a conversation — each line is one speaker's whole turn, labelled with their name where Overlap knows it and stamped with the time it began. Clicking a line jumps playback there, the current line highlights as the recording plays, and hovering over the transcript reveals buttons to copy it or download it as a `.txt`.
Three actions sit above the sidebar once a recording is ready:
* the **download** button saves whatever you're currently watching
* **Edit video** continues into the Studio editor to turn the session into a finished program — see the [Long-Form Editor](/essentials/long-form-editor)
* **Find clips** hands the session to a clipping workflow, described below
While a session is still being assembled the page says **Processing this recording** with its progress, and those actions appear once it's done.
### Turn a recording into clips
**Find clips** on the recording page renders the session in the background and then runs one of your clipping workflows on the result — you don't have to open the editor, render anything yourself, or keep the tab open.
Choosing it opens **Select workflow**, which lists the workflows that contain a [Find Clips](/nodes/findclips) node. Pick one and Overlap confirms that the render has started and takes you to that workflow's page, where the recording appears as a source marked **Rendering**. When the render finishes the workflow runs on it by itself, and the clips land in your Library like any other workflow output. Runs from the same project group under the same source, so a weekly show builds up one place to look.
A recording that needs a full pass in the editor first says so and offers **Open in editor**, carrying the workflow you picked across with it. Studio has the same **Find clips** button in its header, so you can hand any long-form project to a clipping workflow the same way.
**Sources**, in the corner of the player, lists everything the session captured — the composed session, each participant's isolated camera, screen share, and audio tracks, any media played into the room, and any branding stills; click one to play it, or download it straight from the list. When the composed session is playing, a **Grid** | **Focus** switch beside it flips between the everyone-in-a-grid cut and the speaker-focused cut.
The transcript reads as a conversation — each line is one speaker's whole turn, labelled with their name where Overlap knows it and stamped with the time it began. Clicking a line jumps playback there, the current line highlights as the recording plays, and hovering over the transcript reveals buttons to copy it or download it as a `.txt`.
Three actions sit above the sidebar once a recording is ready:
* the **download** button saves whatever you're currently watching
* **Edit video** continues into the Studio editor to turn the session into a finished program — see the [Long-Form Editor](/essentials/long-form-editor)
* **Find clips** hands the session to a clipping workflow, described below
While a session is still being assembled the page says **Processing this recording** with its progress, and those actions appear once it's done.
### Turn a recording into clips
**Find clips** on the recording page renders the session in the background and then runs one of your clipping workflows on the result — you don't have to open the editor, render anything yourself, or keep the tab open.
Choosing it opens **Select workflow**, which lists the workflows that contain a [Find Clips](/nodes/findclips) node. Pick one and Overlap confirms that the render has started and takes you to that workflow's page, where the recording appears as a source marked **Rendering**. When the render finishes the workflow runs on it by itself, and the clips land in your Library like any other workflow output. Runs from the same project group under the same source, so a weekly show builds up one place to look.
A recording that needs a full pass in the editor first says so and offers **Open in editor**, carrying the workflow you picked across with it. Studio has the same **Find clips** button in its header, so you can hand any long-form project to a clipping workflow the same way.