> ## Documentation Index
> Fetch the complete documentation index at: https://docs.overlap.ai/llms.txt
> Use this file to discover all available pages before exploring further.
> Add an AI-generated title overlay to clips in a workflow.
# Title overlay
> Add an AI-generated title overlay to every video or clip that reaches this node.
### Schema
* **Input**: Video or clips from an upstream trigger or editing node
* **Output**: Video or clips with a title overlay applied
## Add the node
Open **Workflows** from the left sidebar and click **New** to open the workflow builder.
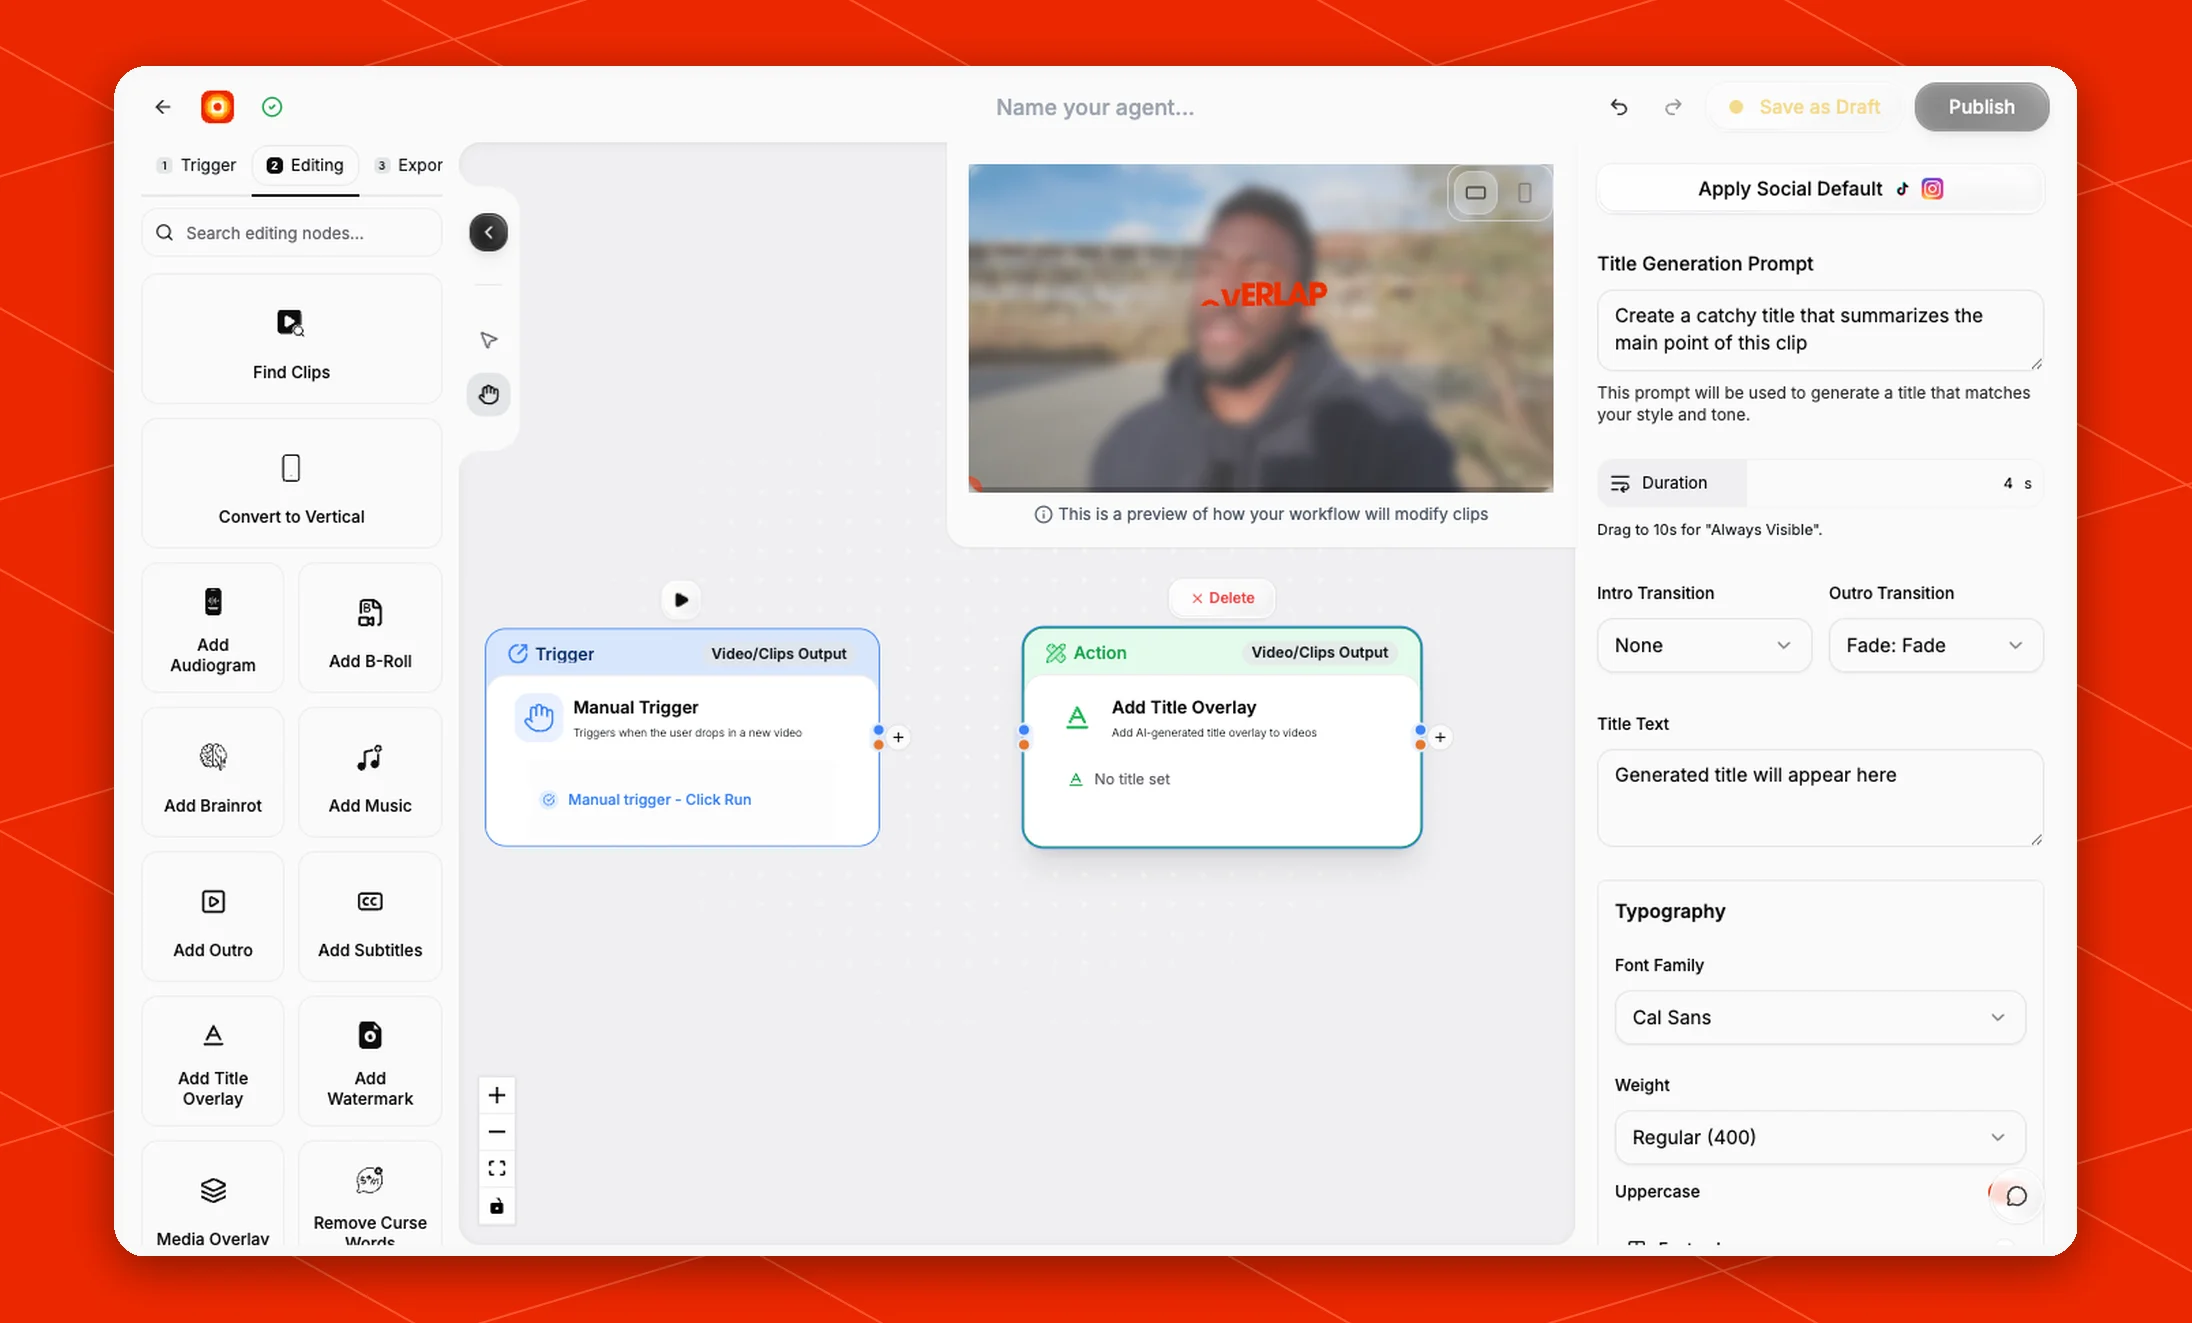
Add a trigger first, then continue in the **Editing** stage. Choose **Add Title Overlay** from the editing node panel. Overlap adds an action node to the canvas.
Click the **Add Title Overlay** node on the canvas whenever you need to reopen its settings.
 ## Generate the title
Use **Title Generation Prompt** to describe the kind of title Overlap should create for each clip. The default prompt asks Overlap to create a catchy title that summarizes the main point of the clip.
**Title Text** sets the preview text shown in the builder so you can see how a title looks with your styling. At run time the node generates a title for each clip and replaces this preview text. To send a fixed title instead of an AI-generated one, use the API: pass `title_config.text` together with `generateTitle: false` (see [Node Config](/api-reference/node-config-overrides)). Note that an API title applies the same text to every clip in the run; for different per-clip titles, edit each clip after generation.
Click **Apply Social Default** to start from the current social title style, then adjust the settings below it.
Choose **Vertical Video Hook** when you want a two-part editorial opener. The preset declares an ordered **Name** block and **Title / Hook** block, so Overlap generates each field with its matching prompt instead of relying on preset-specific workflow logic. It prefers a known guest or active speaker over the host when speaker metadata is available. You can enter fixed copy in the title-block control to override its generated text for every clip.
## Set timing and motion
Use **Duration** to decide how long the title stays visible. The panel notes that dragging duration to **10s** makes the title **Always Visible**.
Set **Intro Transition** and **Outro Transition** to control how the title appears and disappears. The current defaults are **None** for intro and **Fade: Fade** for outro.
## Style the title
Use the typography controls to adjust the title's font, weight, uppercase setting, font color, font size, line height, and character spacing.
Use the background controls to choose the background style, text alignment, background color, padding, vertical padding, border radius, and line margin. Shadow controls let you set the shadow color, blur, and offset.
Enable **Dynamic Position** when the title should anchor to a detected split-view seam. Enable **Avoid Faces** when the title should move away from detected face and subject regions. The settings are independent and both default to off. Use **Position** to set the preferred vertical placement.
## Build the rest of the workflow
Use **Add Title Overlay** after the workflow has a video or clip source. A common flow is [New YouTube Video](/nodes/youtube) -> [Find Clips](/nodes/findclips) -> **Add Title Overlay** -> [Add Subtitles](/nodes/subtitles) -> **Post to Social**.
Finish the workflow with an export node, then click **Publish** when the workflow is ready.
## Generate the title
Use **Title Generation Prompt** to describe the kind of title Overlap should create for each clip. The default prompt asks Overlap to create a catchy title that summarizes the main point of the clip.
**Title Text** sets the preview text shown in the builder so you can see how a title looks with your styling. At run time the node generates a title for each clip and replaces this preview text. To send a fixed title instead of an AI-generated one, use the API: pass `title_config.text` together with `generateTitle: false` (see [Node Config](/api-reference/node-config-overrides)). Note that an API title applies the same text to every clip in the run; for different per-clip titles, edit each clip after generation.
Click **Apply Social Default** to start from the current social title style, then adjust the settings below it.
Choose **Vertical Video Hook** when you want a two-part editorial opener. The preset declares an ordered **Name** block and **Title / Hook** block, so Overlap generates each field with its matching prompt instead of relying on preset-specific workflow logic. It prefers a known guest or active speaker over the host when speaker metadata is available. You can enter fixed copy in the title-block control to override its generated text for every clip.
## Set timing and motion
Use **Duration** to decide how long the title stays visible. The panel notes that dragging duration to **10s** makes the title **Always Visible**.
Set **Intro Transition** and **Outro Transition** to control how the title appears and disappears. The current defaults are **None** for intro and **Fade: Fade** for outro.
## Style the title
Use the typography controls to adjust the title's font, weight, uppercase setting, font color, font size, line height, and character spacing.
Use the background controls to choose the background style, text alignment, background color, padding, vertical padding, border radius, and line margin. Shadow controls let you set the shadow color, blur, and offset.
Enable **Dynamic Position** when the title should anchor to a detected split-view seam. Enable **Avoid Faces** when the title should move away from detected face and subject regions. The settings are independent and both default to off. Use **Position** to set the preferred vertical placement.
## Build the rest of the workflow
Use **Add Title Overlay** after the workflow has a video or clip source. A common flow is [New YouTube Video](/nodes/youtube) -> [Find Clips](/nodes/findclips) -> **Add Title Overlay** -> [Add Subtitles](/nodes/subtitles) -> **Post to Social**.
Finish the workflow with an export node, then click **Publish** when the workflow is ready.