
Open a clip in Studio to refine timing, text, subtitles, and finishing touches before you export or share it.
Opening Studio
There are two common ways to open Studio, depending on whether you are editing an existing clip or starting a brand-new project.Option 1: Edit an existing clip
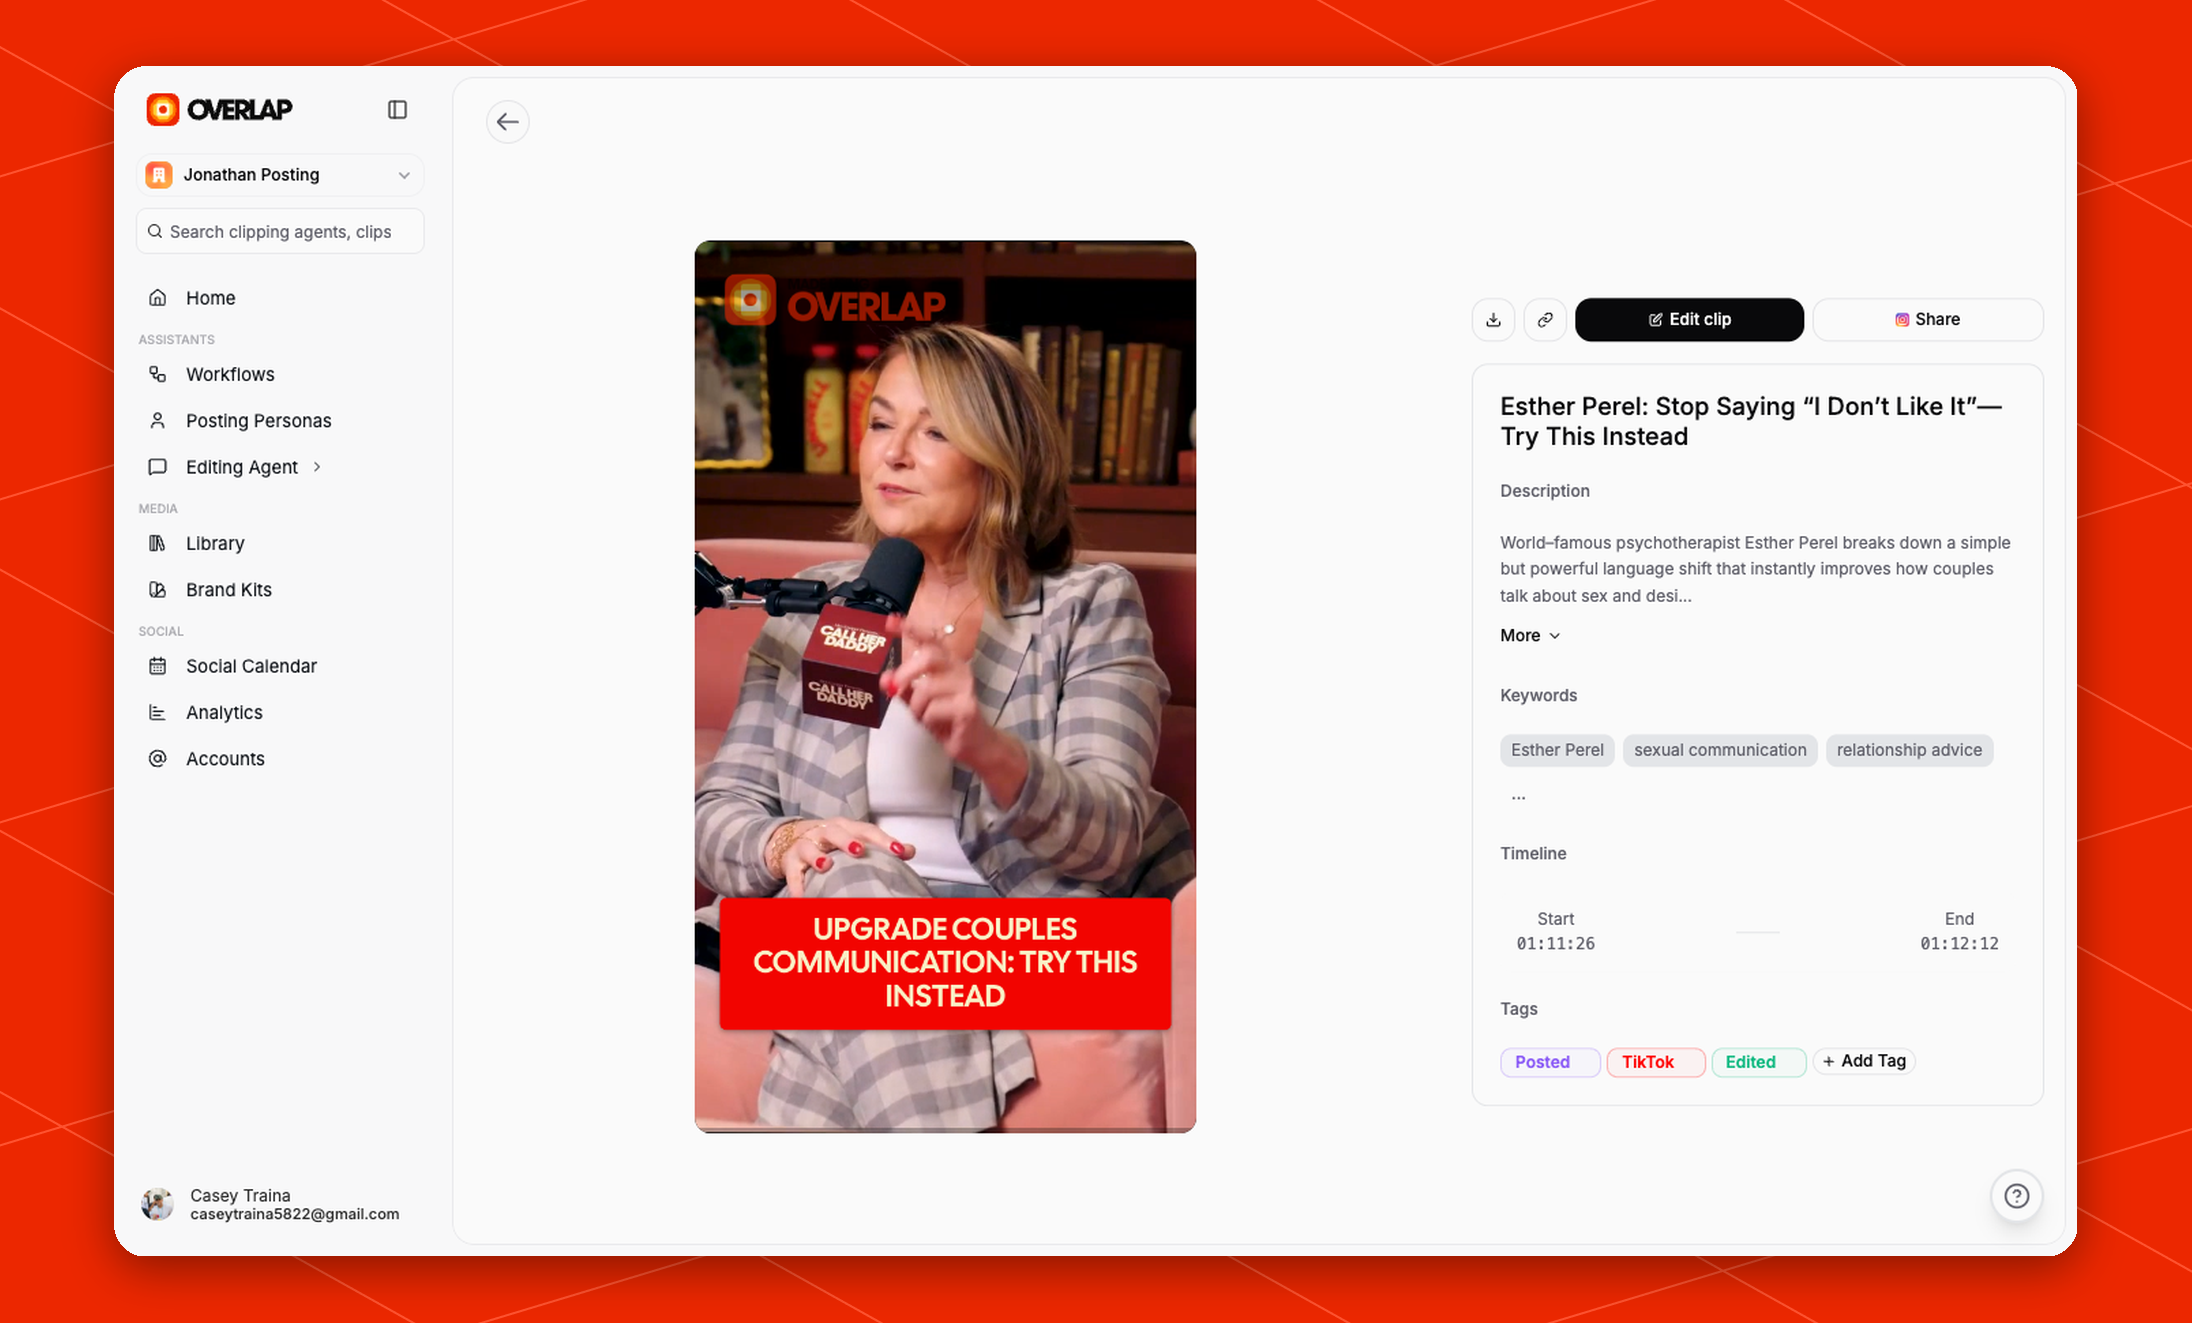
Open a clip and clickEdit Clip. That takes you directly into Studio.
You will typically do this from the clip detail page after Overlap has already generated or surfaced a clip for review. A good mental model is:
- automation and workflows generate or queue the clip
- the clip detail page gives you a focused view of the selected clip
Edit Clipopens the manual editor for that specific outputStudiois where you make the final hands-on changes before exporting or sharing
Option 2: Start a video from scratch
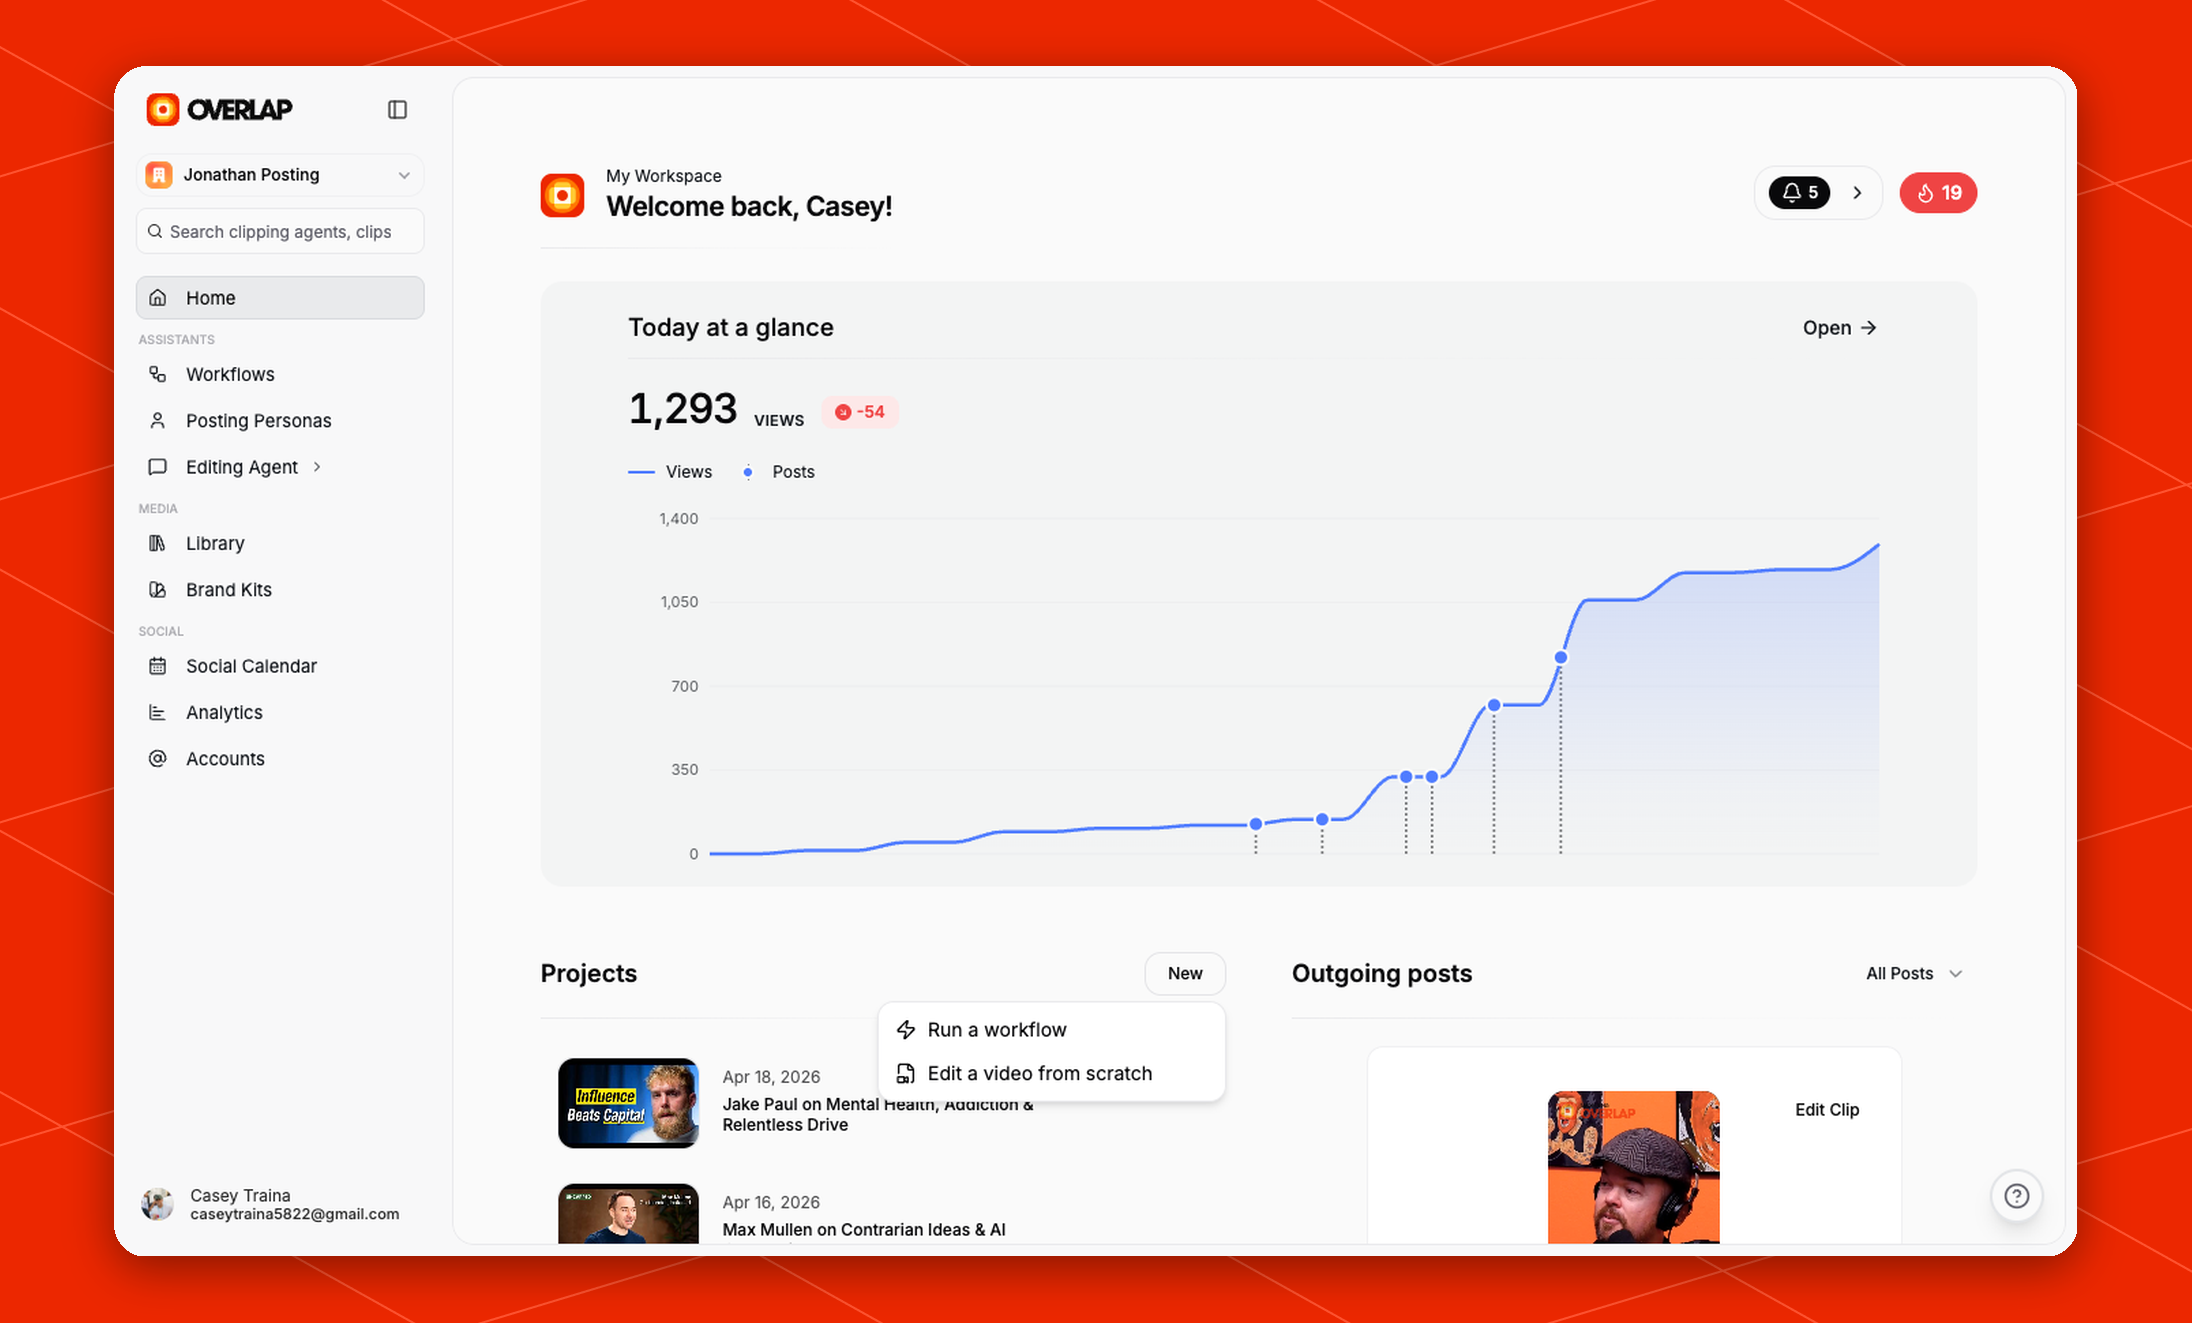
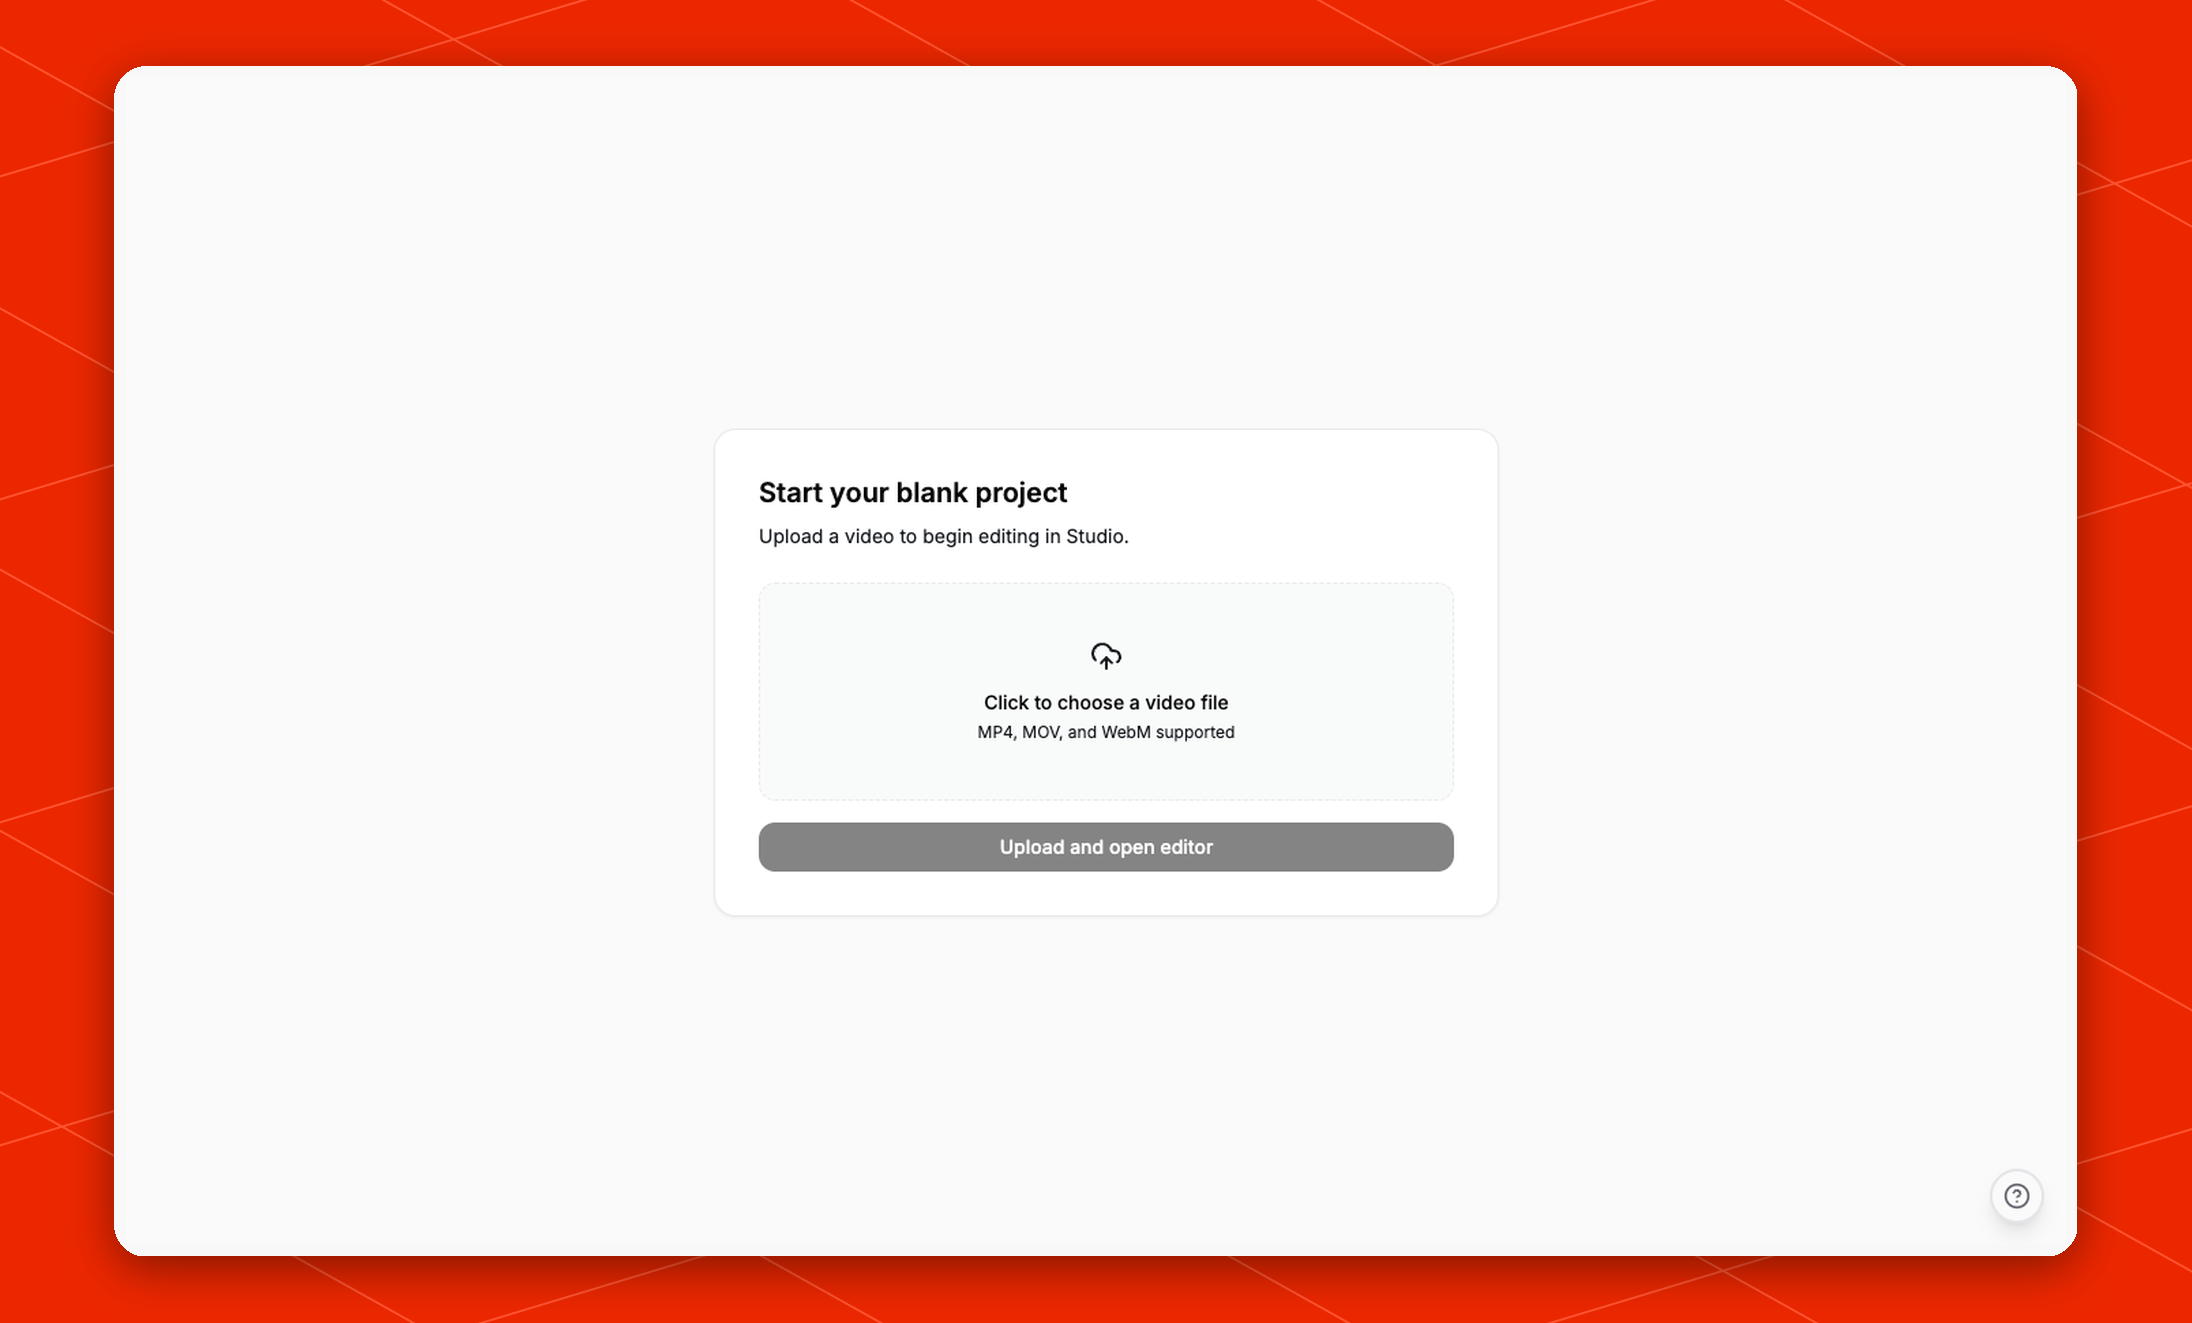
From theHome page, use New in the Projects section, then choose Edit a video from scratch.
Understanding the Studio layout
Studio brings the clip preview, playback controls, timeline, and editing tools into one screen.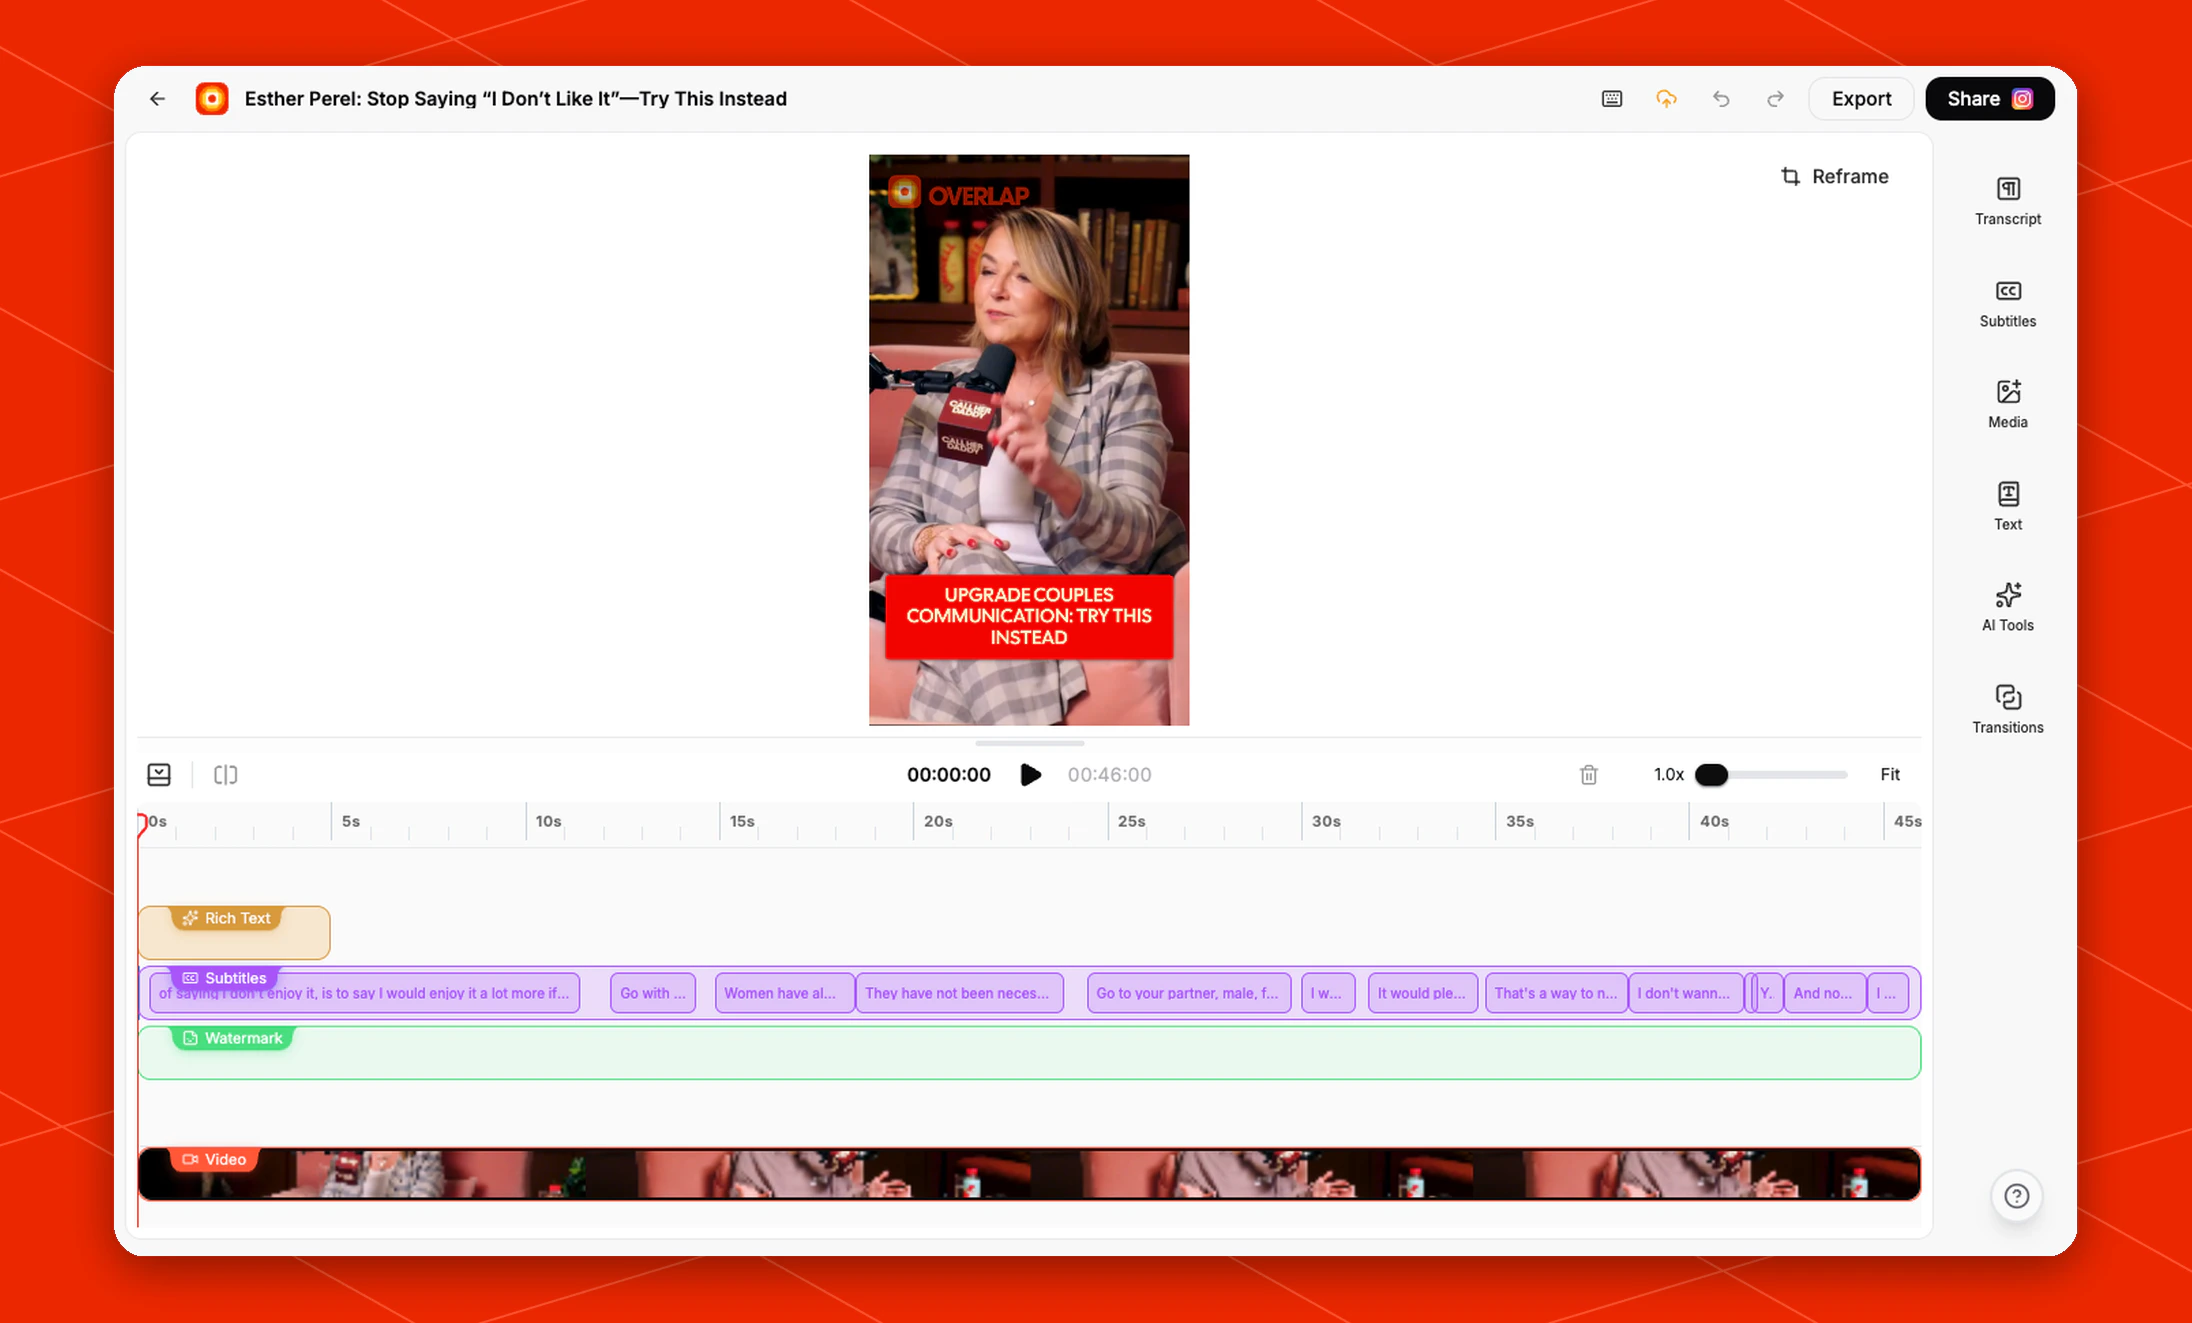
- The top bar, where you can go back, see the clip title, and access
ExportandShare - The preview canvas in the center, which shows the current frame of the clip
- The
Reframecontrol beside the preview for adjusting composition - The
Thumbnail Editorcontrol besideReframe, which opens a dedicated thumbnail design surface - The playback controls below the preview, including the play button, current time, total duration, speed control, and fit/zoom controls
- The timeline at the bottom, where Overlap shows each visual or text layer over time
- The right-side tool rail, which opens different editing panels
Color grading a clip
OpenColor in the right-side tool rail to apply a finishing grade to the current clip. The Looks tab compares the current video frame across reusable presets, while Adjustments provides grouped Light, Color, and Finishing controls with a live RGB histogram.
Drag horizontally across a value to tune exposure, brightness, contrast, highlights, shadows, saturation, vibrance, temperature, tint, fade, vignette, blur, and animated film grain. Changes update the Studio preview immediately and save with the edited clip. The grade affects the base video while subtitles, titles, watermarks, and other authored graphics retain their original colors.
Editing with the transcript
OpenTranscript in the right-side tool rail to work on the spoken content directly.
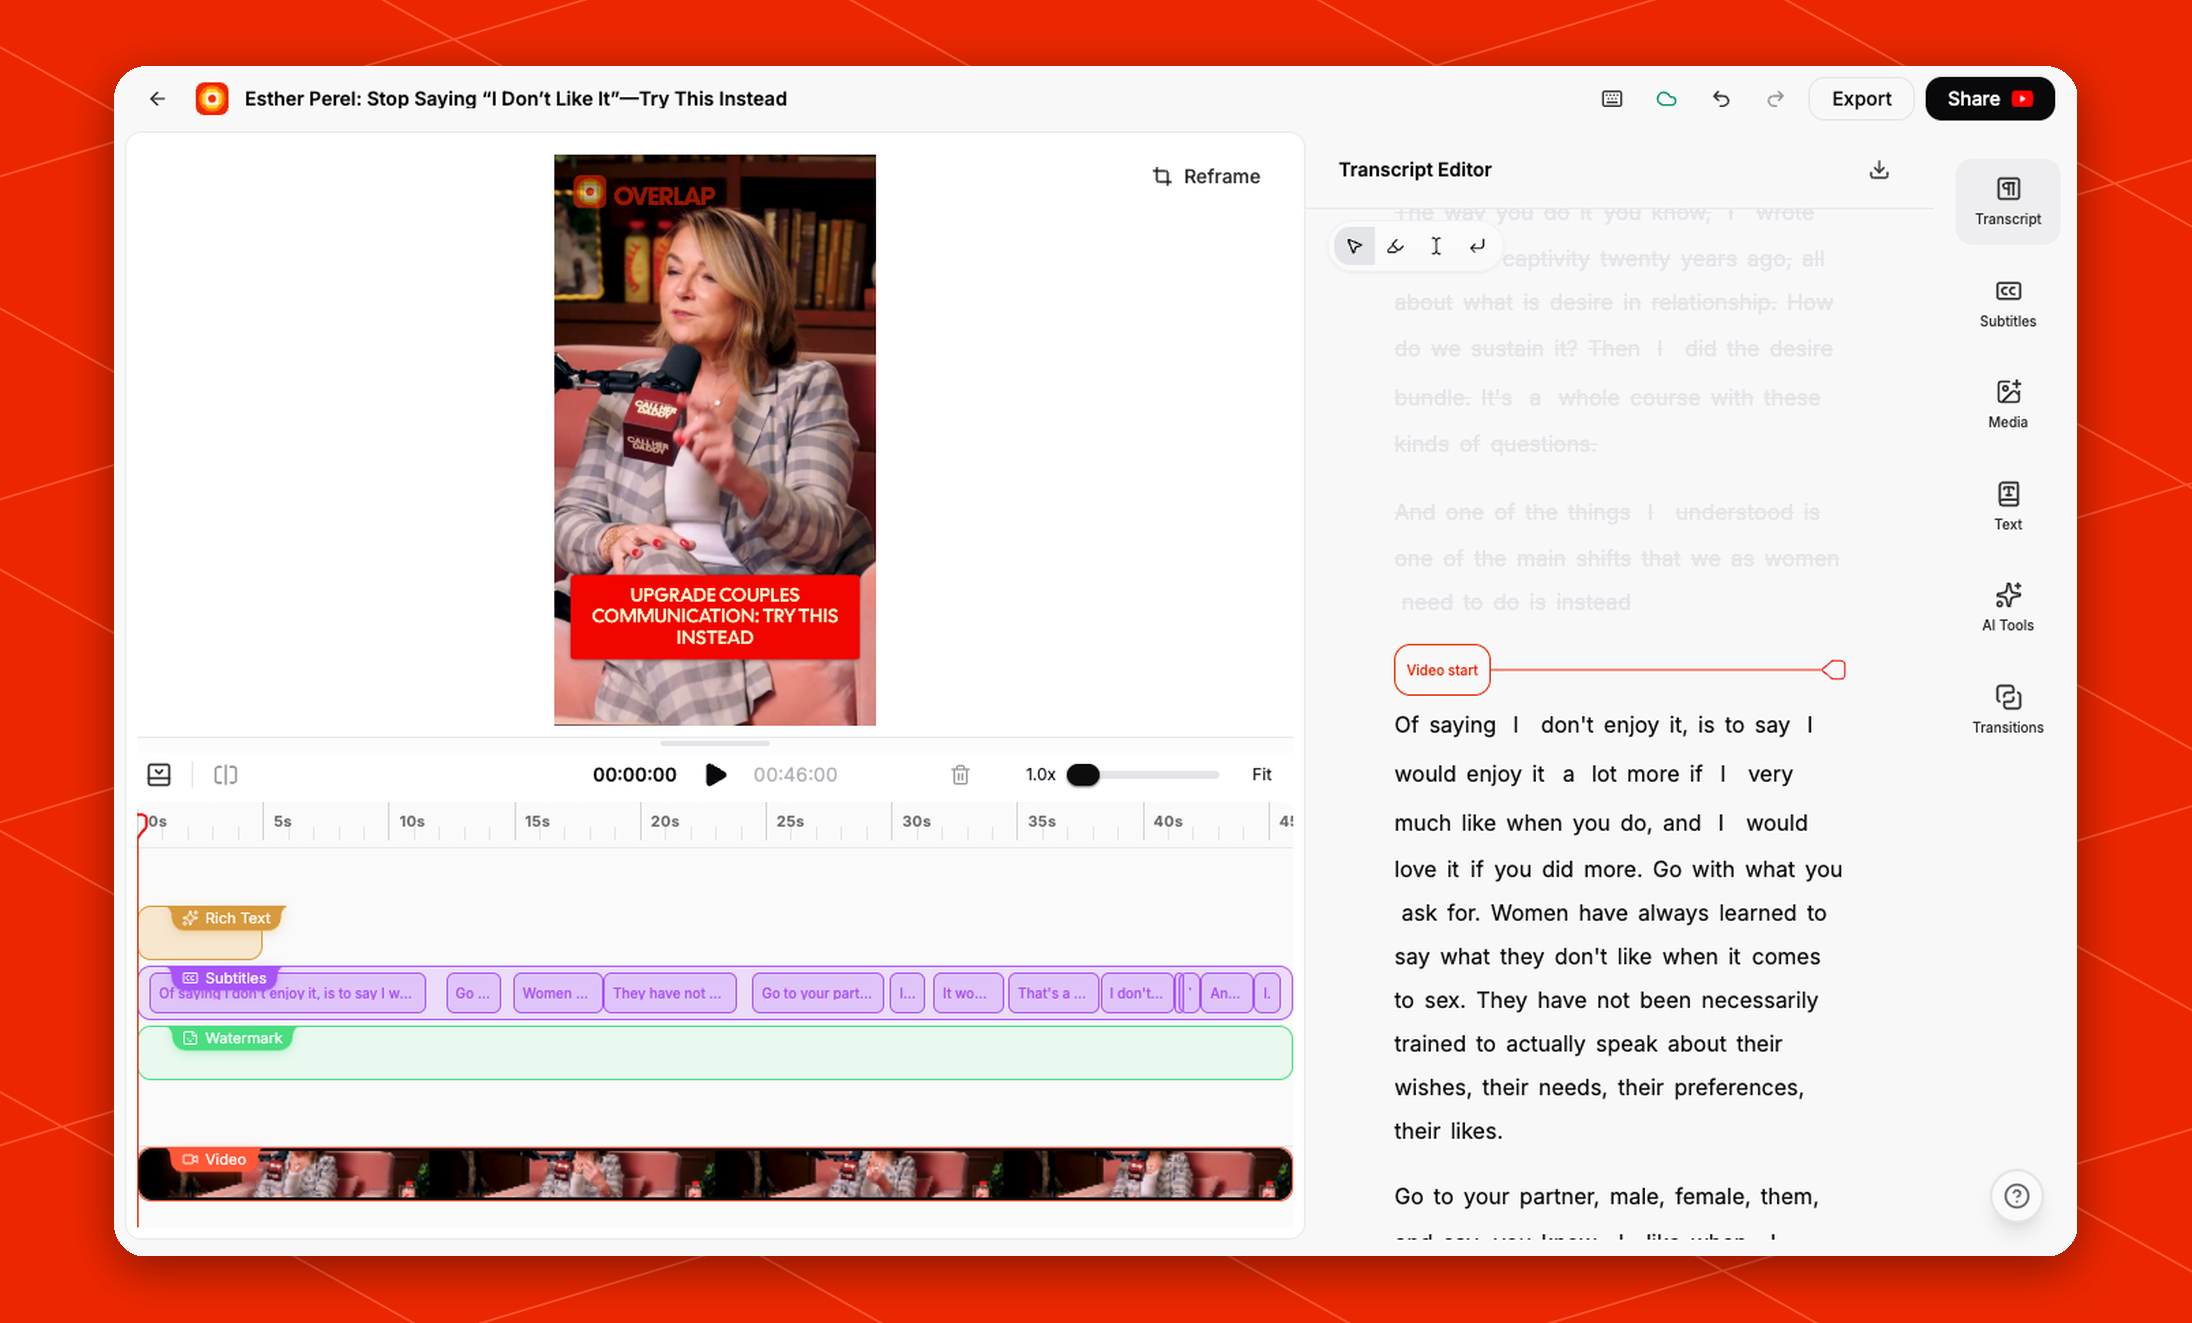
Transcript Editor, Overlap shows:
- speaker-grouped transcript blocks; click a speaker’s name or portrait to identify that speaker across every matching section and every clip made from the same source input, or use the adjacent dropdown to move only the current section to a different speaker track. While either menu is open, the transcript softly previews exactly which sections will be affected. Existing People names and portraits appear automatically when the speaker is already known
- markers like
Video startandVideo endso you can see what portion of the source is currently inside the clip - a transcript-focused toolbar above the text for quick edit operations
Highlighting transcript sections
To edit a specific moment, highlight the exact word, phrase, sentence, or paragraph you want to change in the transcript. From there, use transcript actions such as:Cut from Videoto remove the selected spoken portion from the clip itselfMuteto silence the selected section when you want to keep the visuals but remove the audioEdit Captionsto change what appears on screen without treating it as a full video cut
- use
Cut from Videowhen the pacing or content of the clip should change - use
Mutewhen the shot should stay but the audio should drop out - use
Edit Captionswhen the video timing is fine and only the on-screen text needs adjustment
Censor/Uncensor, Mute/unmute, Remove Caption, Cut from Video, and Restore — take priority over the Filler Words, Stutter Words, and Curse Words tools. They stay in place after reopening the clip, after changing those tools’ settings, and in exports. Unmuting a curse word by hand also keeps it in the video when Curse Words is set to Skip in Video. Trimming or extending the clip on the timeline decides again whether the affected words are in the clip.
A practical way to use the transcript editor is:
- Read through the clip from top to bottom in
Transcript. - Highlight the exact section that feels off.
- Decide whether the problem is the spoken content, the audio, or only the captions.
- Apply the corresponding action.
- Scrub the timeline and preview the result before moving on.
Working with the timeline
The timeline is the fastest way to understand how the clip is assembled over time. In the current studio view, the clip is split into separate tracks such as:Rich TextSubtitlesWatermarkVideo
- Check when subtitle segments begin and end
- See how long a text overlay remains on screen
- Confirm whether the watermark spans the full clip
- Scrub through the video before exporting
- Jump back to the saved thumbnail frame from the thumbnail marker
Command+C and Command+V on Mac, or Ctrl+C and Ctrl+V on Windows, to copy and paste the segment after the selected position. Use Command+D or Ctrl+D to duplicate the selected segment in one step. These shortcuts are scoped to the timeline and are not available in Reframe editing mode.
Hiding a layer without deleting it
You can hide a layer, such as a title card, subtitles, a text overlay, an image or video overlay, an end card, or an audio track, so it is left out of the preview and every export while keeping all of its settings. Click the layer on the timeline, then click the eye button next to its transition In and Out menus, or pressShift+H. For audio tracks, select the track and press Shift+H. Hidden layers stay on the timeline, dimmed and marked with a crossed-out eye, so you can still select them, change their timing, and edit them. Select a hidden layer and click the eye button again, or press Shift+H, to bring it back.
Hiding applies everywhere the clip is rendered: downloads, cloud exports, and posts to social. Hiding subtitles hides every speaker’s caption row together; switching subtitles back on in the Subtitles panel also shows them again. The main video can’t be hidden.
The clip’s automatic thumbnail refreshes after you hide or show a layer. A thumbnail you designed in the thumbnail editor or set yourself keeps its own layers; open the thumbnail editor to change it.
The ruler across the top of the timeline shows time markers in seconds, which makes it easier to inspect short-form clips precisely. The saved thumbnail frame appears on the ruler as a small black-and-white marker. Hover the marker to see Thumbnail, or click it to scrub the preview back to that frame.
Designing the clip thumbnail
By default, Overlap uses the first frame as the clip thumbnail. To create a designed cover, scrub to the frame you want and clickThumbnail Editor beside Reframe.
The thumbnail editor starts from the clip exactly as it appears at that frame. Inside it, you can:
- scrub to a different frame
- add and style text with the Studio text presets
- upload an image or choose one from the company media library
- move, resize, replace, or delete thumbnail layers
- turn off
Show subtitlesto keep the clip’s captions out of this thumbnail - remove clip overlays such as subtitles, titles, watermarks, and b-roll from the thumbnail without removing them from the video
- adjust exposure, contrast, saturation, vibrance, warmth, and tint
Save thumbnail when the design is ready. Overlap composites the selected frame and thumbnail-only layers at the clip’s full output resolution, saves the result as the clip thumbnail, and keeps the editable design so it reopens on the same frame with the same layers and colour settings.
Thumbnail edits are independent from the video timeline. Removing or restyling a layer in the thumbnail editor does not change the clip itself, and later Studio saves do not replace a designed thumbnail automatically.
You can also open the same editor from a scheduled clip in Social Calendar: open the post and click Design in its cover controls.
Creating a thumbnail in chat
The editing agent can create a polished thumbnail from the current clip, uploaded PNG/JPEG/WebP images, or a mix of both. Ask it to create a thumbnail and describe the headline, subject, and visual direction you want. It samples candidate moments from the clip, uses the company colors, fonts, voice, and logos saved under Brand Kits → My Brand, and returns the generated image in chat. You can also request square or vertical artwork when the destination is not a standard 16:9 thumbnail. Clip sampling compares nine moments in a 3×3 grid. It renders the actual video with the clip’s reframe crop applied and defaults to clean video-only frames. Ask to include the existing title, subtitle, and graphic layers when you want the full clip composition represented in those samples. Continue in the same conversation to revise the result. Feedback such as “make the headline larger,” “use the other speaker,” “remove the logo,” or “go back to the first version” creates a new version without overwriting the earlier image. Generated and revised thumbnails are never saved to the clip automatically. Review any draft, then click Apply to Clip on that thumbnail to save it as the clip thumbnail. You can also explicitly ask the agent to apply a specific version. Each successful generation appears in chat immediately. If visual review calls for another pass, the previous draft stays visible while the next aspect-ratio-matched placeholder renders, and up to three successful attempts are shown together in a wrapping grid. Thumbnail text is kept fully inside safe margins; the composition can zoom out or reflow when needed to prevent clipped letters. The same conversation memory applies to generated files from every editing-agent skill, not just thumbnails. Overlap keeps compact references to earlier images and files with the chat, so follow-up requests such as “move the text up,” “use the latest image,” or “go back to the first version” can resolve the earlier output after a reload. Relevant prior images are shown to the agent again for visual inspection; file metadata and stable references remain available without storing image bytes or private provider responses in the conversation. When the editing agent needs a clip before it can continue, chat shows a compact clip chooser above the message box. Select an existing clip from the Library modal, upload a video to ingest it as a clip, or paste an Overlap clip link. Chat sends the selected clip back to the agent and continues the request; no command or placeholder text needs to be typed manually. Local videos stream directly from the browser into the ingestion pipeline in small, acknowledged chunks; the original video is not first copied into Firebase Storage. After normalization, Overlap saves the video as a regular company clip with its duration, dimensions, thumbnail, transcript, and source metadata. Remote HTTP video links use the same normalization contract. When the agent needs a long-form video, chat presents an inline chooser where you can select a saved source, drag or upload a video file, or enter an HTTP(S) video URL. YouTube watch, share, Shorts, embed, and live URLs are downloaded through the same normalizer and returned to chat as an Overlap source clip. For longer videos, ask chat to find highlights or viral moments. Chat first asks whether you want to run Find Clips directly or send the same video through one of your saved workflows. The workflow list is scoped to your organization; selecting one starts that configured workflow, while workflows that can publish externally still require their normal confirmation. Choose Find clips here to use the chat selector without a workflow. If your request includes timestamp ranges, the workflow receives them as absolute source seconds. Asking to use exactly those passages marks the ranges as guaranteed-only; asking to find moments within them uses the workflow’s search-within timestamp mode. This runtime guidance applies only to that run and does not change the saved workflow. For a general direct search, the editing agent reads every window of the normalized transcript, uses your direction to prioritize moments, and checks representative source frames for the finalists. If you identify one passage with timestamps, it reads that passage plus nearby context instead of rescanning the entire recording. Both paths finalize transcript-verified source-time boundaries within exact duration requests such as “45 to 90 seconds” and create the clip records directly. The normalized source video is stored once and reused by every clip in the batch. Each result keeps the source’s native aspect ratio and stores its selected source-time ranges in an editablesegments array.
A result may contain one continuous range or multiple ranges that omit an internal digression or form a
coherent montage. Montage ranges are stored in intended playback order, so a strong hook found later in the
source can play first when the resulting progression still makes conceptual sense. Overlap does not make a
trimmed, reframed, or rendered video copy for each result, and you can continue refining those segments later
in Studio.
The compact Activity indicator appears only when preparation or transcript scanning takes long enough to
be useful, and you can expand it for the current phase. Leaving the conversation does not cancel work
still running on the editing server. Completed clip records and their shared normalized source remain
available when you reopen the chat.
When an editing skill fans work out across background agents, each active agent appears immediately in
the conversation as its own pill with a distinct icon and color. Select a pill to follow that agent’s
live milestones and the functions it calls, including which function is still running, which completed
or failed, and how long completed calls took. For a Video Motion Graphics pass, parallel semantic scenes
appear as numbered scene-agent pills so you can inspect each scene independently while the batch continues.
The compact token counter under the conversation reports new, uncached model input plus model
output. Cached input is excluded, while reasoning tokens are already included in output and are not
added a second time. Hover the counter for the input/output breakdown and an indication when a
provider could not return complete usage for an interrupted or direct model call.
Using the right-side tools
The right rail is where you switch between different editing tasks. In the current studio UI, the tool groups are:TranscriptSubtitlesMediaTextAI ToolsTransitions
- Use
TranscriptandSubtitleswhen the spoken words or on-screen captions need refinement- Subtitle position belongs to the subtitle layer under the playhead. If you cut the subtitles into several layers, each one keeps its own position. Dragging the captions on the video and moving the
Vertical/Horizontalsliders inSubtitles→Layout & Positionchange only that layer, and the sliders always show where that layer sits on screen, including on split-screen reframe scenes. Once you move a layer, it keeps that position across every reframe scene it covers; to place captions differently in different scenes, cut the subtitle layer at the scene change first.
- Subtitle position belongs to the subtitle layer under the playhead. If you cut the subtitles into several layers, each one keeps its own position. Dragging the captions on the video and moving the
- Use
Mediawhen you want to work with supporting visual assets - Use
Textwhen you want to manage overlays such as headline or supporting copy. For title-style text fields, clickGenerateto create a short AI title. You can optionally prompt the generator with a preferred angle, tone, or emphasis; leave the prompt blank to generate from the clip context and existing title settings- For
Intro TitleandBody Textlayers, the font size you set in the floating toolbar or theTextpanel is exactly the size that renders, and both show the same number. The box keeps its width, the text wraps onto more lines, and the box grows or shrinks to fit. Drag a side handle to change the wrap width, or a corner handle to scale the text and box together. Preset cards scale as a whole so their design stays in proportion, and they never grow wider than the video.
- For
- Use
AI Toolswhen you want Overlap to apply a broader cleanup or packaging step for you - Use
Transitionswhen you want to adjust how the clip moves between visual states
AI-assisted cleanup and finishing
AI Tools collects several of the fastest cleanup and packaging actions in one panel.
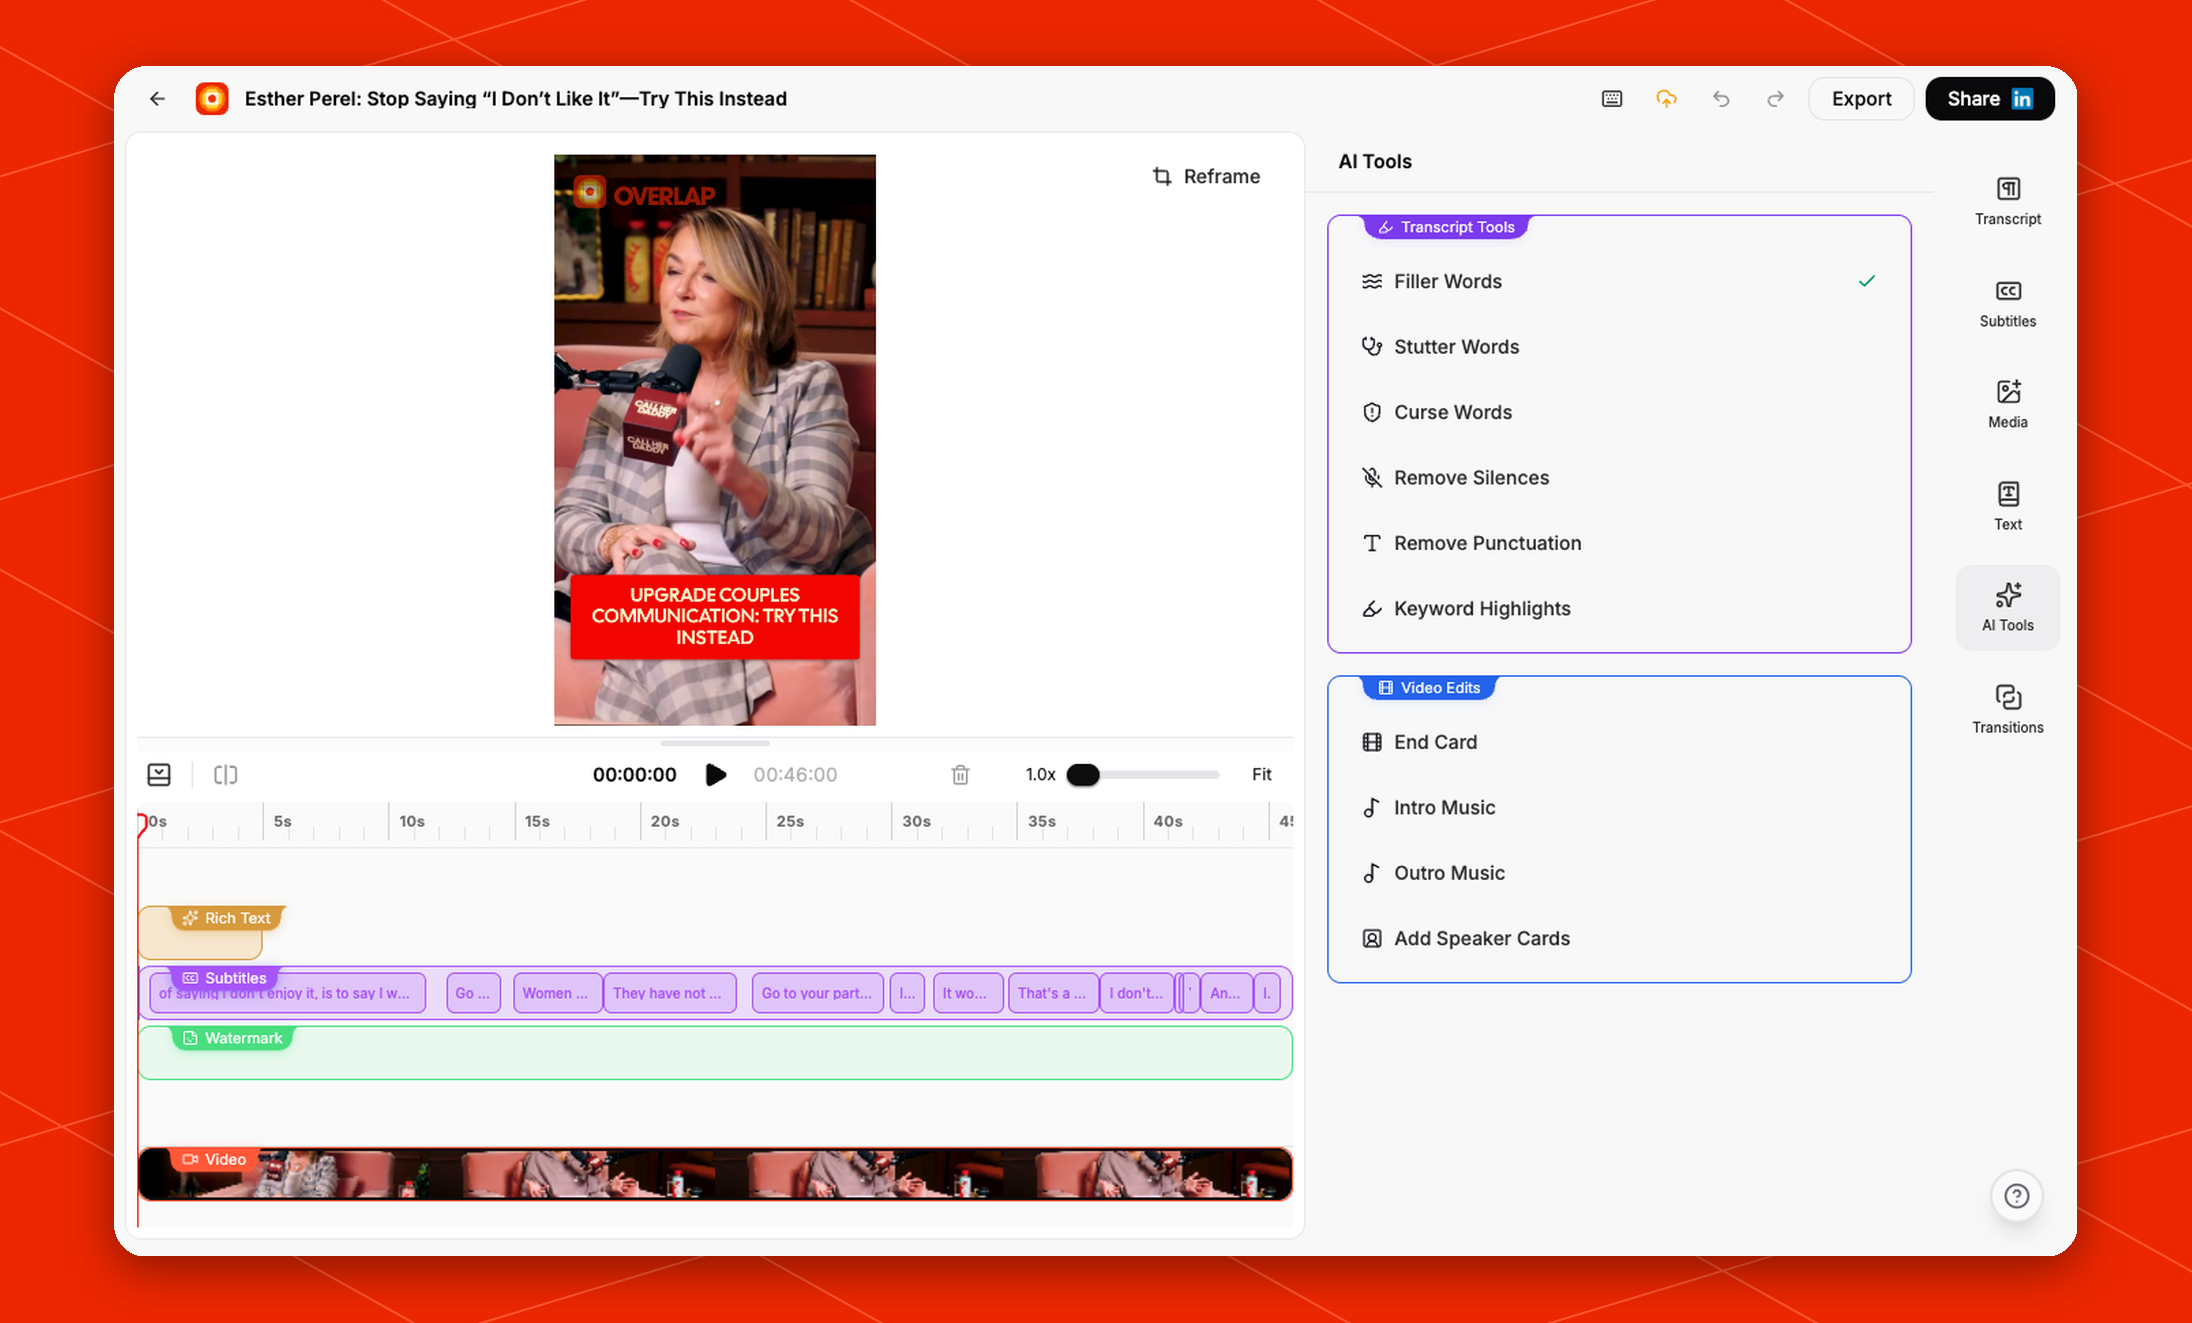
Transcript ToolsVideo Edits
Transcript Tools include:
Filler WordsStutter WordsCurse WordsRemove SilencesRemove PunctuationKeyword Highlights
Video Edits include:
End CardIntro MusicOutro MusicAdd Speaker Cards
Choosing subtitle keywords
In AI Tools → Keyword Highlights, Detect Keywords selects a sparse set of words and short phrases from the retained transcript. It considers the passage before caption wrapping: contrasts, negation, qualified numbers, names, and repeated ideas receive more weight than connecting words. Resizing captions or seeking through a clip does not pick a new set of words. Use Refine with AI for a second pass that considers the meaning of the full retained transcript. This runs only when requested. The result must refer to existing timed words; the transcript itself is not rewritten. An unavailable service, invalid result, or edit made while refinement is running leaves the existing highlights in place. Both actions mark the selected words as keywords in Transcript, and cinematic captions use those same marks. Select words there to highlight or remove a highlight. Manual choices take priority over later detection or AI refinement. For clips with multiple video sources, choose the source in the Transcript panel before editing individual words. Adding a keyword or phrase in Keyword Highlights applies to matching retained occurrences; use Transcript for a particular source word. Repeated uses of that same source word share its keyword choice. Opening an older cinematic clip initializes missing keyword decisions in the editor. Existing saved decisions, including an intentionally empty automatic selection, are preserved. The normal edit/save history stores subsequent keyword changes. These tools use transcript text and timing; they do not measure vocal stress. Dubbed transcripts must be switched back to Original for keyword selection. The editing agent’s Video Motion Graphics skill can generate motion videos for the semantic scenes in the current edit. It grounds one storyboard in the requested creative direction, the edited-timeline transcript, and scene-specific visual evidence, then splits any scene that exceeds the video provider’s 15-second limit or the stricter foreground-subject analysis budget before running bounded generation, CPU-only portrait alpha matting, source treatment, and composited-review tasks. Every animation follows one of three speaker-safe composition contracts: it is placed behind a verified foreground subject, constrained to an explicit safe animation area that avoids the speaker, or rendered as an opaque full-screen animation. Transparent overlays require an exact flat#00FF00 generation background and become transparent WebM files; opaque full-screen scenes remain MP4.
Each review uses a request-scoped Studio preview rather than saving temporary timeline items. The first composite review can compare against the source planning sheet; later reviews receive only the newest edited composite. Behind-subject text may be occluded, but the complete message must remain immediately readable without guessing; otherwise the composition changes instead of repeatedly forcing the effect. Reviews use two bounded parallel browser slots so scene generation does not collapse into a single queue, while identical composites cannot repeatedly consume the full timeout after a deterministic Engine-readiness failure. Over-budget overlays must prove a bounded safe animation area before video generation; required behind-subject scenes must be split. The batch lets every scene finish, then publishes all valid scenes together as native Video Overlay timeline items and reports how many were published or skipped. One failed scene no longer cancels its siblings; if none succeeds, or if the edit changed while generation was running, the previously published edit stays unchanged. Video Motion Graphics runs through the chat’s live socket session; the retired HTML Motion Graphics approval flow and workflow/headless endpoint are no longer available.
Caption identities give captions a designed voice in one step: ask for a quiet lowercase serif (Editorial Whisper), tall condensed documentary type (Condensed Cut), or a wrapped modern grotesk (Grounded Grotesk), then tweak individual fields on top. An identity applies through the same subtitle styling pipeline as manual changes, so it merges with and can be overridden by any existing caption settings.
Saving before leaving
Studio automatically saves your edits. If you use your browser’s Back button or Studio’s top-left back arrow while edits are pending, Studio finishes saving before leaving. The back arrow shows a saving spinner while you wait. If saving fails, the editor stays open and shows an error so you can retry. In Reframe mode, the top-left arrow saves your positioning changes and returns to the main editor.A practical editing flow
If you are editing a clip manually, a good default flow is:- Click
Edit Clipto open the clip in Studio. - Review the preview and scrub the timeline so you understand the current cut.
- Start in
Transcriptif the issue is driven by the spoken content. - Highlight sections to
Cut from Video,Mute, orEdit Captionsas needed. - Check
Subtitles,Text, andRich Texttiming so the on-screen messaging still matches the video. - Use
AI Toolsfor broader cleanup passes such as silence removal or filler-word cleanup. - Use
Reframeif the subject needs better positioning in the final composition. - Scrub to the frame you want people to see first, open
Thumbnail Editor, and save the designed cover. - Finish with
ExportorShareonce the clip looks right.
How this relates to workflows
Workflows are still where you build repeatable automation for generating clips at scale. Studio is where you manually polish a specific output after it has been created.
Use workflows when you want the same editing logic to run automatically across incoming content. Use Studio when you want hands-on control over one clip before publishing.